Enable File Analysis by Cisco Secure Malware Analytics
For maximum protection, files that are unknown to the File Inspection service (AMP) that are not blocked by the anti-virus feature can be sent to Secure Malware Analytics for further analysis.
For file processing details, see Manage File Inspection and Analysis.
When you enable this option, you will create a Secure Malware Analytics account.
Table of Contents
Prerequisites
- Full Admin user role. For more information, see Manage Accounts.
- If you are enabling file analysis for the first time:
- Read this entire procedure before doing anything.
- You must choose a sandbox region (North America or Europe) that cannot be changed later.
The sandbox holds files captured from both internet and private traffic. - Ensure that you can perform the following time-sensitive actions:
Important! Time-sensitive action required
If you are enabling file analysis for the first time...
Before you start this procedure, be sure that:
- you will be able to receive and access the email message that Secure Malware Analytics will send when you save the changes described in this procedure.
- you are able to take the required actions as described at the end of the procedure below.
You must sign in to Secure Malware Analytics within 36 hours after you click Save after enabling Secure Malware Analytics.
Procedure
- Navigate to Secure > Security Profiles.
- Expand an existing profile or click +Add Profile to add a new profile (for either internet or private access.)
- In the Security and Acceptable Use Controls section, for File Inspection, click Edit.
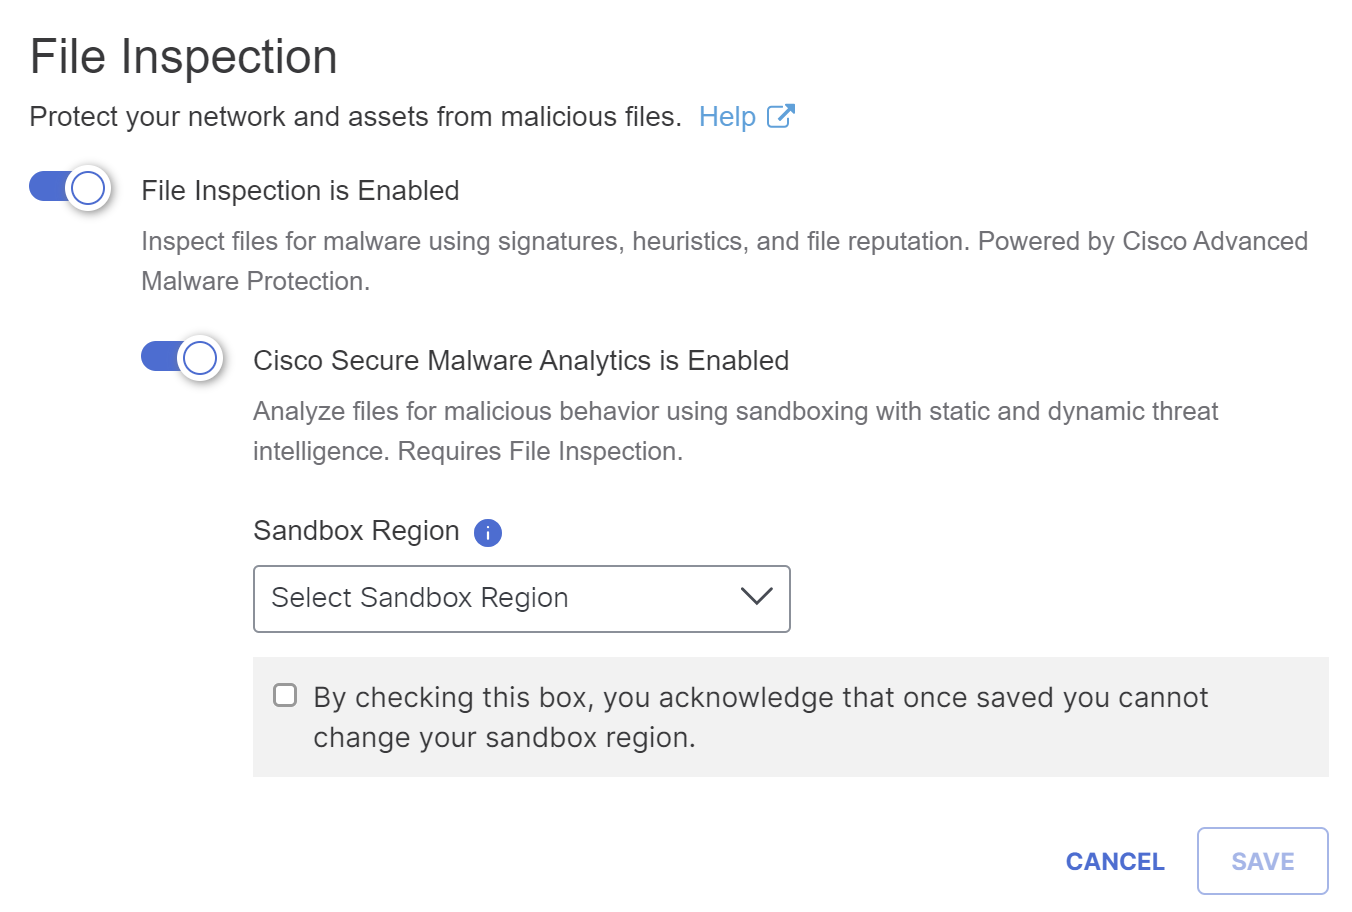
- Enable File Inspection if it is not already enabled.
You cannot enable file analysis unless File Inspection is enabled. - Enable Cisco Secure Malware Analytics:
If this is the first time you are enabling this option, you will see this:
-
Important: Read the rest of this procedure before completing the procedure.
If you are enabling Secure Malware Analytics for the first time:- There is a time limit for performing additional tasks after saving this configuration.
- Select a Sandbox Region (North America or Europe) based on your data sovereignty preferences, then acknowledge that you understand that this location cannot be changed. The sandbox holds files captured from both internet and private traffic.
- As soon as you click Save in the next step in this procedure, your organization's sandbox region is set and cannot be changed.
- Be prepared to access and take action on the email message you will receive after you click Save in the next step. The email will be sent to the address associated with your Secure Access administrator account.
-
Click Save.
-
Important: You must log into Secure Malware Analytics within 36 hours of setting your sandbox region.
-
Take action using the email message you will receive from Secure Malware Analytics.
You will sign into Secure Malware Analytics using the unique link provided in the email message.
If you chose the Europe sandbox, the link goes to panacea.threatgrid.eu.
If you chose the North America sandbox, it goes to panacea.threatgrid.com.
You will accept the End User License Agreement and set up your password. Your Secure Malware Analytics username will be the same email address as your Secure Access account. -
Store your Secure Malware Analytics password securely so that you can use it later; you will need to sign in to Secure Malware Analytics to review information about files sent for analysis.
-
Enable File Inspection < Enable File Analysis by Cisco Secure Malware Analytics > Test File Inspection
Updated 2 months ago