Configure Tunnels with Meraki MX
Follow these steps to connect a Cisco Meraki MX/Z4 series device to Cisco Secure Access through a Meraki Third Party (non-Meraki) VPN Tunnel (NMVPN) configuration.
- The two primary uses cases for Secure Access with Meraki Networks are secure internet access and remote access to private applications.
- To connect to Secure Access, a NMVPN must be established to a Secure Access Network Tunnel Group (NTG).
- With this configuration in place, internet-bound traffic from Meraki branches will be secured through Secure Access.
- The same tunnels can be used to securely connect remote users of AnyConnect VPN and Client/Clientless Zero Trust Access modules in the Secure Client to private applications on Meraki networks.
Table of Contents
- Prerequisites
- Caveats and Considerations
- Supported Use Cases and Requirements
- Step 1: Add a Network Tunnel Group in Secure Access
- Step 2: Configure a Tunnel in Meraki MX
- Verification and Troubleshooting
- Optional Configurations
Prerequisites
- A Cisco Meraki MX/Z4 device (running MX 18.107+ firmware).
- A valid Cisco Secure Access account.
- A network tunnel group configured on Cisco Secure Access; see Add a Network Tunnel Group.
Caveats and Considerations
This section discusses important caveats and considerations associated with the Meraki Third Party (non-Meraki) VPN tunnel configuration to Secure Access.
- There is no stateful failover to a Secure Access secondary tunnel.
a. The MX only supports active/cold standby to a single headend.
b. Traffic from a failed site is required to reestablish the tunnel. - Only static routing is supported; BGP is not supported.
- Requires traffic to be generated from the LAN side of an MX through the non-Meraki VPN to establish connection.
a. Remote application access on Meraki networks through an MX is not possible until traffic is initiated from the application side of the MX through the non-Meraki VPN.
b. Traffic will also need to be consistently generated from the LAN side of the MX over each non-Meraki VPN to keep the tunnel from timing out. - ECMP/Load balancing is not supported. Only a single IPSec tunnel is supported between a single Meraki network and a Secure Access network tunnel group.
- A unique public uplink IP is required for each network.
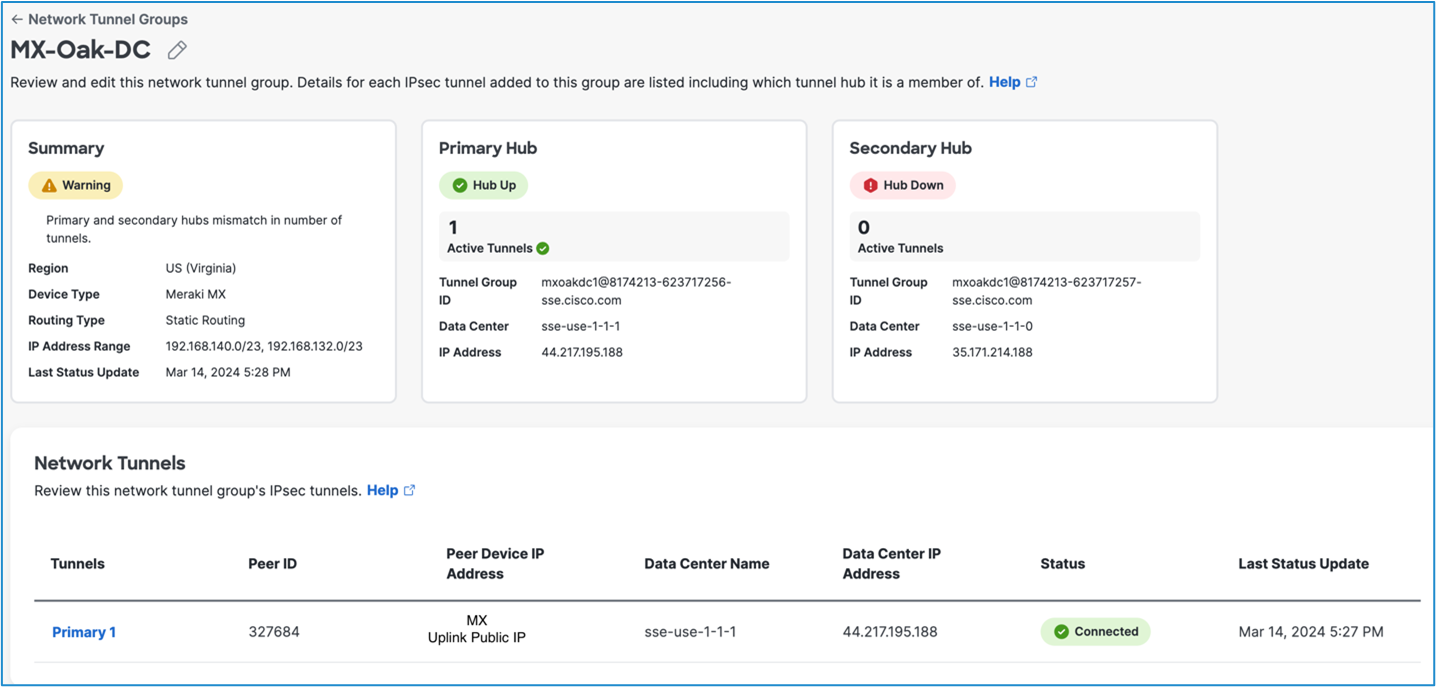
a. The public uplink IP is used as the MX peer device IP, and this cannot be changed. - In the Secure Access dashboard, the network tunnel group will display the status as Warning. This is because the Meraki network cannot build a standby tunnel to the Secondary Hub in the network tunnel group that is provided for intra-region redundancy.
Supported Use Cases and Requirements
The following sections describe supported use cases for Meraki Third Party (non-Meraki) VPN tunnel configuration to Secure Access.
Remote Access VPN and ZTA
- The Meraki networks will need to be tagged.
- Use the Umbrella IKEv2 configuration.
- No default exit hub.
- No spokes.
Branch-to-Branch through Secure Access
One of the following options is required to enable Secure Access policy enforcement to apply to branch-to-branch communication. Otherwise, all traffic will traverse Meraki AutoVPN between Meraki networks directly.
- Each network hosting applications is in a separate org; or
- All networks are in a single org. Note: If this is the case, contact Support to have hub-to-hub communication turned off.
Secure Internet Access with Non-Meraki VPN
The following are requirements for this configuration:
- No AutoVPN default route.
- Local route configuration 0.0.0.0/0.
Step 1: Add a Network Tunnel Group in Secure Access
Secure Access enables fast, reliable, and secure private network connections to your applications through IPsec (Internet Protocol Security) IKEv2 (Internet Key Exchange, version 2) tunnels.
Tunnels and tunnel groups are core concepts in managing connections between your data centers and Cisco Secure Access. A network tunnel group provides the framework for establishing tunnel redundancy and high availability. Connect tunnels to the hubs within a network tunnel group to securely control user access to the Internet and private resources.
- Follow the steps in Add a Network Tunnel Group.
- Make note of the Tunnel ID and Passphrase you enter when configuring the network tunnel group. These values are needed when you configure your Meraki IPsec tunnel.
Note: Secure Access provides the option to download a CSV file with the network tunnel group details. - Remember to select Static routing under routing options. Only static routing is supported.
The new network tunnel group appears in the Secure Access dashboard as Disconnected, and with the Primary Hub and Secondary Hub status showing as Hub Down. The network tunnel group status is updated once it is fully configured and connected with Meraki MX.
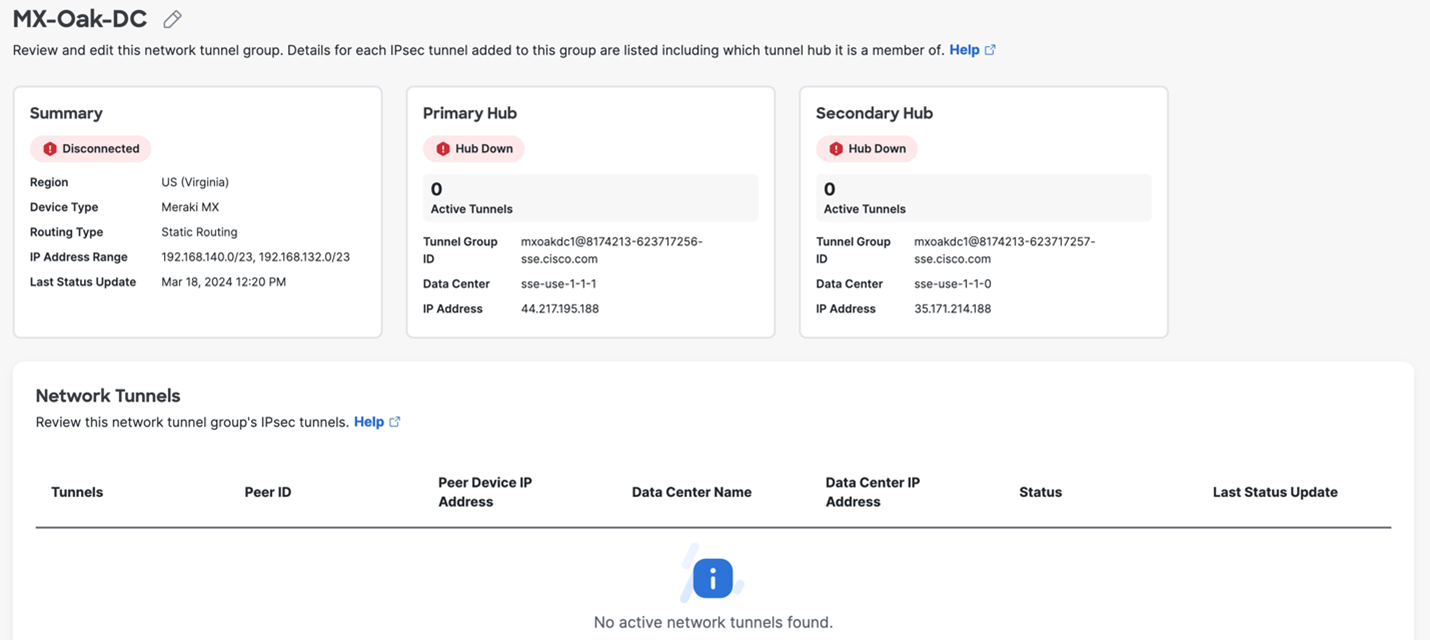
See the Verification and Troubleshooting section for additional information about how to evaluate the network tunnel group status.
Step 2: Configure a Tunnel in Meraki MX
Configure a Meraki Third Party (non-Meraki) VPN tunnel to connect a Meraki MX/Z4 series device to Cisco Secure Access.
-
In the Meraki MX dashboard, navigate to the Organization > Monitor > Overview page.
If the page is not expanded by default, expand the Networks list by clicking the left-facing arrow at the top of the network list.

-
Select the desired network from the networks Name list. Select only the network that will connect to the Secure Access Network Tunnel Group.

-
Add a Network tag to the selected network. Select the Tag dropdown menu from the top left. A tag can be created by typing into the field and then clicking Add.
Note: It is recommended that the same name is used for the Meraki Network Tag as the Secure Access Network Tunnel Group.
-
While in the Meraki dashboard, navigate to Security & SD-WAN > Site-to-site VPN, and choose Hub (Mesh).

-
Next, in the same section, find the VPN settings and choose Enabled for the VLANs that will use the new Secure Access network tunnel group.

-
Scroll down to find Organization-wide settings to locate the Non-Meraki VPN Peers section. Click Add a peer and then add the tunnel ID and tunnel passphrase that you created in Step 1: Add a Network Tunnel Group in Secure Access.
-
Configure the IPsec parameter settings:
-
Name—Provide a meaningful name for the tunnel.
-
IKE Version—Select IKEv2.
-
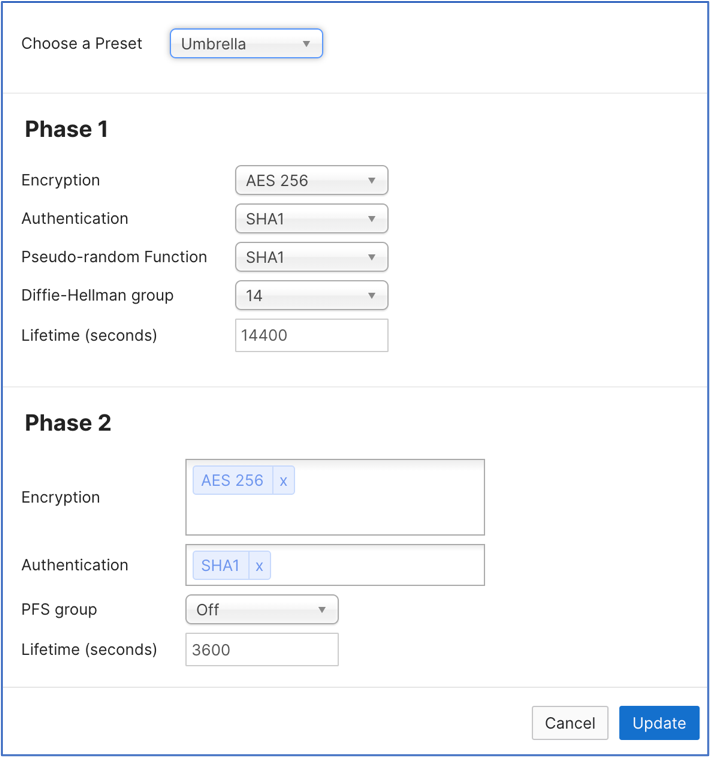
IPsec policies Choose the predefined Umbrella configuration; see Supported IPsec Parameters.
-
Public IP—IP address to connect to Secure Access Network Tunnel Group Primary Data Center IP.
-
Local ID—The Primary Tunnel ID for the Network Tunnel Group.
-
Remote ID—Leave this blank.
-
Private subnets—There are 2 common configurations for Private Subnets:
- If the desired behavior is to use Secure Internet Access and Secure Private Access to access applications on tunnel-enabled vlans/subnets, then the only entry here should be 0.0.0.0/0. This will route all traffic to Secure Access for either Secure Internet Access, Remote Access VPN, or ZTA clients.
- If only Remote Private Application access is required, then all subnets that are used by the Secure Access infrastructure must be entered:
- CGNAT 100.64.0.0/10
- RA VPN and Management IP Pool subnets.
-
Preshared secret—This is the Passphrase for the Network Tunnel Group created in Secure Access.
-
Availability—Enter the Network tag you defined earlier for the MX appliance that builds the tunnels to Secure Access.
Important!
Do not leave this field blank. Ideally this field should match the Network tag entered in Step 3 above. Leaving this field blank, "All Networks", or entering a tag that is associated with multiple networks could cause one or more tunnels to become unstable. This could lead to unexpected behavior and cause an NMVPN tunnel to not be established.
-

- Click Save.
Upon completion of these steps, you should have a functioning tunnel routing your traffic as intended.
Verification and Troubleshooting
-
The Secure Access Network Tunnel Group will move from Disconnected Status to Warning. This change could take several minutes and may require a test ping described in step 2 below.
Network Tunnel Group Status
The Network Tunnel Group will never move from a Warning status to Connected. This is because the Network Tunnel Group is designed to have a Primary and Secondary tunnel connected to each Hub for failover. Traffic will pass to the Primary Hub even if the Network Tunnel Group status is Warning.
-
Run
pingtests from the new VLAN to the internet. For more information, see Using the Ping Live Tool. -
Check the status of the VPN tunnel. For more information, see VPN Status Page.
-
Follow the VPN troubleshooting procedures. For more information, see Troubleshooting Non-Meraki Site-to-site VPN.
Note: Cisco Meraki does not support policy based routing. It is not possible to do client side routing to determine if specific traffic belongs inside or outside the tunnel. However, it is possible to choose if an entire VLAN is tunneled to Secure Access.
Optional Configurations
- To create a VLAN for the subnet to redirect to Secure Access, see Configuring VLANs on the MX Security Appliance.
- To create a new SSID for the VLAN, see Configuring Simple Guest and Internal Wireless Networks.
Configure Tunnels with Cisco Secure Firewall < Configure Tunnels with Meraki MX > Configure Tunnels with NEC ix2000 Series Router
Updated about 1 month ago