Add Resource Connector Groups
We recommend that you deploy resource connectors in groups, for scalability, load balancing, and redundancy. Each connector group is associated with a set of private resources in a particular data center, branch office, or security zone, and any connector in the group can connect traffic to any private resource in the group.
First, add a resource connector group. Then deploy the associated resource connectors using the provisioning key that is generated when you create the connector group.
Secure Access uses the default DNS server that you configured during connector deployment to resolve destinations for private resources. If the private resources in your organization are on various domains and the destinations are resolved by different DNS servers, you can specify these domains and DNS servers for the connector group in Secure Access.
Table of Contents
- Prerequisites
- Guidelines for Configuring Domains and DNS Servers on Connectors Groups
- Procedure
- What's Next
Prerequisites
- Full Admin user role. For more information, see Manage Accounts.
- Meet the requirements to deploy resource connectors. For more information, see Requirements and Prerequisites for Resource Connectors and Connector Groups.
- Determine the volume of traffic your connector group must accommodate. For more information, see Determine the Number of Connectors Needed in a Connector Group.
- (Optional) To add domains and DNS servers for a connector group, you must deploy the resource connectors in the connector group with Cisco Secure Access Connector software image version 2.0.33-xxxxx or newer.
Guidelines for Configuring Domains and DNS Servers on Connectors Groups
- You can add up to five DNS servers and domains with a total of 50 unique domains.
- For each addition, you can select the same DNS Server but add unique domains only.
- When you select a DNS server, Secure Access adds the primary DNS server and if configured, the secondary DNS server.
- You can add a maximum of ten unique domains with a DNS server. When you add multiple domains, separate the domains with a comma.
- You must add at least one domain with a DNS server.
- Secure Access does not support wildcards with domains.
- Secure Access supports valid domains only.
About Resource Connectors and DNS resolution of Internal Domains
Resource connectors do not support multicast DNS (mDNS) and the use of nslookup to resolve internal domains configured with *.local.
If a DNS server associated with a resource connector has DNS entries configured with *.local, the resource connector is unable to resolve these local domains. DNS resolution of local domains with the *.local extension rely on mDNS.
Procedure
Configure the properties of the Connector Group and optionally add DNS Servers and domains to resolve traffic for private resources.
- Configure Connector Group Name and Region
- Estimate the Volume of Traffic to Your Resource Connectors
- (Optional) Add Domains and DNS Servers for the Connector Group
Configure Connector Group Name and Region
-
Navigate to Connect > Network Connections, and then click Connector Groups.

-
If you see a Next Steps section at the top of the page, scroll down to the Connector Groups section.
You will return to the Next Steps section after you add one or more connector groups. -
Click Add a Connector Group.
-
For Connector group, enter a name for the connector group and choose a Region.
We recommend that you indicate the data center, branch office, or security zone location in the name.
Choose the Region (Secure Access cloud instance) closest to the data center location where you are creating this connector group. Choose the region carefully. You cannot change this later.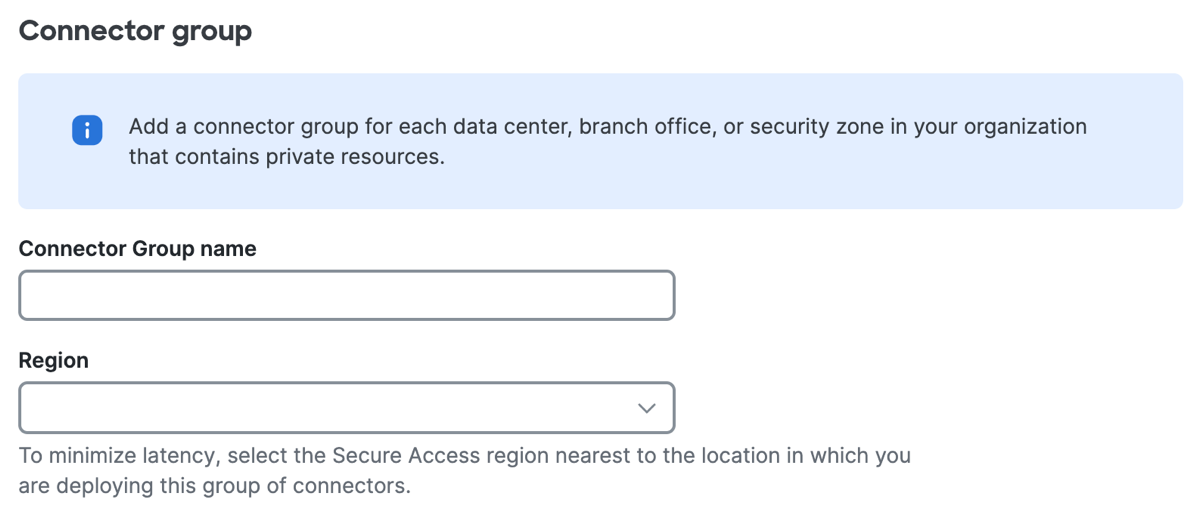
-
Click Next.
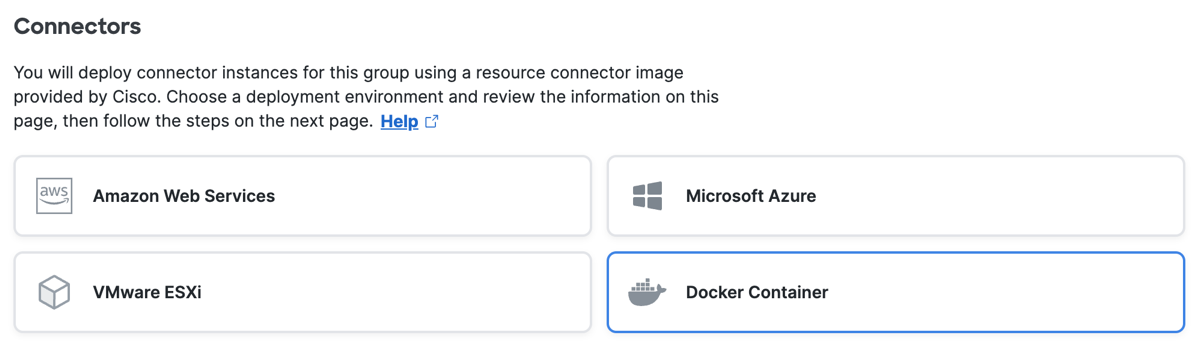
Estimate the Volume of Traffic to Your Resource Connectors
This section is only for your guidance; it does not configure anything. Make a note of the number of connectors that Secure Access recommends.
-
For Connectors, select the environment where you will deploy the resource connectors.
-
To determine the number of connectors to deploy in this group, choose the estimated maximum throughput capacity that the connectors in the group must handle.
The estimated number of connectors that Secure Access recommends includes instances required for redundancy. For more information, see connector and capacity requirements in Requirements and Prerequisites for Resource Connectors and Connector Groups.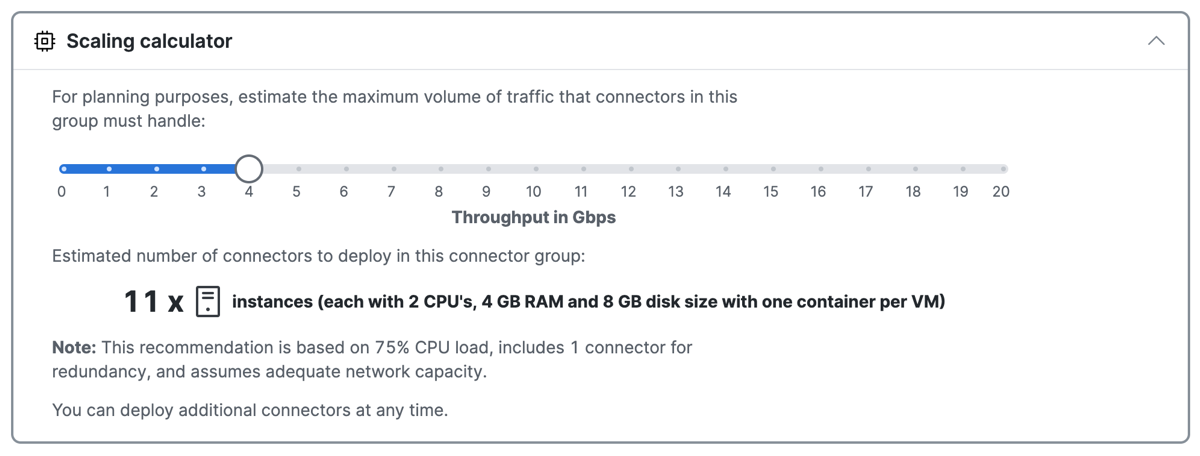
-
Click Next.
-
Click Save or optionally, add domains and DNS servers for the connector group. For more information, see (Optional) Add Domains and DNS Servers for the Connector Group.
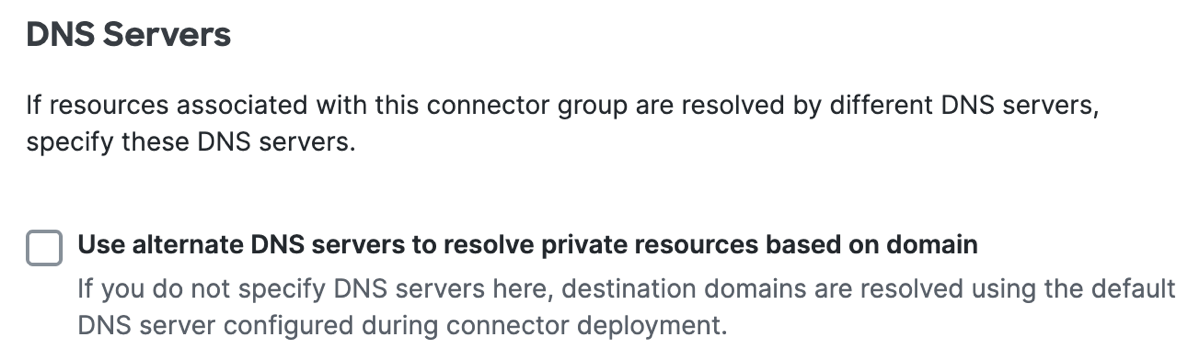
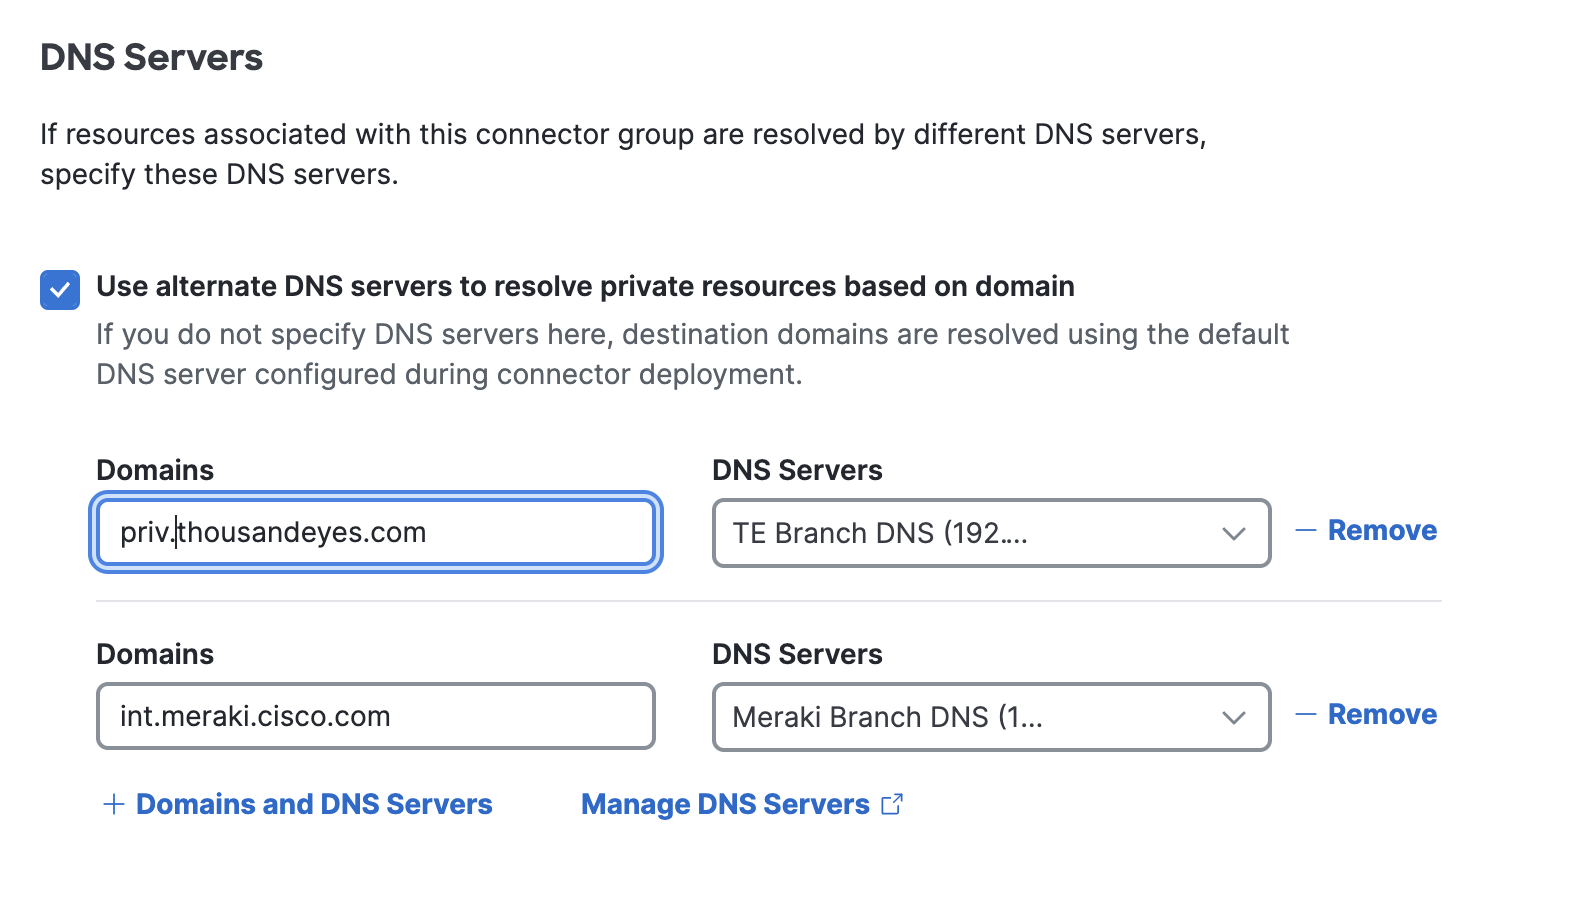
(Optional) Add Domains and DNS Servers for the Connector Group
During initialization, resource connectors use the default DNS server to resolve the fully-qualified domain name (FQDN) of a private resource. By associating domains with DNS servers, you override this behavior and allow alternate DNS servers to resolve the domains for private resources.
Before you add domains and DNS servers for a connector group, review the requirements. For more information, see Guidelines for Configuring Domains and DNS Servers on Connectors Groups.
-
For DNS Servers, check Use alternate DNS servers to resolve private resources based on domain.
-
For Domains, enter a single domain or a comma-separated list of domains.
-
For DNS Servers, select a configured DNS server.
The selected DNS servers includes the primary DNS server and if available, the secondary DNS server. For more information, see Manage DNS Servers. -
(Optional) To add more domains and DNS servers, click +Domains and DNS Servers, and then repeat steps 2-3.

-
Click Save.
What's Next
- Deploy connectors for the group. For more information, see Add Connectors to a Connector Group.
- Assign private resources to the group. For more information, see Assign Private Resources to a Connector Group.
Allow Resource Connector Traffic to Secure Access < Add Resource Connector Groups > Add Connectors to a Connector Group
Updated about 2 months ago