Enable Logging to Your Own S3 Bucket
You can configure Secure Access to log events to an Amazon S3 bucket that you manage. To enable logging to a self-managed Amazon S3 bucket, follow the prerequisite steps to set up an AWS account and create an Amazon S3 bucket. Once you have created an S3 bucket in Amazon, configure Secure Access to use it for the storage of logs.
Table of Contents
Prerequisites
- Full Admin user role. For more information, see Manage Accounts.
- A login to Amazon AWS service (http://aws.amazon.com/console/). If you don't have an account, Amazon provides free sign-up for S3.
Note: Amazon requires a credit card in case your usage exceeds free plan usage. - A bucket configured in Amazon S3 to be used for storing logs. For more information, see Amazon's S3 documentation.
Note: Periods in S3 bucket names are not supported.
JSON Bucket Policy
When you set up your Amazon S3 bucket, you must add a bucket policy that accepts uploads from Secure Access. Copy the following preconfigured JSON and substitute your S3 bucket name for bucketname. Then, paste the Secure Access S3 bucket policy into your Amazon S3 bucket policy.
{
  "Version": "2008-10-17",
  "Statement": [
    {
      "Sid": "",
      "Effect": "Allow",
      "Principal": {
        "AWS": "arn:aws:iam::568526795995:user/logs"
      },
      "Action": "s3:PutObject",
      "Resource": "arn:aws:s3:::bucketname/*"
    },
    {
      "Sid": "",
      "Effect": "Deny",
      "Principal": {
        "AWS": "arn:aws:iam::568526795995:user/logs"
      },
      "Action": "s3:GetObject",
      "Resource": "arn:aws:s3:::bucketname/*"},
    {
      "Sid": "",
      "Effect": "Allow",
      "Principal": {
        "AWS": "arn:aws:iam::568526795995:user/logs"
      },
      "Action": "s3:GetBucketLocation",
      "Resource": "arn:aws:s3:::bucketname"
    },
    {
      "Sid": "",
      "Effect": "Allow",
      "Principal": {
        "AWS": "arn:aws:iam::568526795995:user/logs"
      },
      "Action": "s3:ListBucket",
      "Resource": "arn:aws:s3:::bucketname"
    }
  ]
}
Procedure
Note: You must first configure a bucket in Amazon S3. For more information, see Amazon's S3 documentation.
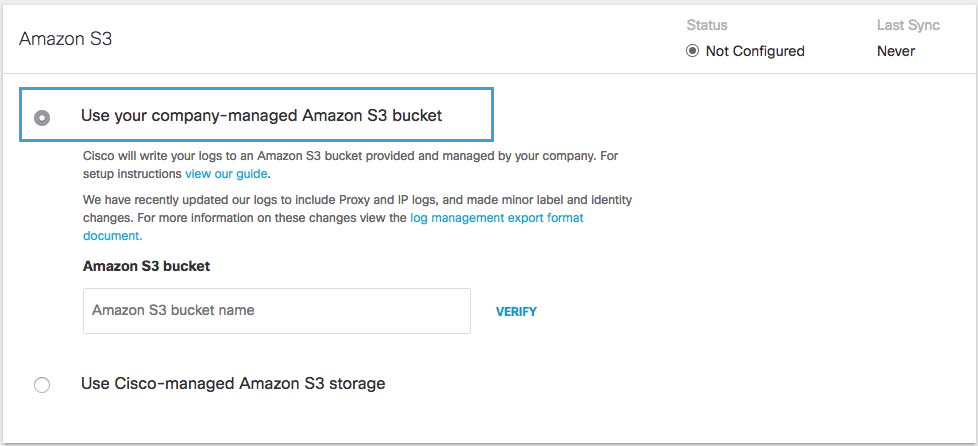
- Navigate to Admin > Log Management and in the Amazon S3 area select Use your company-managed Amazon S3 bucket.

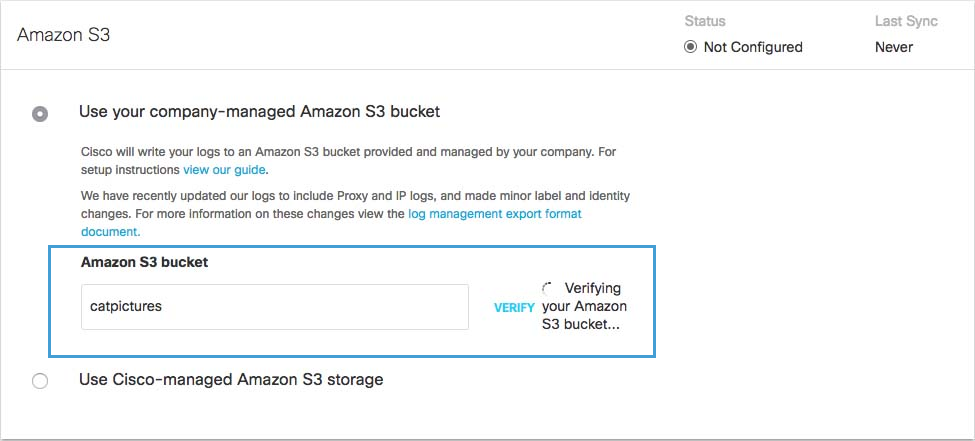
- In the Amazon S3 Bucket field, type or paste the exact bucket name you created in Amazon S3 and click Verify.
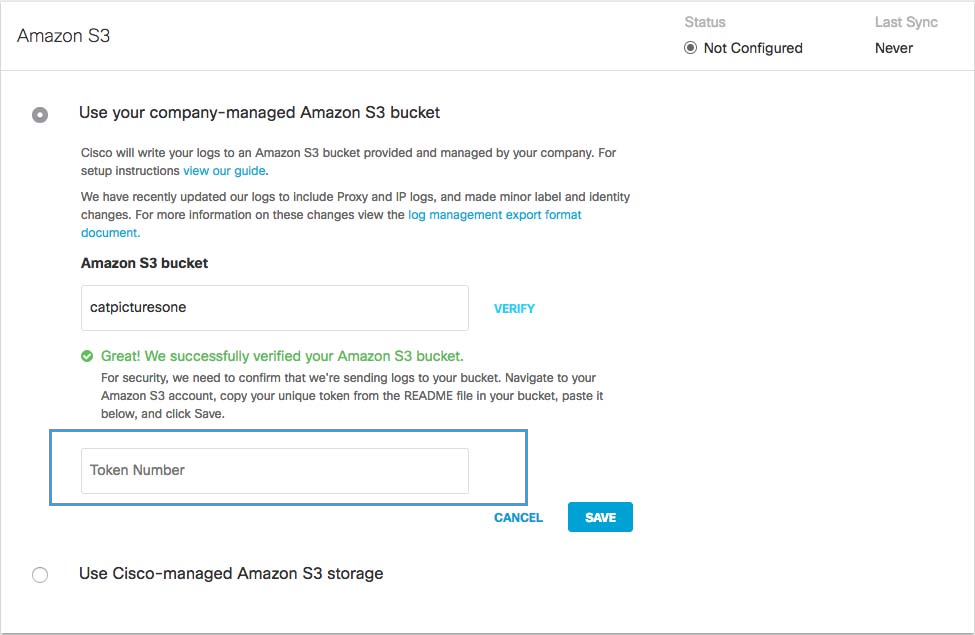
Secure Access verifies your bucket, connects to it, and saves a README_FROM_UMBRELLA.txt file to your bucket.

- Open the README_FROM_UMBRELLA.txt file Secure Access saved to your bucket, copy and paste the token listed in it into Token Number, and click Save.

S3 Bucket Data Path
You can integrate your self-managed AWS S3 bucket with the Cisco Cloud Security App for Splunk. Use the data path to your AWS S3 bucket to set up the integration. The S3 bucket data path contains the following path fields:
<AWS S3 bucket name>-<AWS region>/<AWS S3 bucket directory prefix>
- AWS S3 bucket name and AWS region—the name of your AWS S3 bucket, a dash (
-), and the AWS region. - AWS S3 bucket directory prefix—the directory prefix (customer folder name) to the AWS S3 bucket.
Sample S3 Bucket Data Path:
my_company_name-us-west-1/dnslogs
Use the data path to your self-managed S3 bucket to:
- Download log files with the AWS CLI.
- Set up your AWS S3 bucket with the Cisco Cloud Security App for Splunk. The Cisco Cloud Security App for Splunk enables you to analyze your Secure Access logs found in your AWS S3 bucket. For more information, see Cisco Cloud Security App for Splunk.
Download Files From the S3 Bucket Locally
You can use the Amazon command-line interface (CLI) to download files from a self-managed S3 bucket to your local directory.
Prerequisites
- Install the AWS CLI to your system.
Run the AWS CLI to download your files from an S3 bucket to your local directory. To run the AWS CLI command in test mode (without syncing files), use the --dryrun flag.
AWS CLI command syntax:
aws s3 sync s3://DATAPATH /path/to/local/directory/
Detailed sample command:
aws s3 sync s3://mycompany-us-west-1/dnslogs /opt/splunk/etc/apps/TA-cisco_umbrella/data/
Enable Logging< Enable Logging to Your Own S3 Bucket > Enable Logging to a Cisco-managed S3 Bucket
Updated 7 months ago
