Deploy a Connector in VMware
A resource connector is a lightweight service deployed in a virtual machine in your cloud environment. A resource connector manages the network communications to a configured private resource. Cisco Secure Access provides a pre-configured resource connector image for VMware ESXi.
This guide describes the steps to deploy an OVA file package that includes the Secure Access virtual appliance image for resource connectors running on VMware ESXi. You can deploy the Secure Access OVF template to create your resource connector instances on VMware vSphere or vCenter.
Save Your Private SSH Key
After you generate an SSH key pair required for access to the resource connector, you must save your SSH key in your environment. Cisco cannot recover your SSH key and you will lose remote access and the capability to manage the resource connector. For more information, see SSH Key Generation.
Table of Contents
Prerequisites
Note: Secure Access does not support deploying resource connectors on standalone VMware ESXi hosts. You can only create your resources connectors on VMware vSphere or vCenter.
Meet the requirements for deploying a connector on VMware ESXi. For more information, see Requirements and Prerequisites for Resource Connectors and Connector Groups.
Requirements for deploying the VMware ESXi resource connector image:
- vSphere version—7.0.2 or 8.0.3.
- CPU—a 2-core CPU.
- Memory—4GB.
- Disk space—40GB.
- We recommended that you use an NTP server on your own network. If you use an NTP server on the internet, you must allow traffic to that address on UDP port 123.
Add a Connector Group
- Add a connector group in the region nearest to the geographical location where you will deploy these connectors, and choose VMware ESXi connectors.
- All connectors in a group must use the same virtual environment, for example VMware, otherwise registration fails.
Obtain the Connector Image
You can download the image once and use it for any number of connectors in any connector group. If you have a previously downloaded image, ensure that the image you deploy is the latest version.
- For more information, see Obtain the Connector Image.
- Copy the provisioning key for the connector group where you will deploy the connectors. For more information, see Provisioning Keys for Resource Connectors.
Disk Encryption
Disk encryption is recommended for your connectors. You configure disk encryption during connector deployment, but you should complete any prerequisites before deploying the image. For more information, see the VMware documentation.
SSH Key Generation
To troubleshoot a resource connector, Secure Access requires an SSH key pair. Use the SSH key pair to log in to your resource connector instance. The username is acadmin.
- (Recommended) Generate an SSH key pair using a standard tool such as ssh-keygen. When you configure the resource connector, add your public SSH key.
- Supported SSH public key types are
ssh-rsaandssh-ed25519. - For keys of type
ssh-rsa, we recommend the key length of 2048 bits or 4096 bits. - Save your SSH key in your location environment.
Note: You can not set up the SSH login after you deploy the connector.
UEFI Secure Boot Environment for Resource Connector Images
The Secure Access Resource Connector images for VMware support UEFI Secure Boot, which provides a trusted boot environment for the connector instance.
Requirements for the UEFI Secure Boot Environment
- You can deploy Resource Connector images with UEFI Secure Boot on these architectures:
- Intel x86_64
- AMD64
- We recommend that you deploy your Resource Connector instances with the UEFI Secure Boot environment.
Procedure
Perform the following tasks once per connector instance. You can use the Cisco Secure Access Resource Connector image to create multiple connector instances. You must deploy each connector instance independently.
Important
Do not clone the connector instances.
- Step 1 – Extract the Connector Image for VMware Tar File
- Step 2 – Verify the Integrity of the Image
- Step 3 – Deploy the OVF Template
- Step 4 – Power on Connector Instances
- Step 5 – Confirm Connectors
Step 1 – Extract the Connector Image for VMware Tar File
- Extract the contents of the Connector Image for VMware tar file.
tar –xvf resource-connector-v1.0.9ova.tar
The VMware connector image tar file includes:
- an .ova template containing the Secure Access virtual machines
- a signature file
- a Cisco public key to validate the signature
- a README file
Step 2 – Verify the Integrity of the Image
Validate the signature and verify the checksum of the signing key.
Validate the Signature
Verify the authenticity of the image's signature and ensure that the image hasn't been corrupted.
- Run the openssl dgst command with the
-sha512flag.
openssl dgst -sha512 -verify resource-connector-v0.2.10-240116.pubkey -signature resource-connector-v0.2.10-240116.sign resource-connector-v0.2.10-240116.ova
On successful signature validation, you should see the message:
Verified OK.
Verify the Checksum of the Signing Key
The image download includes a .pubkey file. To enhance security and ensure the authenticity of this signing key, you can verify its checksum using the shasum command.
- Run the shasum command and provide the name of the
.pubkeyfile that is included in your downloaded tar file.
shasum -a 256 resource-connector-v0.2.10-240116.pubkey
The hash generated by this command should match this string:
148e2dffa6aa12a4dc6c7cd66d4726ac2c8ef372f28597056ad4e86614da6201
Step 3 – Deploy the OVF Template
These instructions are for vSphere, but you can also use vCenter.
-
Sign in to your VMware vSphere client.
-
Click the File tab.
-
Click Deploy OVF Template and choose the extracted
.ovatemplate.
You can use a local copy of the file or a copy of the file stored in your library.
-
Complete the deployment for your environment.
Note: You can not make changes later. If necessary, deploy a new connector.
a. For Select Networks, choose only a single network.
b. (Recommended) Enable disk encryption.
c. On Customize Template:- For Provisioning key, add your provisioning key. The provisioning key is required.
- For SSH public key, enter your public key only. Do not include the key type.
The key must be entered as a single line, without spaces, carriage returns, or new lines. - For SSH public key type, enter the key type. The key type is case-sensitive.
- SSH access is required in order to troubleshoot any issues and provide information to Cisco Support.
For more information, see SSH Key Generation. - If you don't add the SSH key when you deploy the template, you can not add it later.
- SSH access is required in order to troubleshoot any issues and provide information to Cisco Support.
- For NTP server list, we recommend that you use an NTP server on your own network.
If you use an internet NTP server, allow traffic through your firewall to the NTP server's address on UDP port 123. - All other settings on the Customize Template page are optional.
- Important: Information you provide on the Customize Template page is not validated during configuration. Verify your entries carefully. If there are errors, your only option is to delete and redeploy the connector.
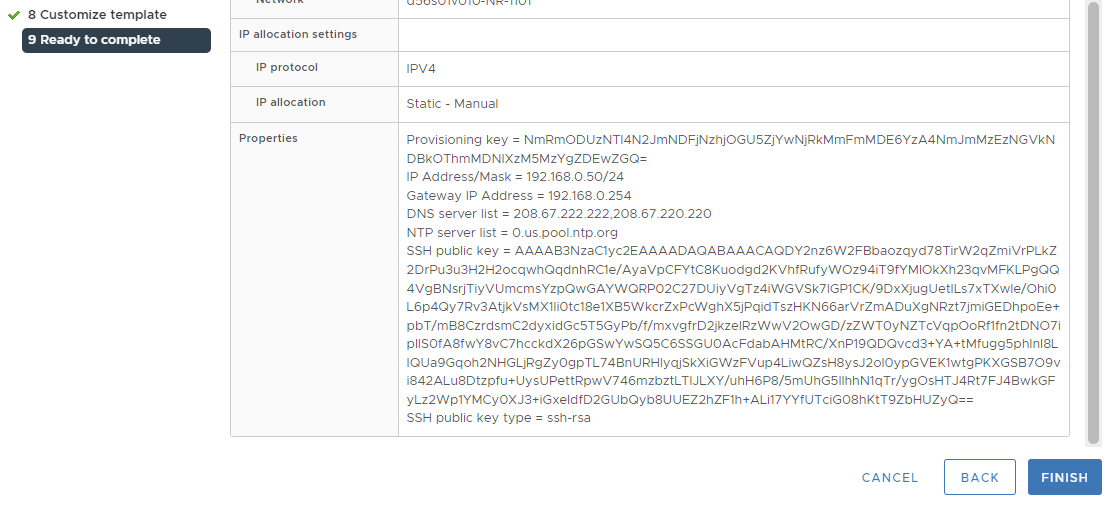
d. On Ready to Complete, review your configurations.
If you entered an SSH key on the Customize Template page, verify that the entire key, and only the key, appears on the line and meets the formatting requirements.
For example:
- Repeat this procedure to deploy additional connectors as needed.
Step 4 – Power on Connector Instances
After deploying, power on each connector instance. Connectors automatically connect to Secure Access.
Step 5 – Confirm Connectors
To complete the connector configuration, you must confirm each connector instance.
- You must confirm each connector instance to complete the connector configuration. For more information, see Add Connectors to a Connector Group: Confirm Connectors.
- If you do not see the connector in your deployed connectors list, see Troubleshoot Resource Connectors and Connector Groups.
Provisioning Keys for Resource Connectors < Deploy a Connector in VMware > Deploy a Connector in AWS
Updated 25 days ago