Define Custom Attributes
A custom attribute has a type and a named value. The type of the attribute is defined first, then one or more named values of this type can be defined. You create the Secure Client custom attribute objects from the VPN Profiles dashboard, add the objects to a VPN profile, and associate the VPN profile with a remote access VPN to enable the features for the VPN clients.
This topic describes how to define and apply Secure Client custom attributes to your organization's VPN profiles.
Table of Contents
- Prerequisites
- Supported Platforms
- Limitations
- Define Per App VPN Custom Attributes
- Define Bypass Virtual Subnets Custom Attributes
- Edit Cisco Secure Client Settings
Prerequisites
- Full Admin user role. For more information, see Manage Accounts.
- For Per App VPN, ensure that you have:
- Set up an MDM server and enrolled each mobile device to the MDM server.
- For more information, see the MDM documentation.
We recommend that you configure the applications that can traverse the VPN tunnel in the MDM server. This configuration simplifies the headend configuration.
- Downloaded and installed the Cisco AnyConnect Enterprise Application Selector from the Cisco Software Download Center to your local host. You need this tool to define the Per App VPN policy.
Supported Platforms
- Per App VPN is supported for mobile devices running:
- Android
- iOS
- Bypass Virtual Subnet is supported for devices running:
- Windows 10 (and later)
- macOS 11 (and later)
Limitations
See the following sections for information about the limitations for deploying Secure Client custom attribute objects in Secure Access:
- Guidelines and Limitations for Secure Client AnyConnect on Android
- Guidelines and Limitations for Secure Client AnyConnect on Apple iOS
Define Per App VPN Custom Attributes
To define custom attributes for Per App VPN applications, download the Policy Tool for Android and Apple iOS devices to generate application IDs and assign Per App VPN custom attributes to Secure Access VPN profiles.
Step 1 - Determine the Application IDs for Mobile Applications
To configure the list of allowed applications on the headend, you must determine the application IDs for each application on each type of endpoint.
The application ID, or the bundle ID in iOS, is a reverse DNS name. You can use an asterisk as a wildcard. For example, . indicates all applications, com.cisco.* indicates all Cisco applications.
To determine the application IDs:
Android
- In a web browser, go to Google Play (https://play.google.com/store/).
- Click the Apps tab.
- Click an application that you want to allow in the VPN tunnel.
- The application ID is part of the URL.
- Copy the string after the ‘id=’ parameter.
For Microsoft Remote Desktop, the URL is:
https://play.google.com/store/apps/details?id=com.microsoft.rdc.androidx, and the app id is com.microsoft.rdc.androidx.
Note: For applications that are not available on Google Play, download a package name viewer application to extract the app ID.
iOS
- In a web browser, go to Apple App Store (https://www.apple.com/in/app-store/).
- In the search results, search for an application.
The application ID is part of the URL. - Copy the number after the ‘id’ string.
For Facebook, the URL is:
https://apps.apple.com/in/app/facebook/id284882215 and the application ID is 284882215. - Open a new browser window, and add the number to the end of the following URL: https://itunes.apple.com/lookup?id=
For Facebook the URL is https://itunes.apple.com/lookup?id=284882215. - Download the text file, usually named 1.txt.
- Open the file in a text editor, and search for ‘bundleId’. For Facebook, the ‘bundleId’ is "com.facebook.Facebook". Use this bundle ID as the app ID.
Once you have your list of application IDs, you can define the custom attributes for the mobile device as described in the following steps.
Step 2 - Create a Base64 Encoded String for Each Mobile Application
Create a base64 encoded string for each app using the Cisco Secure Client Enterprise Application Selector Tool.
- Download the Cisco Secure Client Enterprise Application Selector Tool from here .
- Open the Application Selection Tool and select the mobile platform from the drop-down menu located on the upper left, either Android or iOS.
- Add a rule by entering the following options:
- Friendly Name—Enter something meaningful.
- App ID—Enter the name of the mobile application.
- The rest of the fields are optional.
- On the menu bar, click on Policy > View Policy. The encoded base64 rule is displayed in its encrypted format.
- Select and copy the policy string, and save it to use later when you create Secure Client custom attribute objects.
Step 3 - Create a Custom Attribute Object
-
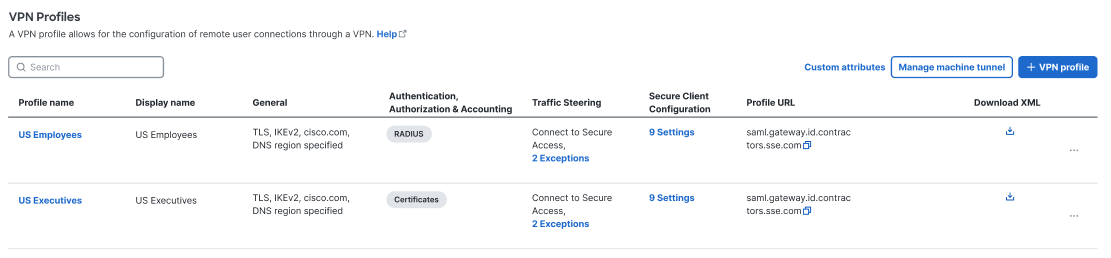
Navigate to Connect > End User Connectivity > Virtual Private Network.
-
For VPN Profiles, click Custom attributes.
-
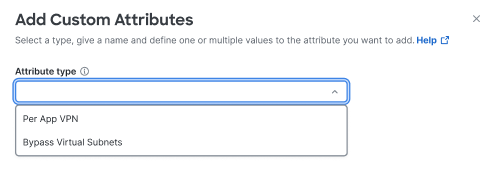
Click + Add custom attribute to configure an attribute for a third-party application for a mobile device.

-
From the Add Custom Attributes drawer, choose Per App VPN from the Attribute type drop-down.
-
Click Add attributes and values to configure your custom attributes.

-
Configure the following options:
-
Attribute name—Enter a unique name for the attribute. For example, Android_Apps or Apple_iOS_Apps.
-
Attribute Values—Add one or more values by copying the base64 format from the policy tool and pasting it here. Each value cannot exceed 420 characters. If your value exceeds this length, click + Add value to add multiple values for the additional value content. The configured values are concatenated before being sent to the Cisco Secure Client.
All values added to an attribute will be used when that attribute is assigned to a VPN profile.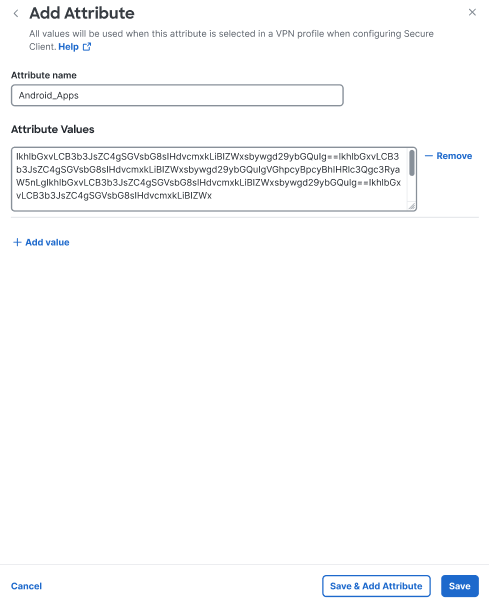
-
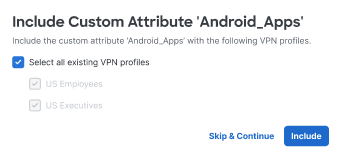
Click Save when you are finished with this attribute. If you have active VPN profiles, you'll be presented with the option to selectively add the attribute to VPN profile.
-
Click Include to add the attribute to VPN profiles, or click Skip & Continue.
-
Click Save & Add Attribute to add the attribute to the dashboard. Once saved, you can come back to Edit or Delete the attribute.
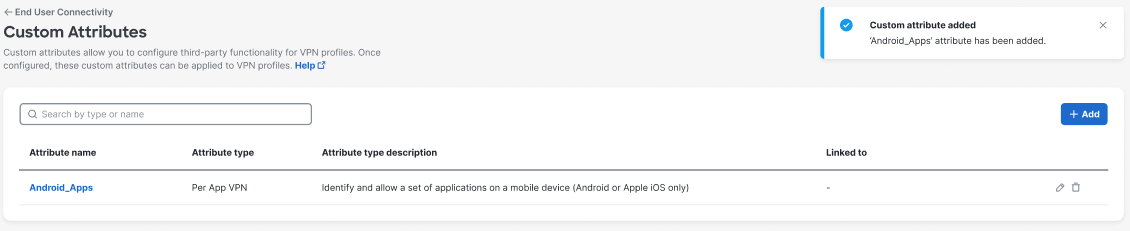
-
-
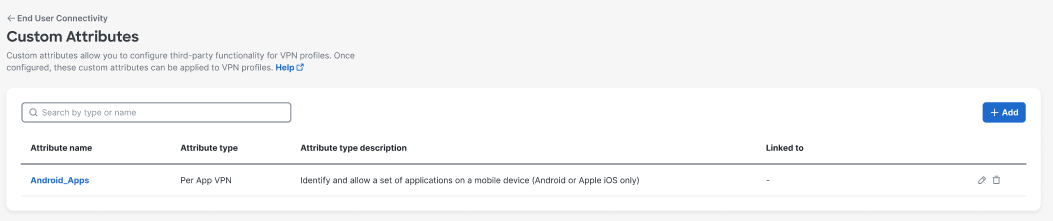
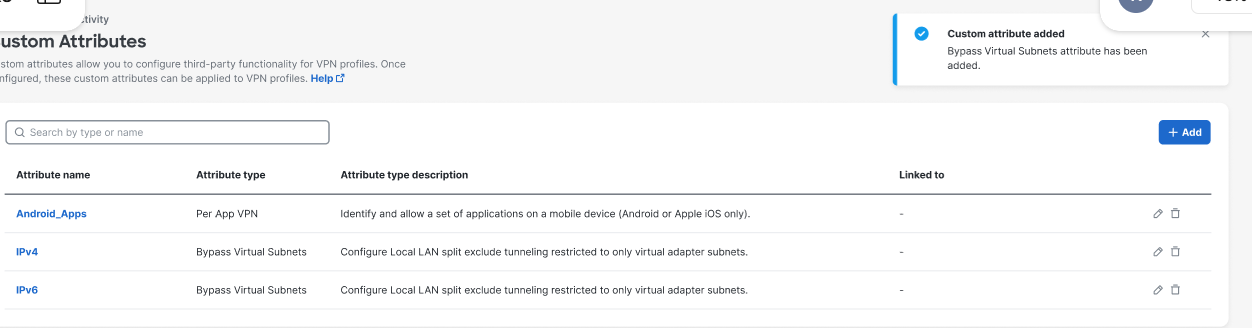
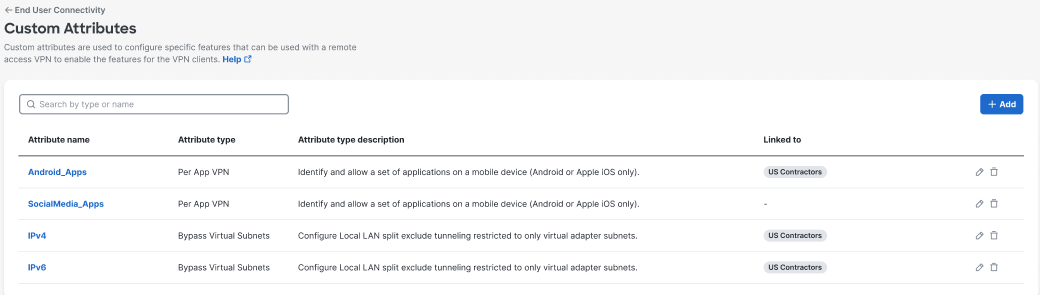
Navigate to Connect > End User Connectivity > Virtual Private Network > Custom attributes to view the table of available custom attributes.
Define Bypass Virtual Subnets Custom Attributes
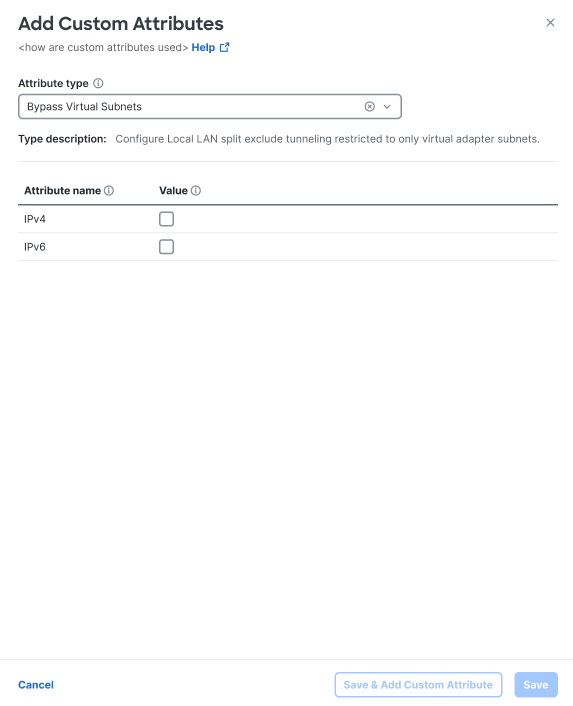
If you experience connectivity issues with Windows Subsystem for Linux (WSL2) or VMware Fusion VM when the AnyConnect VPN is active on the host (Windows 10 or macOS 11 (and later), follow these steps to configure Local LAN split exclude tunneling restricted to only virtual adapter subnets.
Procedure
-
Navigate to Connect > End User Connectivity > Virtual Private Network.
-
For VPN Profiles, click Custom attributes.
-
Click + Add to configure an attribute for a third-party application for a mobile device.
-
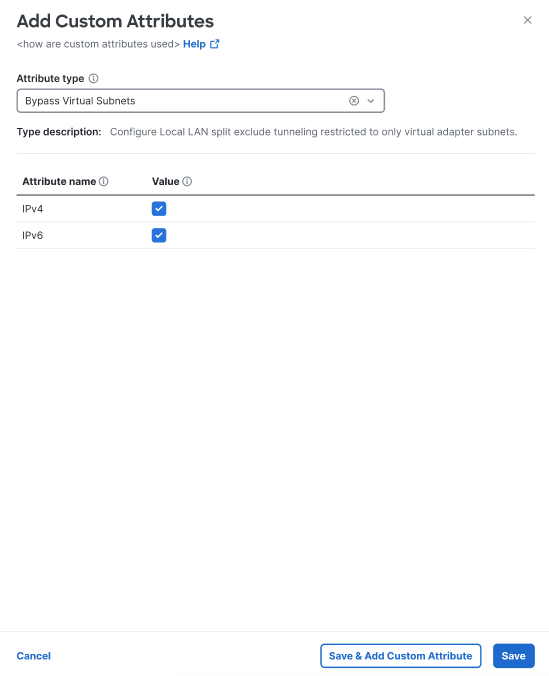
From the Add Custom Attributes drawer, choose Bypass Virtual Subnets from the Attribute type drop-down.
-
Click Add attributes and values to configure your custom attributes.
-
Choose from the following options:
-
IPv4—Select IPv4 to bypass virtual subnets for only IPv4 traffic.
-
IPv6—Select IPv6 to bypass virtual subnets for only IPv6 traffic.
You can choose either or both of these options. -
Click Save if you need to come back to this attribute at a later time; click Save & Add Attribute if you are finished.
-
-
Navigate to Connect > End User Connectivity > Virtual Private Network > Custom attributes to view the table of available custom attributes.
Edit Cisco Secure Client Settings
You can modify Cisco Secure Client settings to attach a previously created custom attribute type and name to a VPN profile via Connect > End User Connectivity > Virtual Private Network.
Procedure
-
Navigate to Connect > End User Connectivity > Virtual Private Network.
-
Choose a profile from the VPN Profiles list, click the ellipses ... and choose Edit.
-
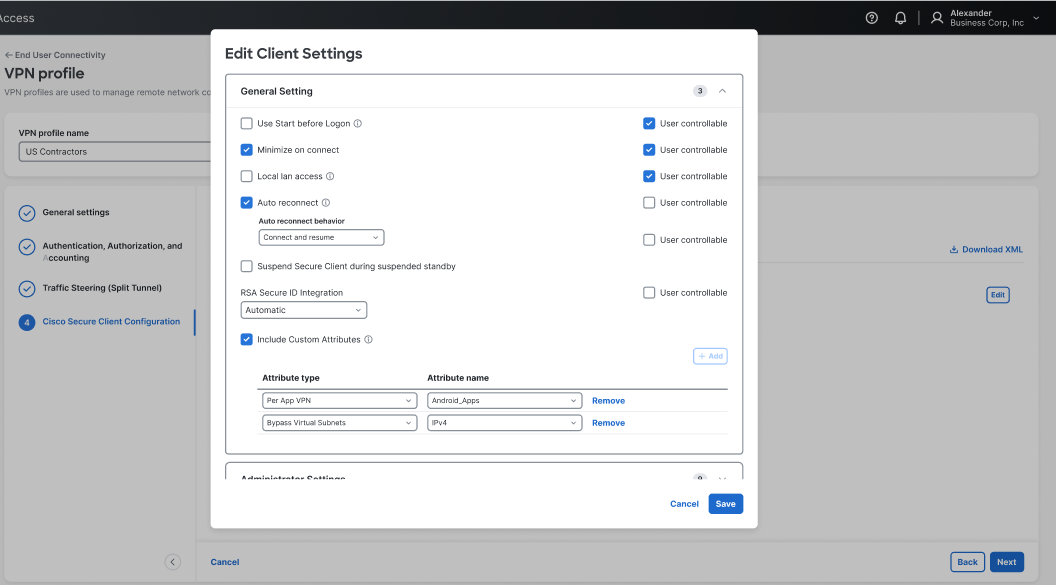
Click through the profile to the Cisco Secure Client Configuration.
-
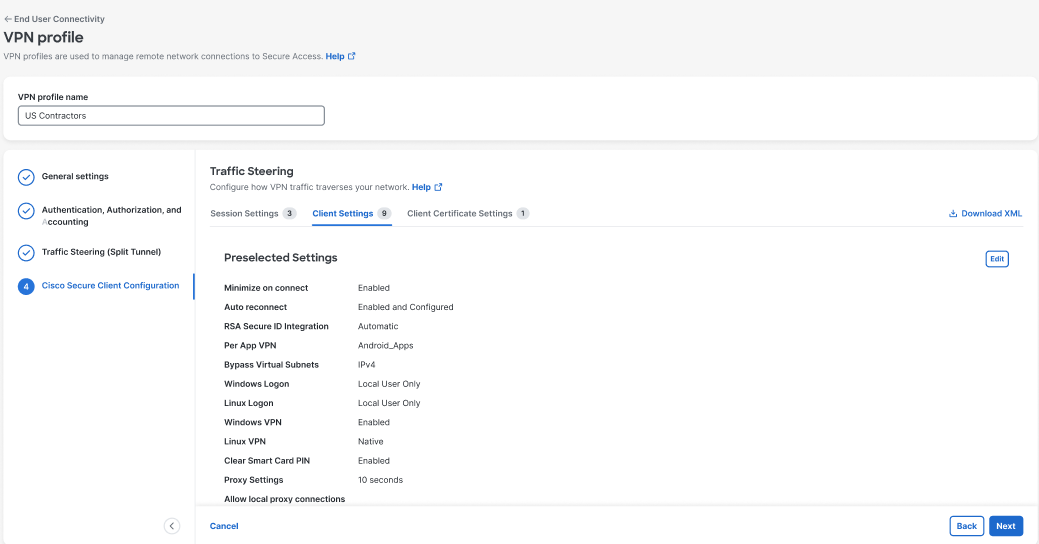
Click the Client Settings tab then click Edit to modify client-specific settings. See The Cisco Secure Client Profile Editor for complete information about Cisco Secure Client settings.

-
Check Include Custom Attributes and add the desired attributes to the VPN profile.
-
Click Save.
-
Navigate to Connect > End User Connectivity > Virtual Private Network and click Custom attributes to view the custom attributes available to VPN profiles from the Custom Attributes dashboard, which also includes which VPN profiles have assigned attributes in the Linked to column.
Manage Custom Attributes\ < Define Custom Attributes > Manage Internet Security
Updated 6 months ago