Provision Users and Groups from Okta
Cisco Secure Access supports the provisioning of users and groups from the Okta identity provider (IdP).
This guide describes how to add your Secure Access System for Cross-domain Identity Management (SCIM) token to the Cisco User Management Connector app in the Okta portal and provision users and groups to Secure Access through the app.
Table of Contents
- Prerequisites
- Limits and Best Practices
- Supported Features
- Configure the Cisco User Management Connector App in Okta
- View Provisioned Users and Groups in Secure Access
- Refresh SCIM Token
Prerequisites
- Full Admin user role. For more information, see Manage Accounts.
- A valid Okta subscription.
- Add the IdP in Secure Access and generate a valid SCIM token. For more information, see Add a Cloud Identity Provider.
- (Optional) Enable the authorization of the authName attribute in Secure Access. For more information, see Manage Advanced Configuration Settings.
- No concurrent provisioning of the same users or groups from on-premises AD and Okta. If you are using the on-premises AD Connector to import users and groups and choose to import the same users and groups from Okta, ensure that the on-premises AD Connector is switched off or that the Connector service on the connector machine is stopped.
Limits and Best Practices
- Secure Access supports provisioning a maximum of 1000 groups from Okta. Any groups beyond this number that are in scope are not provisioned. Secure Access does not restrict the number of users that you can provision from Okta. For more information, see Limitations and Range Limits.
- To ensure that all users are provisioned, assign the Everyone group to the Cisco User Management Connector app. You can push other additional groups for group-based Secure Access rule enforcement.
- Okta does not support nested groups.
- If you previously imported groups from the on-premises AD and push the same groups from Okta, the groups from Okta do not overwrite the groups imported from the on-premises AD. You must reassign any group-based Secure Access policy rules to the groups imported from Okta.
- Provisioning large numbers of users and groups to Secure Access may take several hours.
- After the initial provisioning of users and groups, it can take up to one hour for subsequent changes to users and groups to reflect in Secure Access.
- Concurrent synchronization of the same users and groups from the on-premises AD and the Cisco User Management Connector app is not supported and leads to inconsistent policy enforcement.
- For IP-to-user mapping deployments, you must use an on-premises AD Connector. Okta does not store the private IP to AD user mappings.
Supported Features
Secure Access supports these features in Okta:
- Create Users—New users created in Okta are also created in Secure Access.
- Update User Attributes—Updates to a user's profile through Okta are pushed to Secure Access.
- Deactivate Users—Deactivating a user through Okta deactivates the user in Secure Access.
- Group Push—Groups in Okta are pushed to Secure Access.
Configure the Cisco User Management Connector App in Okta
Configure the Cisco User Management Connector app on the Okta portal.
Note: The To Okta setting is not supported in the Cisco User Management Connector app.
- Step 1 – Add the Cisco User Management Connector App in Okta
- Step 2 – Add the Secure Access SCIM Token and URL in the App
- Step 3 – Configure User Options in the App
- Step 4 – (Optional) Add a New Attribute
- Step 5 – (Optional) Provision authName Attribute to Authenticate Users
- Step 6 – Assign Users or Groups in the App
- Step 7 – Push Users or Groups from the App to Secure Access
- Step 8 – View Logs in the App
Step 1 – Add the Cisco User Management Connector App in Okta
- Sign in to your instance of Okta.
- Navigate to Applications, and then select Create App Integration or Browser App Catalog.
- Select the Cisco User Management Connector app, and then click Add Integration.
- Click Done.
Step 2 – Add the Secure Access SCIM Token and URL in the App
In this step of the procedure, add the access token and the provisioning URL for the Secure Access SCIM API. When you configure the cloud IdP in Secure Access, copy the access token and provisioning URL for the Secure Access SCIM API. For more information, see Add a Cloud Identity Provider.
-
Click the Provisioning tab in the app.
-
Navigate to Settings, and then click Integration.
-
Click Enable API Integration.
Note: The app enables the Import Groups option automatically.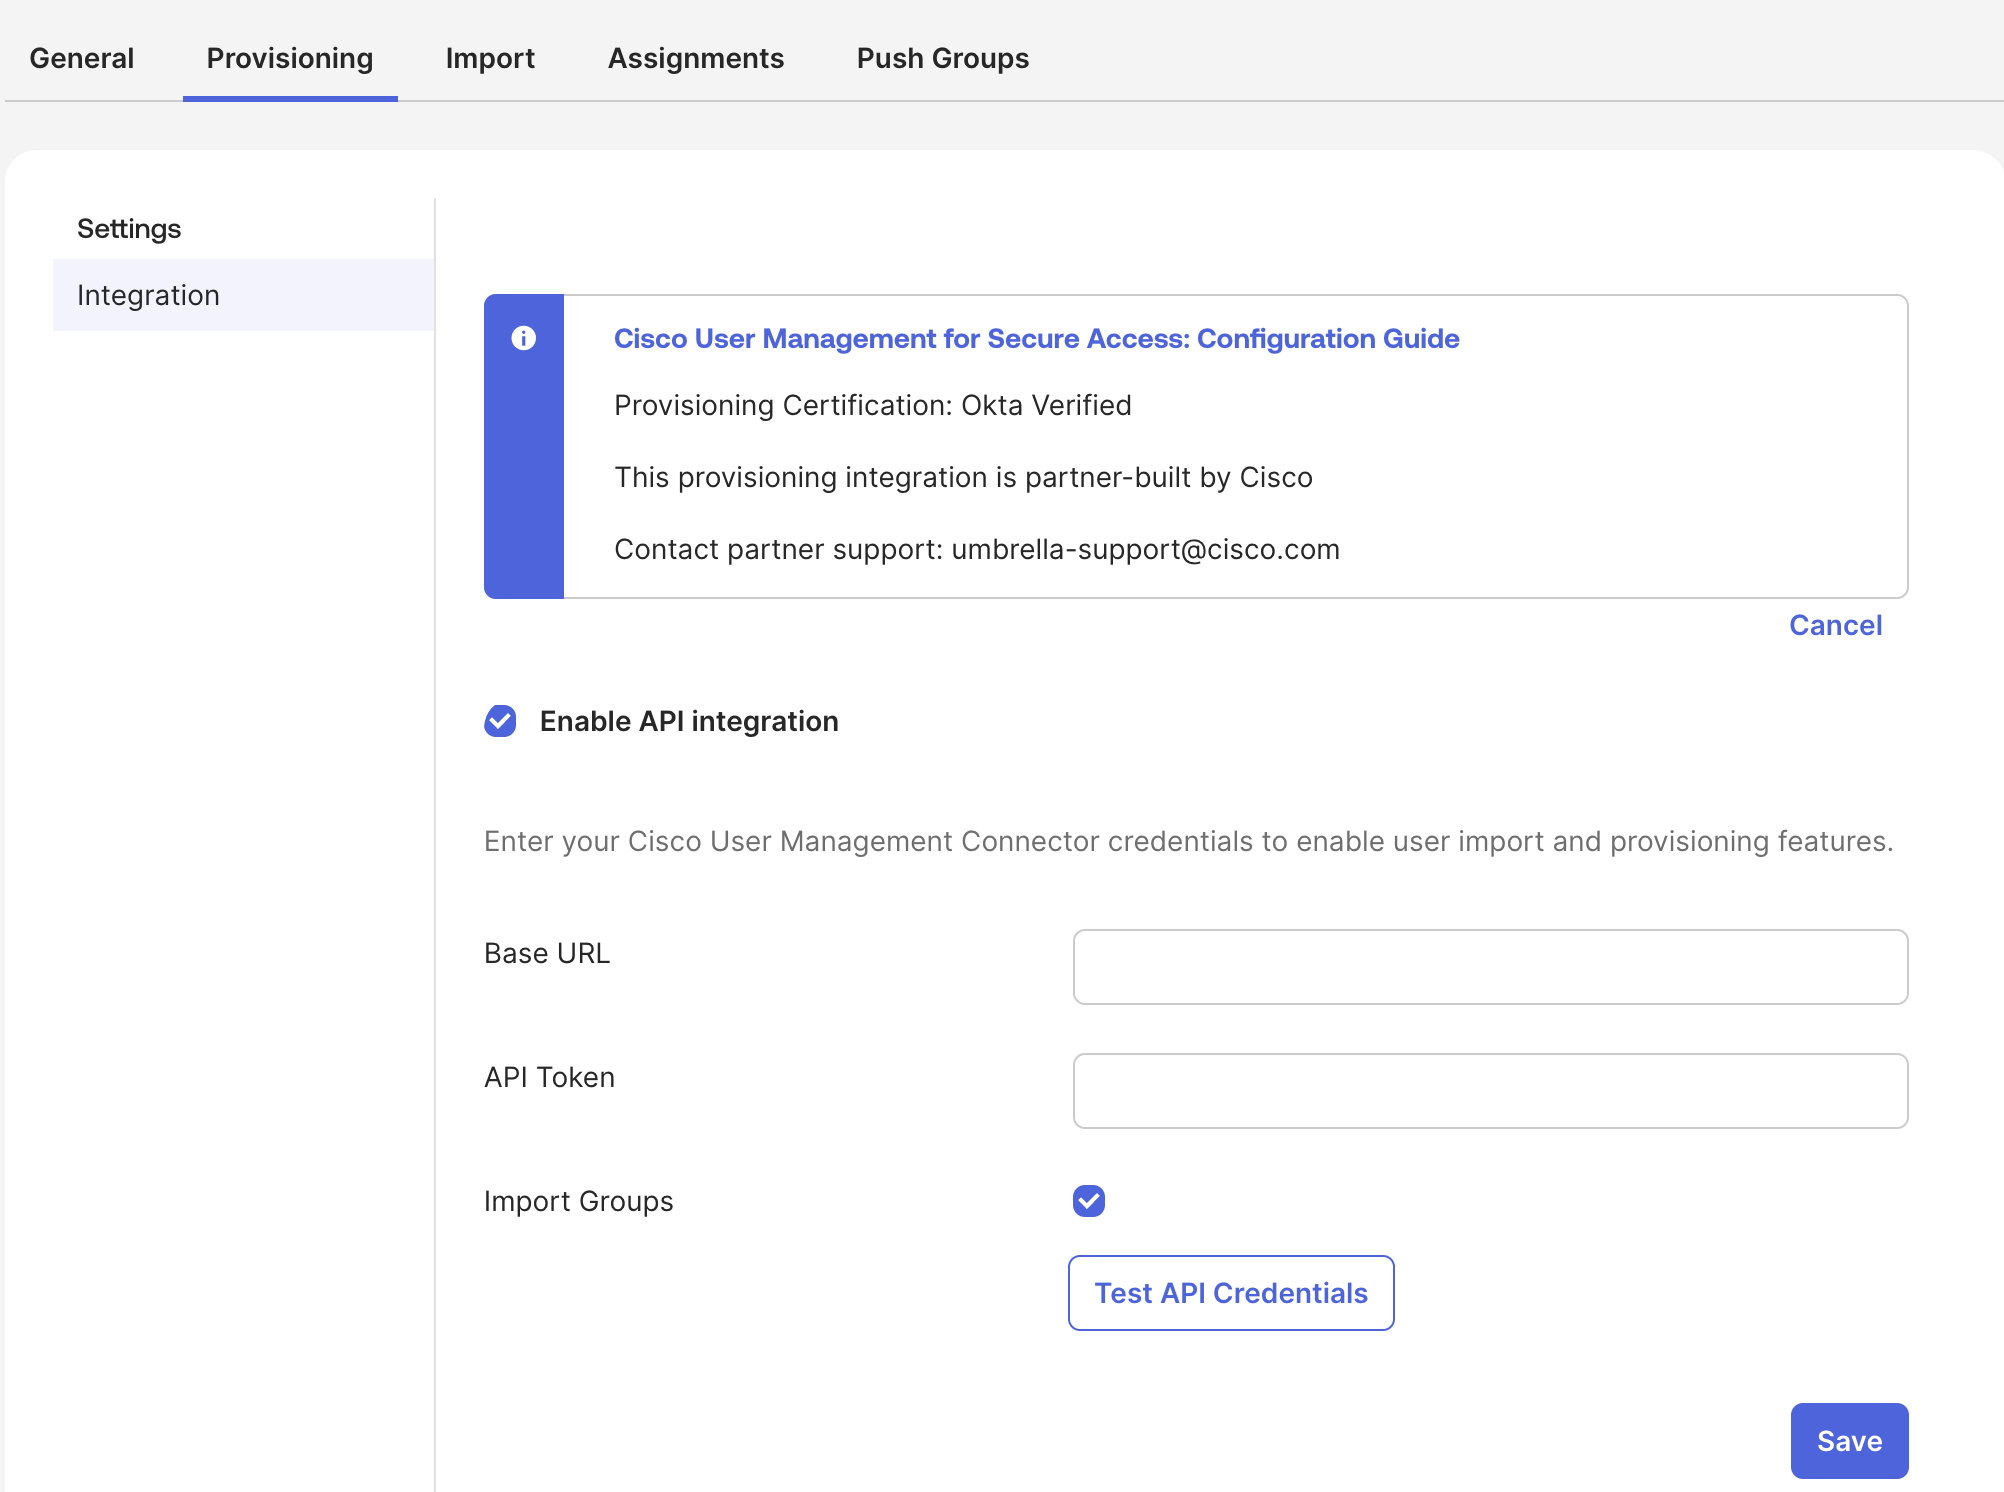
-
For Base URL, enter the Secure Access provisioning URL for the SCIM API.
https://api.sse.cisco.com/identity/v2/scim -
For API Token, enter the access token for the Secure Access SCIM API.
-
Click Test API credentials, to confirm that you can use your Secure Access SCIM token to connect the Secure Access API with Okta.
-
Click Save.
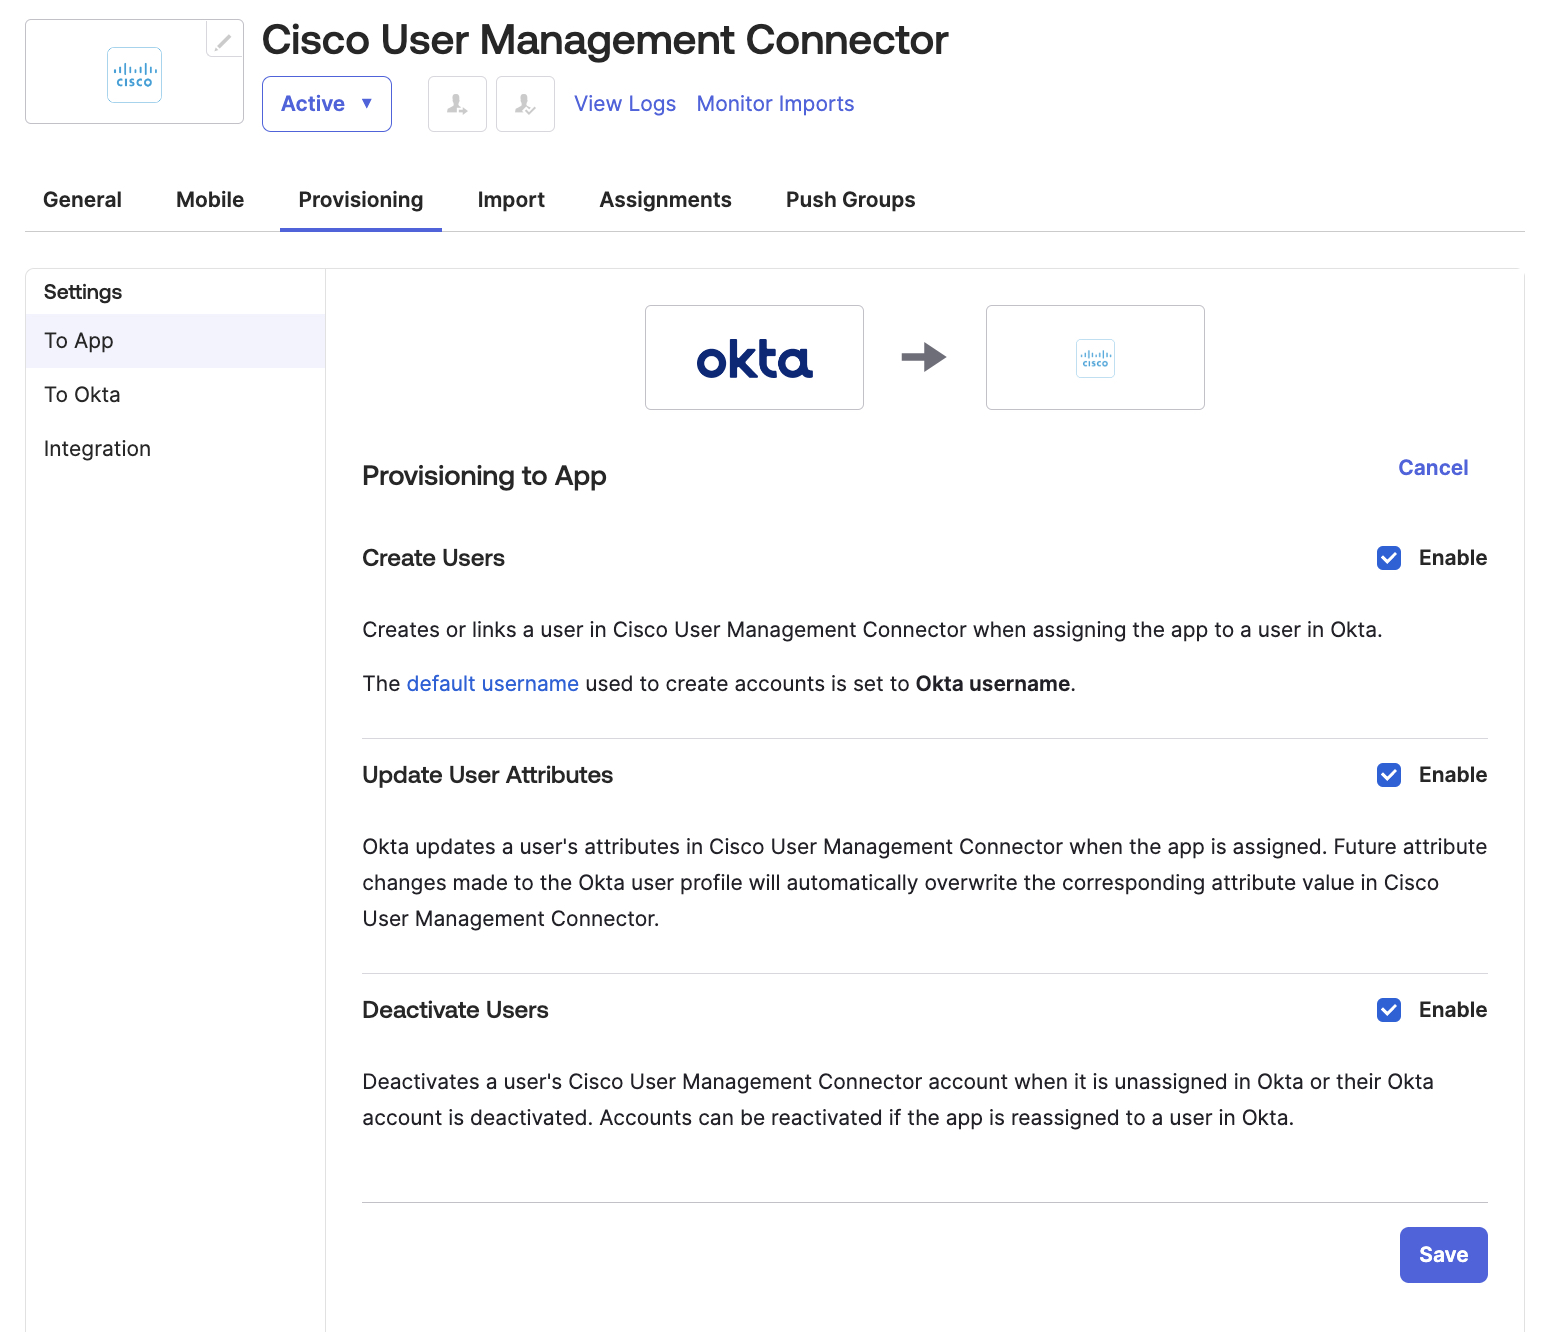
Step 3 – Configure User Options in the App
-
Click the Provisioning tab in the app.
-
Navigate to Settings, and then click To App.
-
Navigate to Provisioning to App.
-
Click edit, and then select these options: Create Users, Update User Attributes, and Deactivate Users.
-
Verify that you select these attributes for synchronization to Secure Access. Secure Access only lists the Display name and Username attributes for users, not the Given name and Family name attributes.
- Username
- Given name
- Family name
- Display name
-
Click Save.
Step 4 – (Optional) Add a New Attribute
Click to View: Add an objectGUID Attribute and Create the User Profile Mapping
(Optional) Add an objectGUID Attribute and Create the User Profile Mapping
If you need to import the objectGUID attribute for users, add a new attribute and map the attributes in the profile mapping.
Note: Before setting up the import of the objectGUID, review and meet the prerequisites. For more information, see Prerequisites.
The on-premises Secure Access AD Connector and the Cisco Secure Client rely on the objectGUID attribute for user and group identification. Ensure that the objectGUID attribute of users is synchronized from Okta to Secure Access only if either of the following conditions are true:
- You have previously imported AD users to Secure Access using the on-premises Secure Access AD connector, are now importing the same user identities from Okta, and want the previously imported identities to be persisted for policy or reporting purposes.
- You have endpoints that authenticate against on-premises AD and run the Cisco Secure Client.
Note: The Okta Active Directory agent does not synchronize the objectGUID attribute of users from on-premises AD to Okta by default.
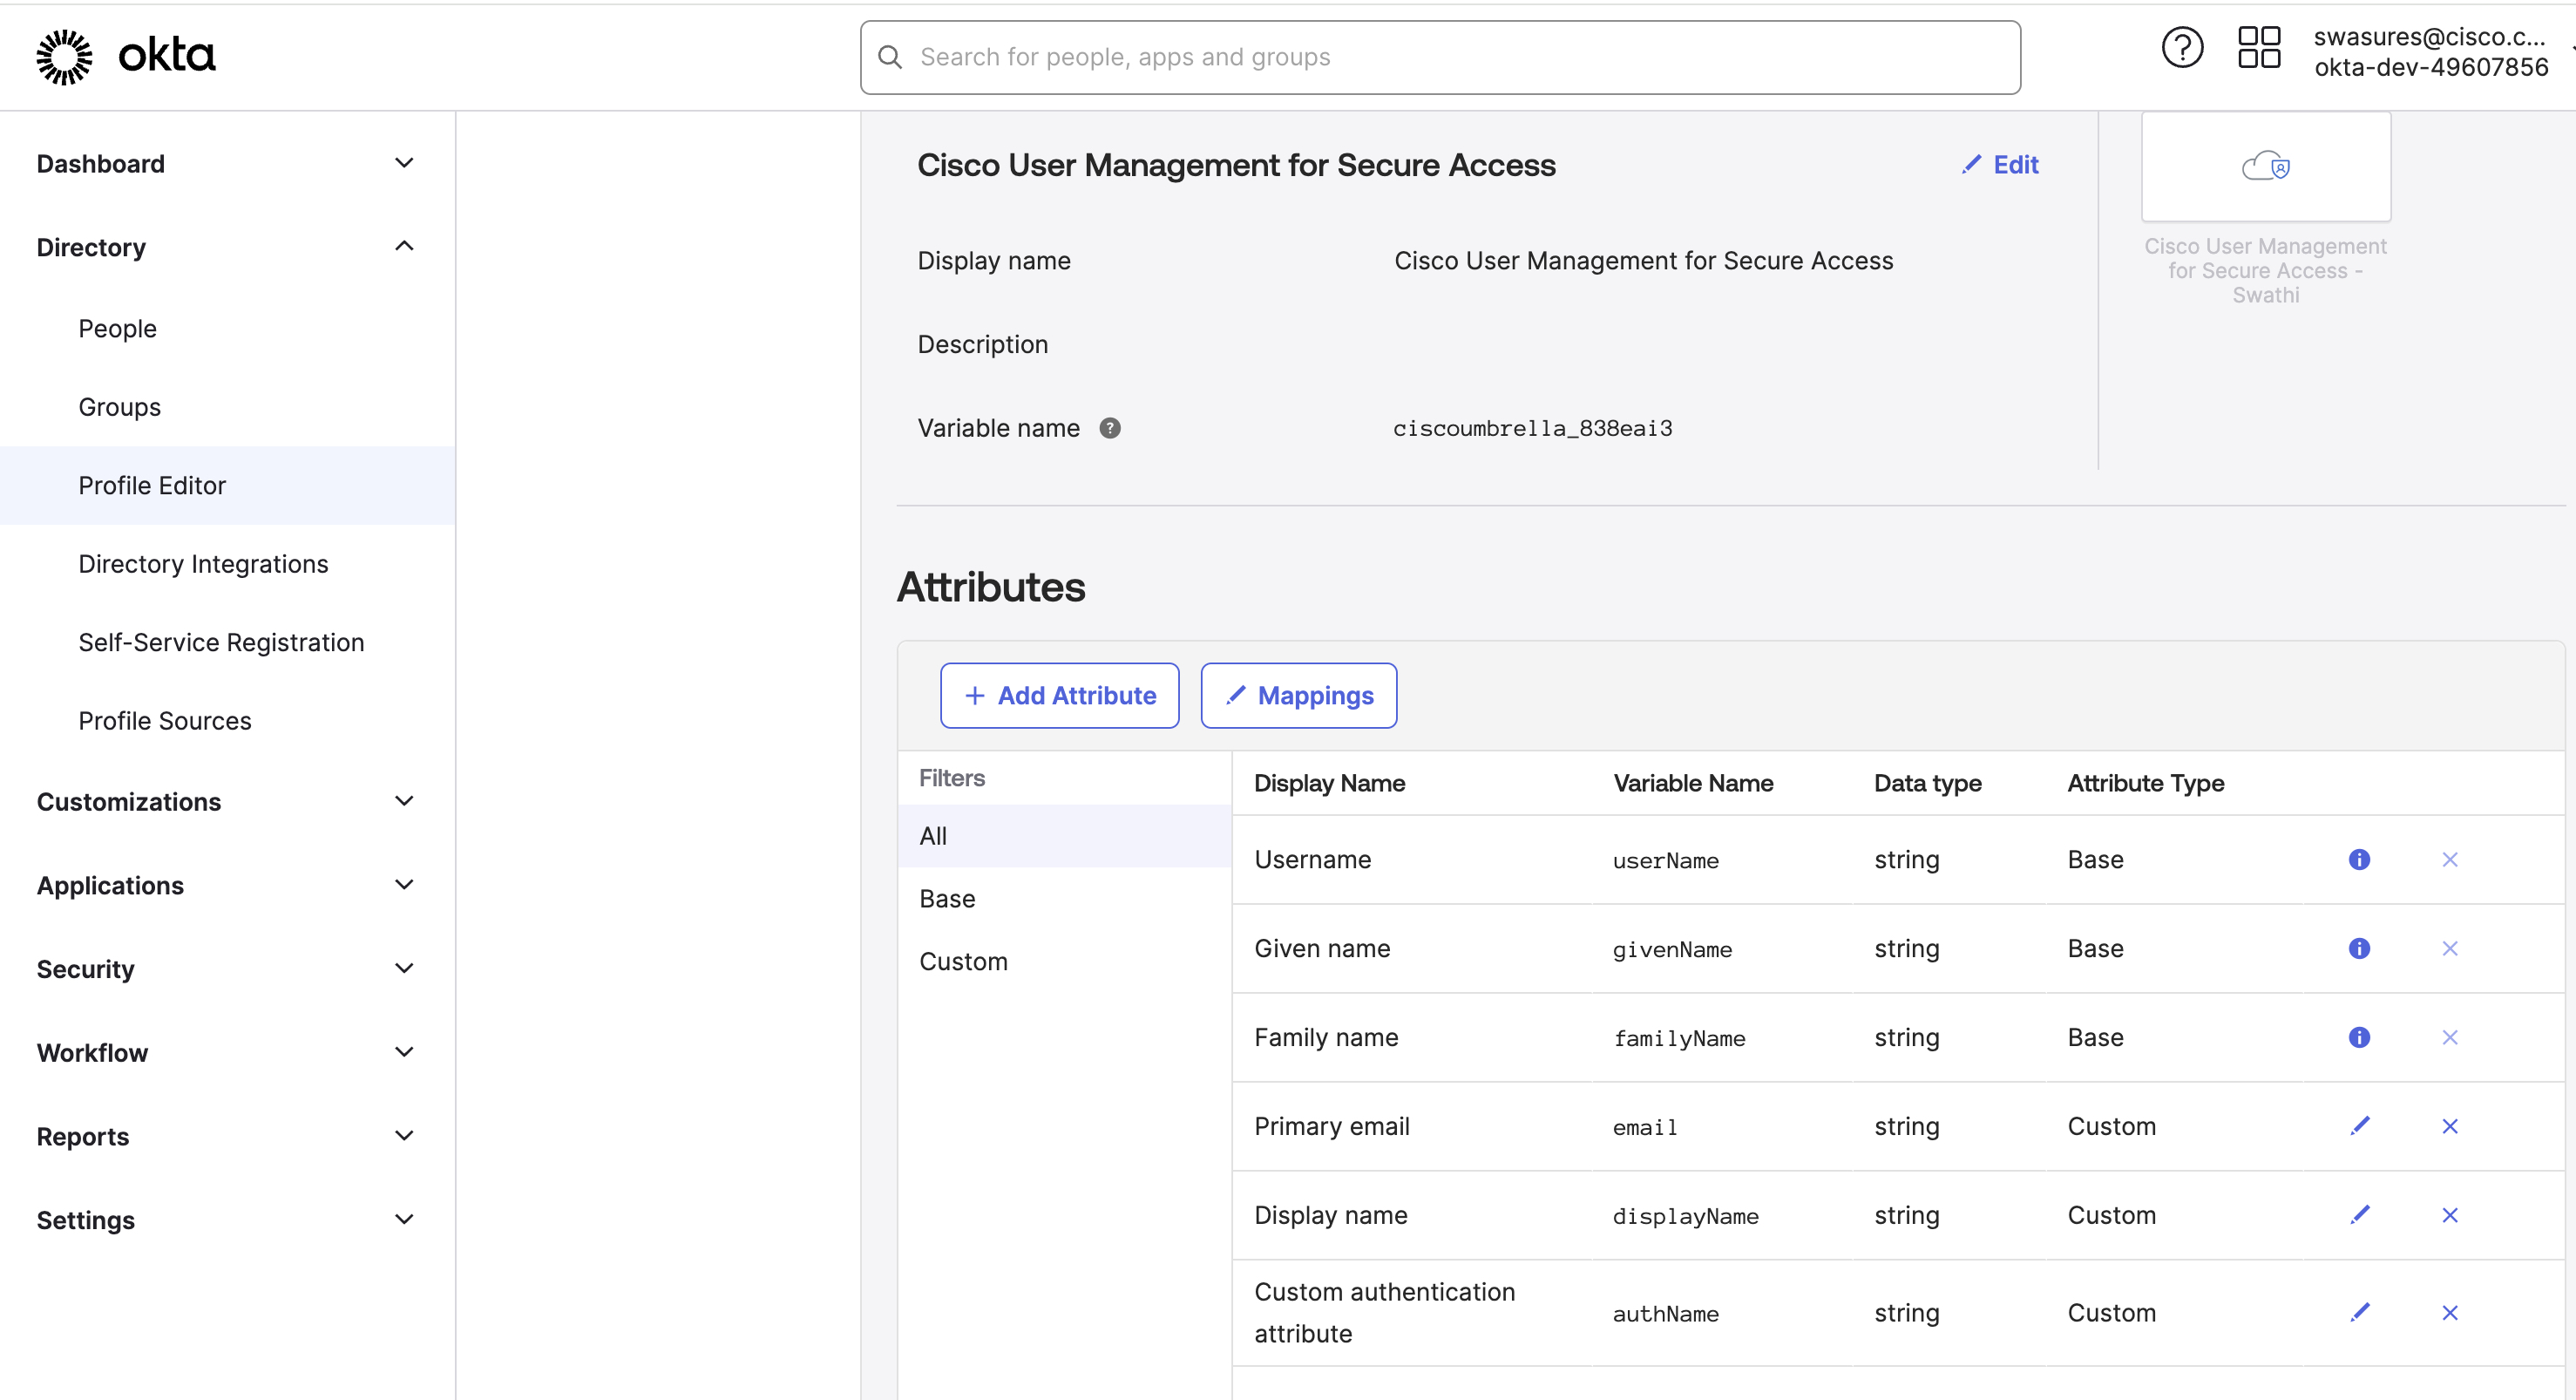
Add the objectGUID Attribute
-
In Okta, navigate to the Provisioning tab on the Cisco User Management Connector app.
-
From Settings > To App, navigate to Profile Editor.
-
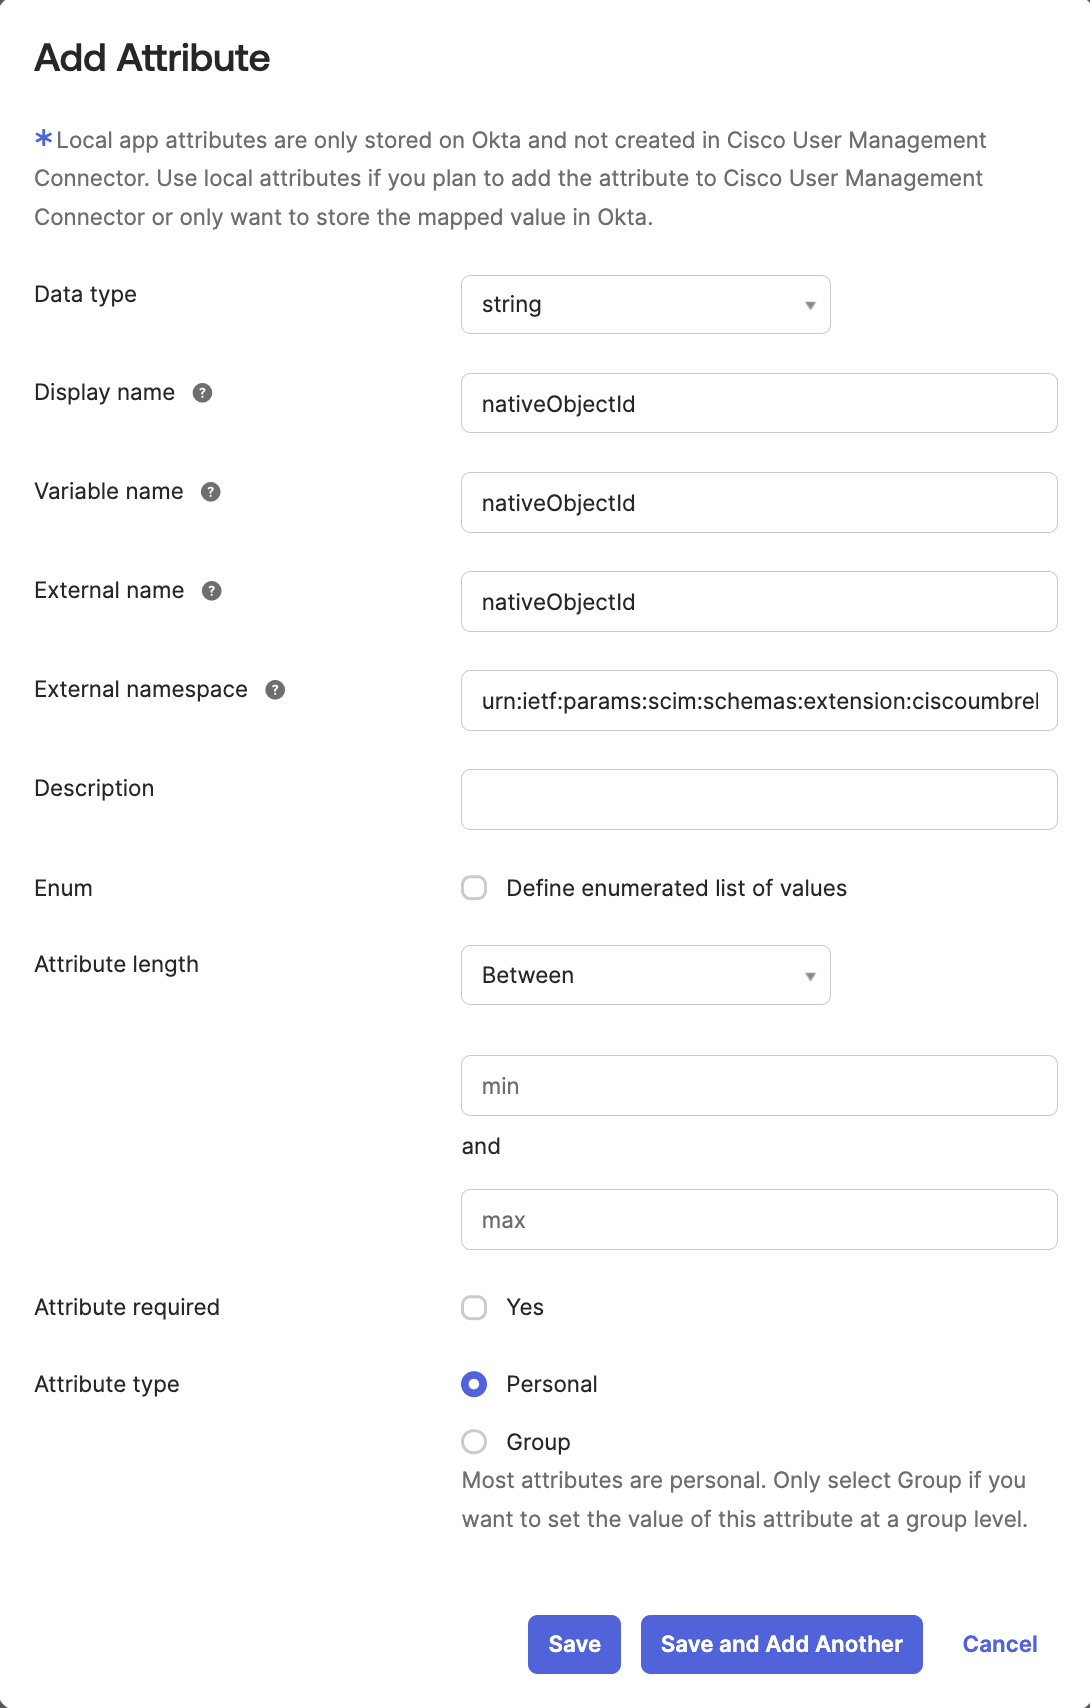
For Okta Attribute Mappings, click Add Attribute to create a custom attribute of string type called
objectGUID.- Set Display name, Variable name, and External name to
native.ObjectId. - For Scope, click User personal.
- Set External namespace to
urn:ietf:params:scim:schemas:extension:ciscoumbrella:2.0:user
- Set Display name, Variable name, and External name to
-
Click Save.
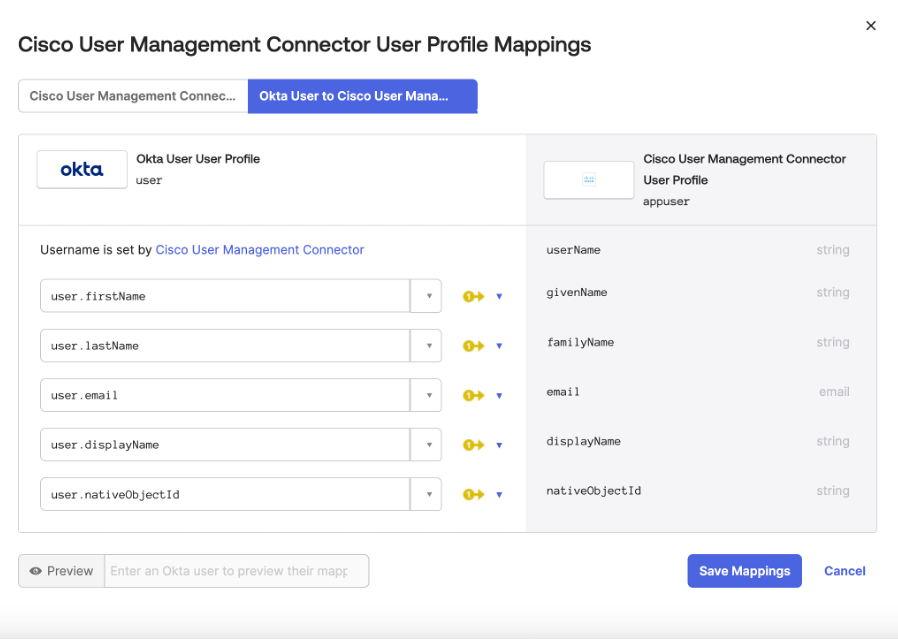
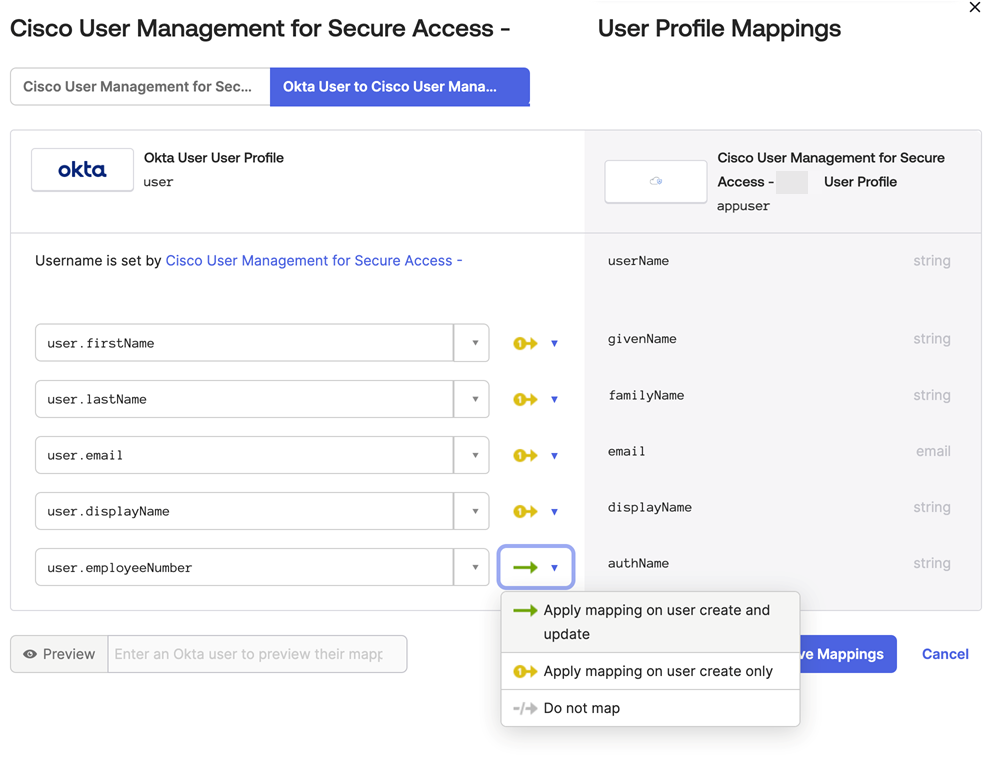
Create the User Profile Mappings
-
In Okta, navigate to the Provisioning tab on the Cisco User Management Connector app.
-
From Settings > To App, navigate to Profile Editor.
-
For Cisco User Management Connector User Profile Mappings, create a new Okta User Profile that maps the Okta user to the Cisco User Management Connector user. The profile must map the
user.objectGUIDtonativeObjectId. -
Click Save Mappings.
-
Select the option to Apply the Mappings to All Users with this Profile.
Step 5 – (Optional) Provision Custom Attribute to Authenticate Users
For more information, see (Optional) Provision Custom Attribute to Authenticate Users
Click to View: Provision Custom Attribute to Authentication Users
(Optional) Provision authName Attribute to Authenticate Users
To use an attribute to authenticate users in addition to the user principal name (UPN) attribute, customize the authName attribute and map it to a user profile (such as employee email or ID).
Prerequisites
Authorize the use of the authName attribute. For more information, see Set Up Authentication Preferences for Identity Providers.
Customize the authName Attribute
- In Okta, open the Cisco User Management for Secure Access app.
- Navigate to the Provisioning tab.
- Navigate to Cisco User Management Connector for Secure Access - Attribute Mappings.
- Click Go to Profile Editor.
- On the Profile Editor page, scroll down to the Cisco User Management for Secure Access section.
- In the Attributes section, click Add Attribute.
- In the Custom attribute window, complete the following fields:
- Data type—Choose string.
- Display name—Type Custom authentication attribute.
- Variable name—Type authName.
- External name—Type authName
- External namespace—Selecturn:ietf:params:scim:schemas:extension:ciscoumbrella:2.0:User.
- Description—(Optional) Enter a description for your unique authentication attribute.
- Enum—Leave Define enumerated list of values unchecked.
- Attribute length—Choose Greater than.
- Min value—Enter a number of characters for the unique authentication attribute.
- Attribute required—Click Yes if you want all users to be authenticated with the unique authName attribute.
- Attribute type—Click the Personal radio button.
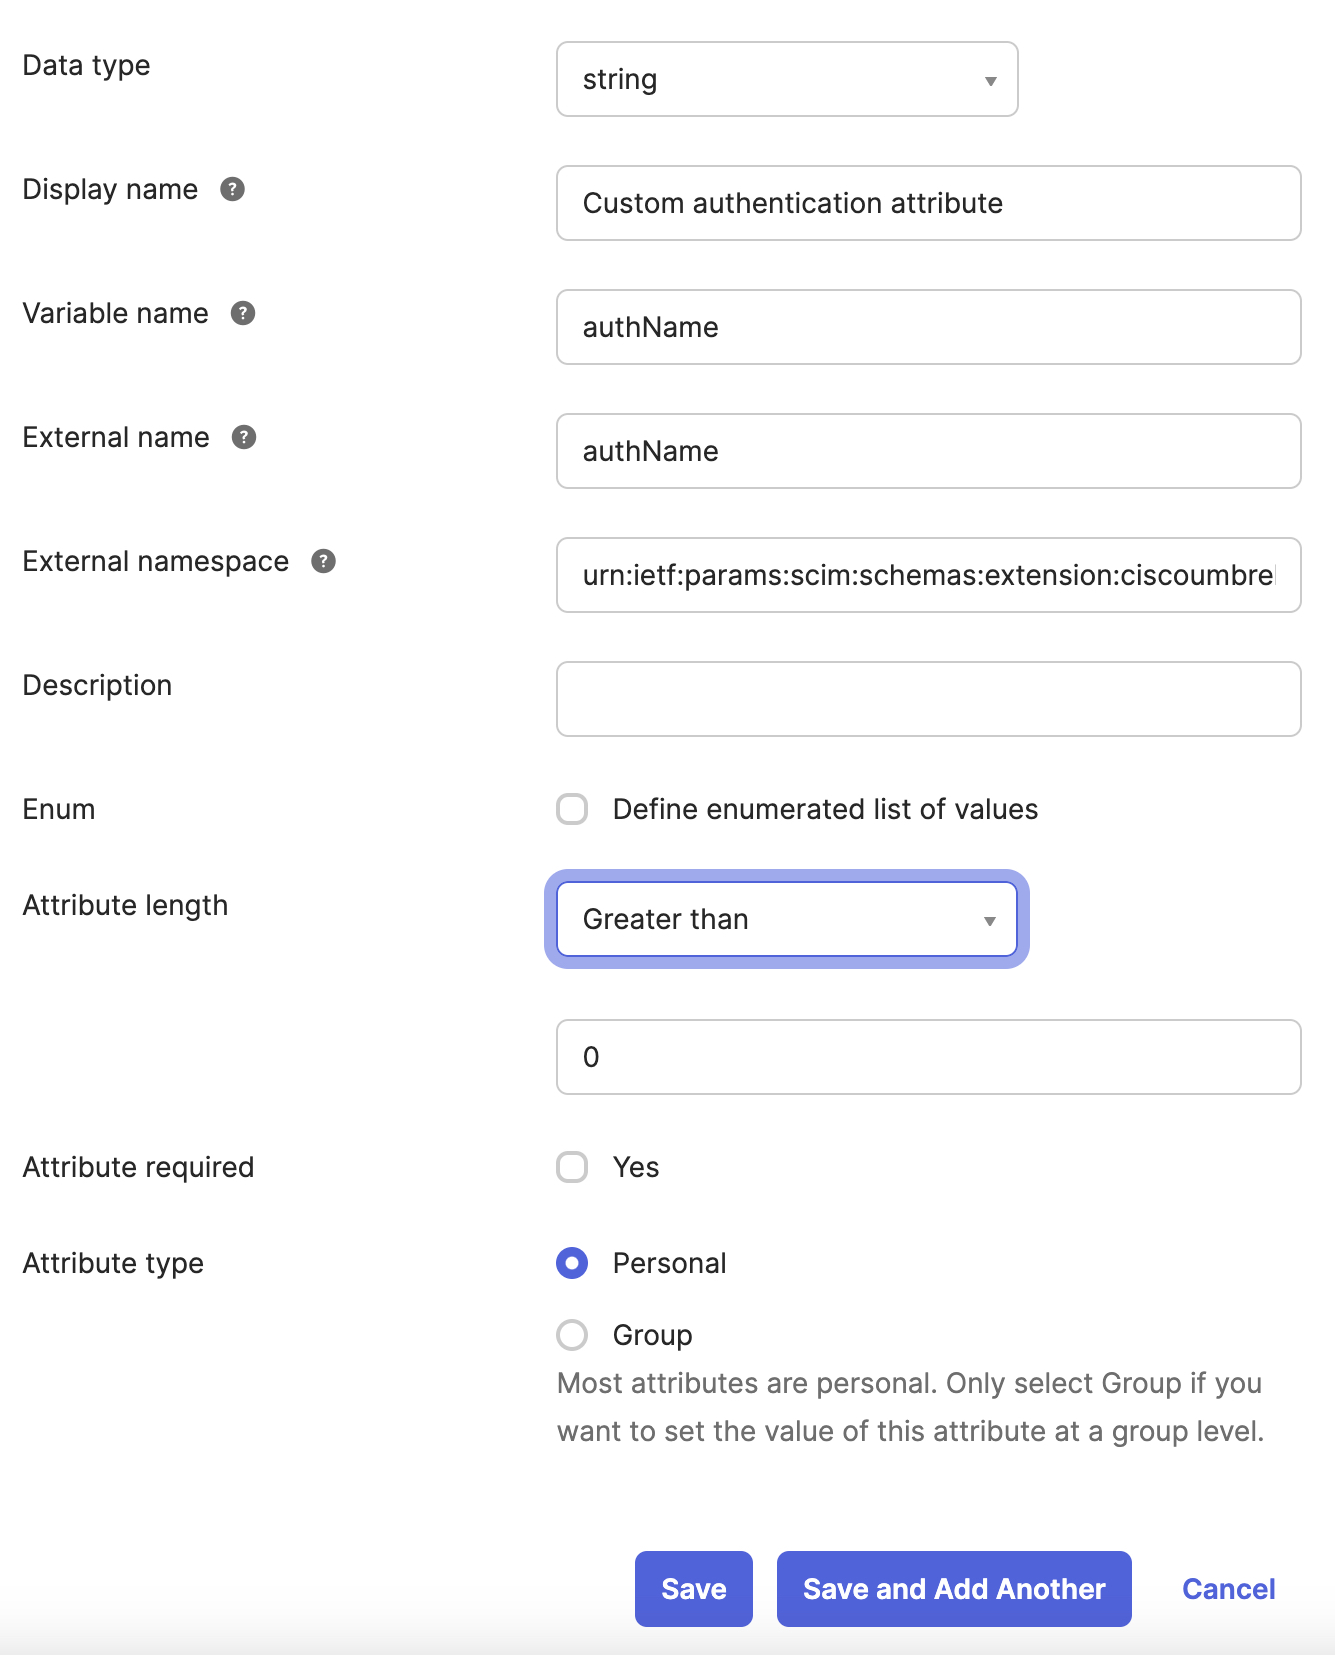
- Click Save.
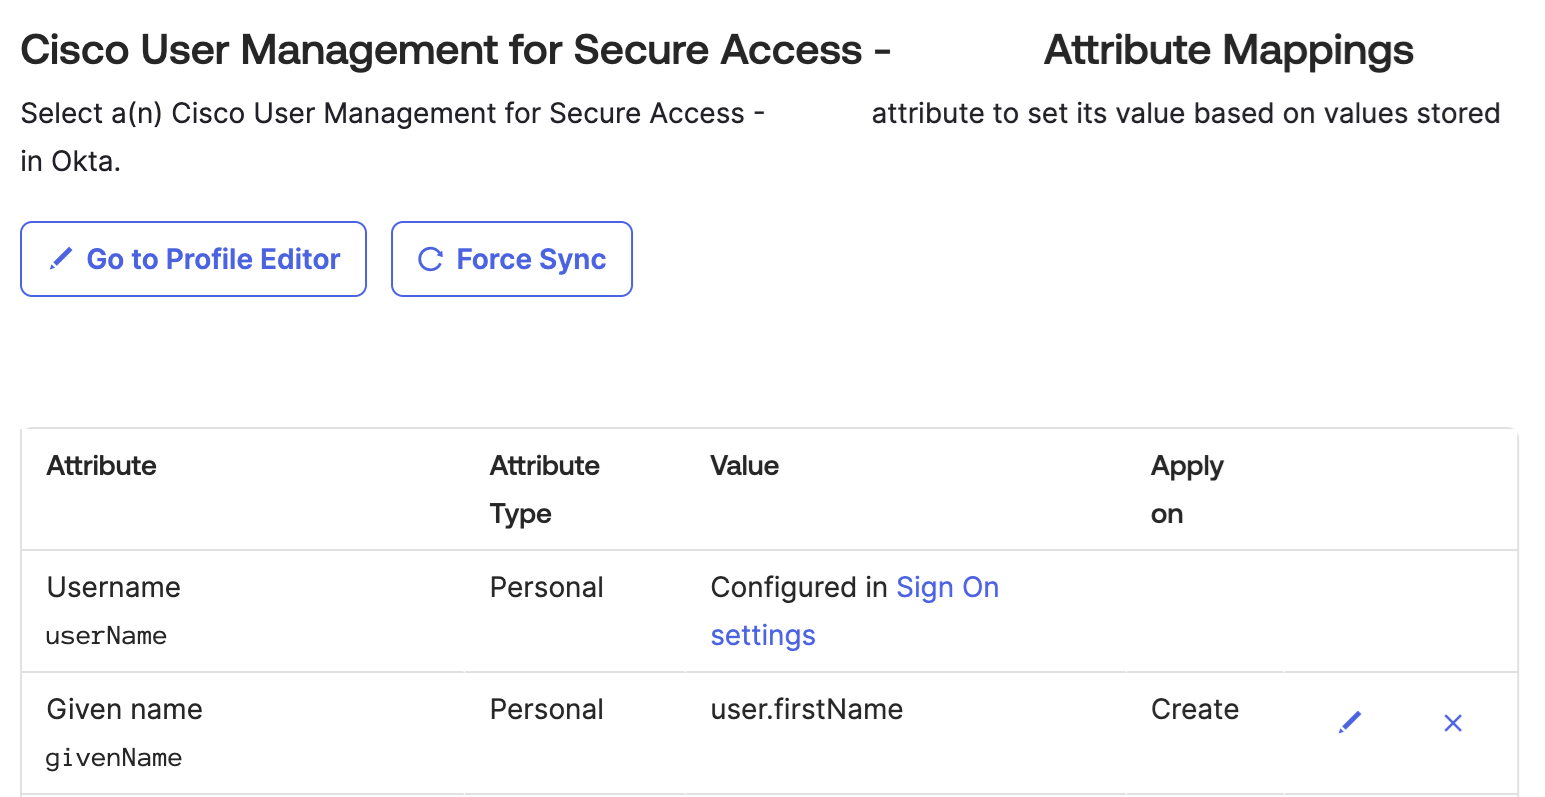
Map the Custom authName Attribute to a User Profile
-
In the left pane, select Profile Editor.
-
In the Attributes section, click Mappings.
-
On the Cisco User Management for Secure Access - User Profile Mappings page, click Okta User to Cisco Umbrella User Management Connector.
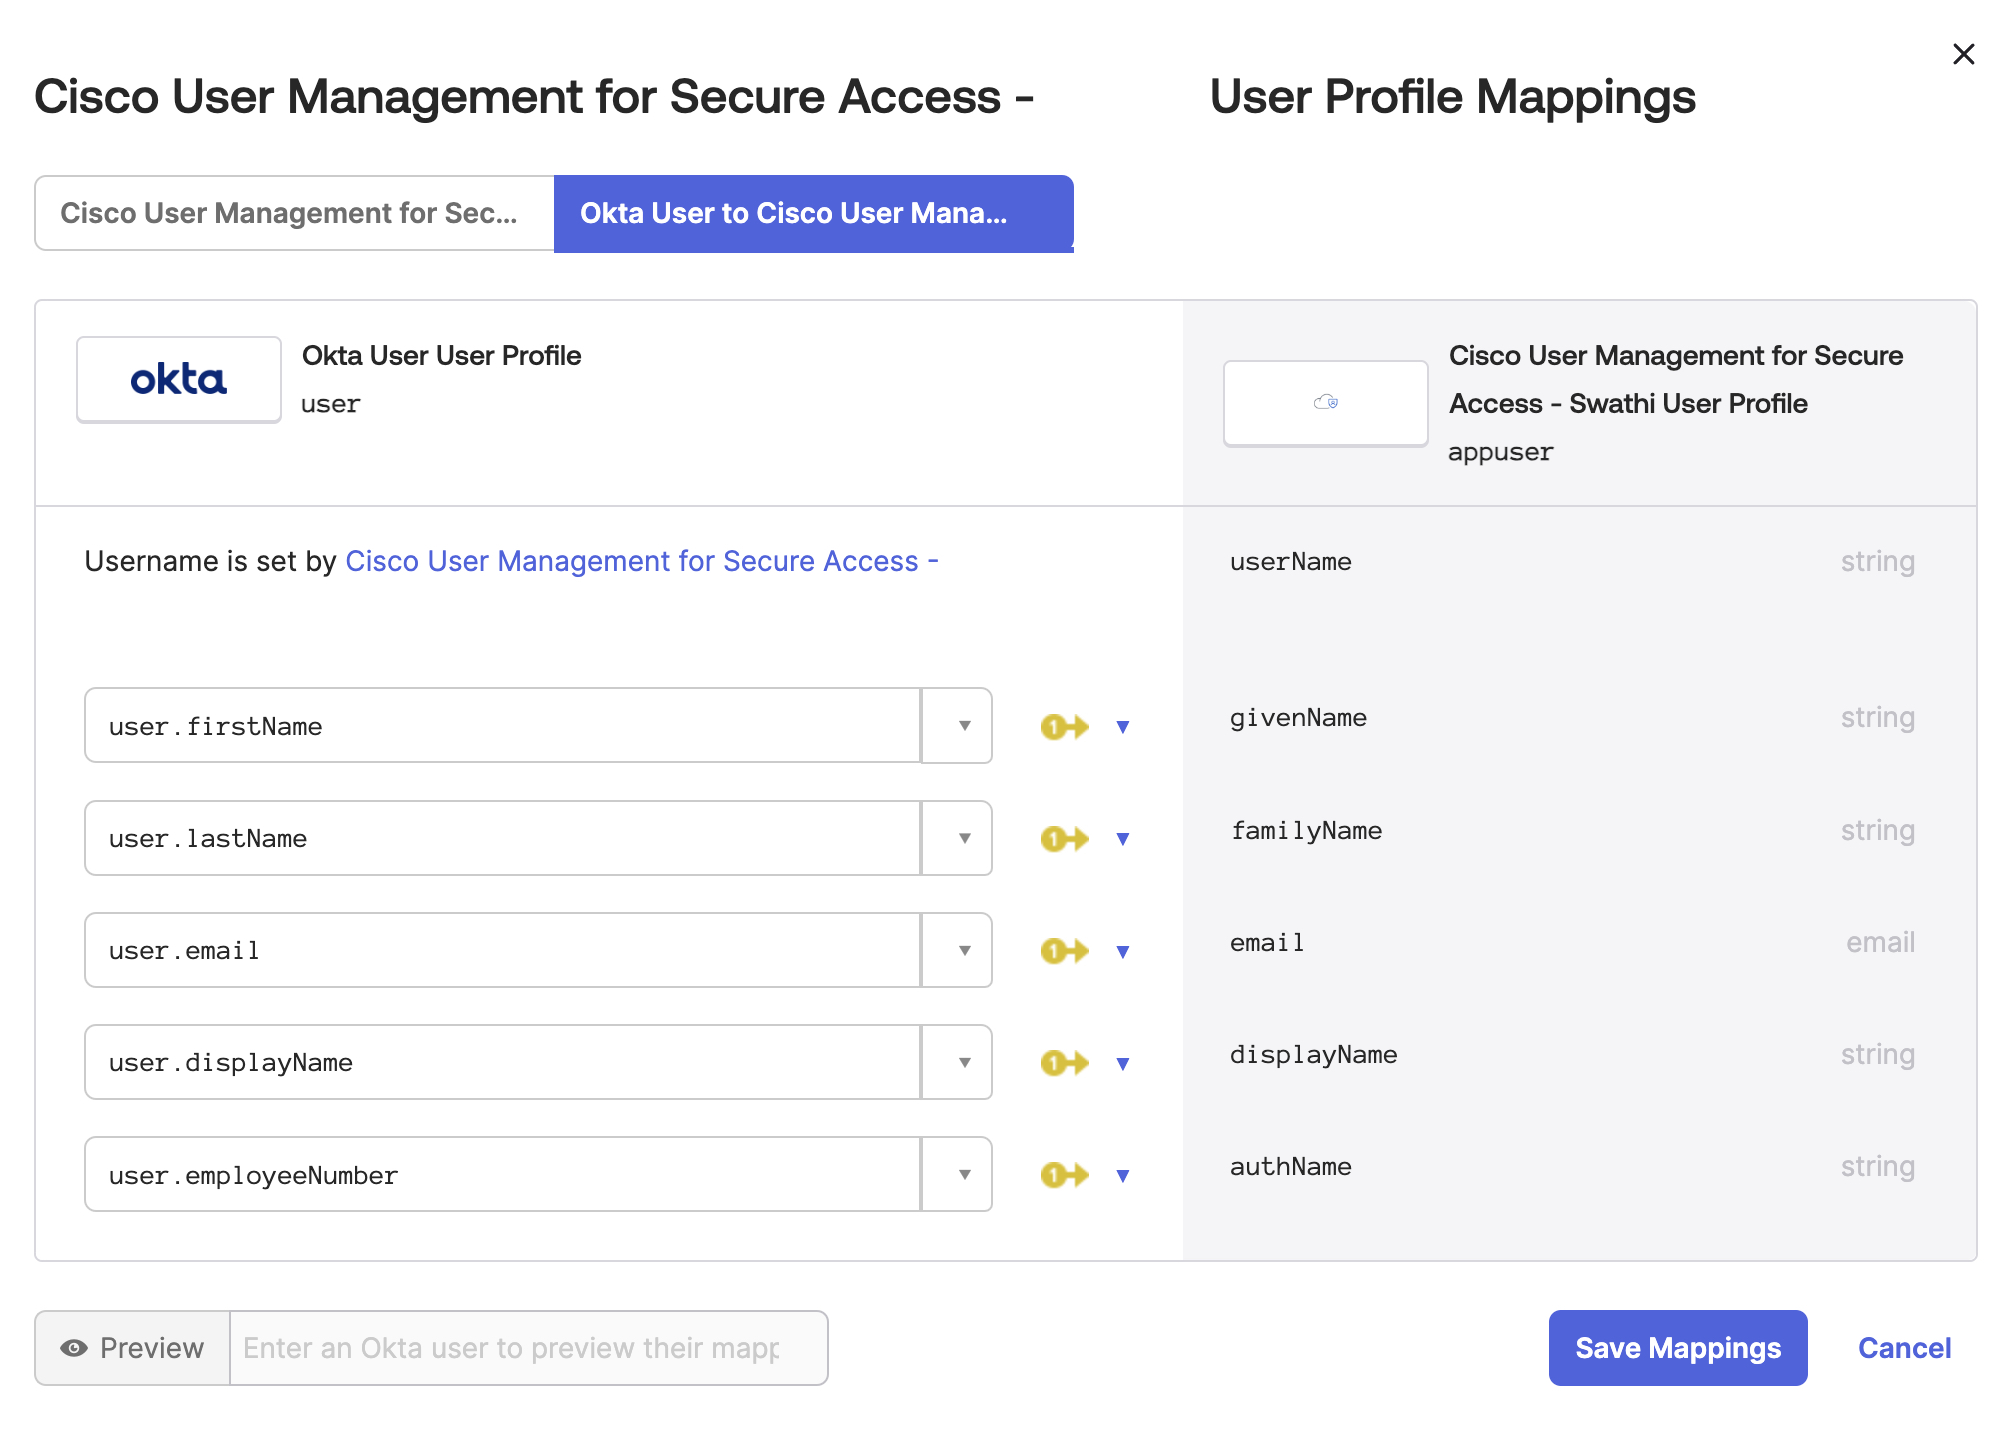
- In the left pane for the user profile, click the yellow arrow and select Apply mapping on user create and update.
- Click Save Mappings.
(Optional) Force-Sync Existing Users
Sync the existing users with the authName attribute. New users sync automatically.
- In the Cisco User Management for Secure Access app, navigate to Applications.
- Select the Provisioning tab.
- Click Force Sync.
Note: Based on your directory size, expect a delay for users to sync with the authName attribute.
Step 6 – Assign Users or Groups in the App
After you add users and groups in Okta, you can assign these users and groups in the Cisco User Management Connector app.
- Click the Assignments tab in the app.
- Assign users and groups in the app.
Important: Assigning groups to the app does not provision these groups to Secure Access. Okta only provisions users that are members of the assigned groups. Do not manually change the value of thenativeObjectIdfield when assigning any groups and users.
a. Navigate to People, and then click Assign.
(Optional) To assign all users, assign the Everyone group to the app.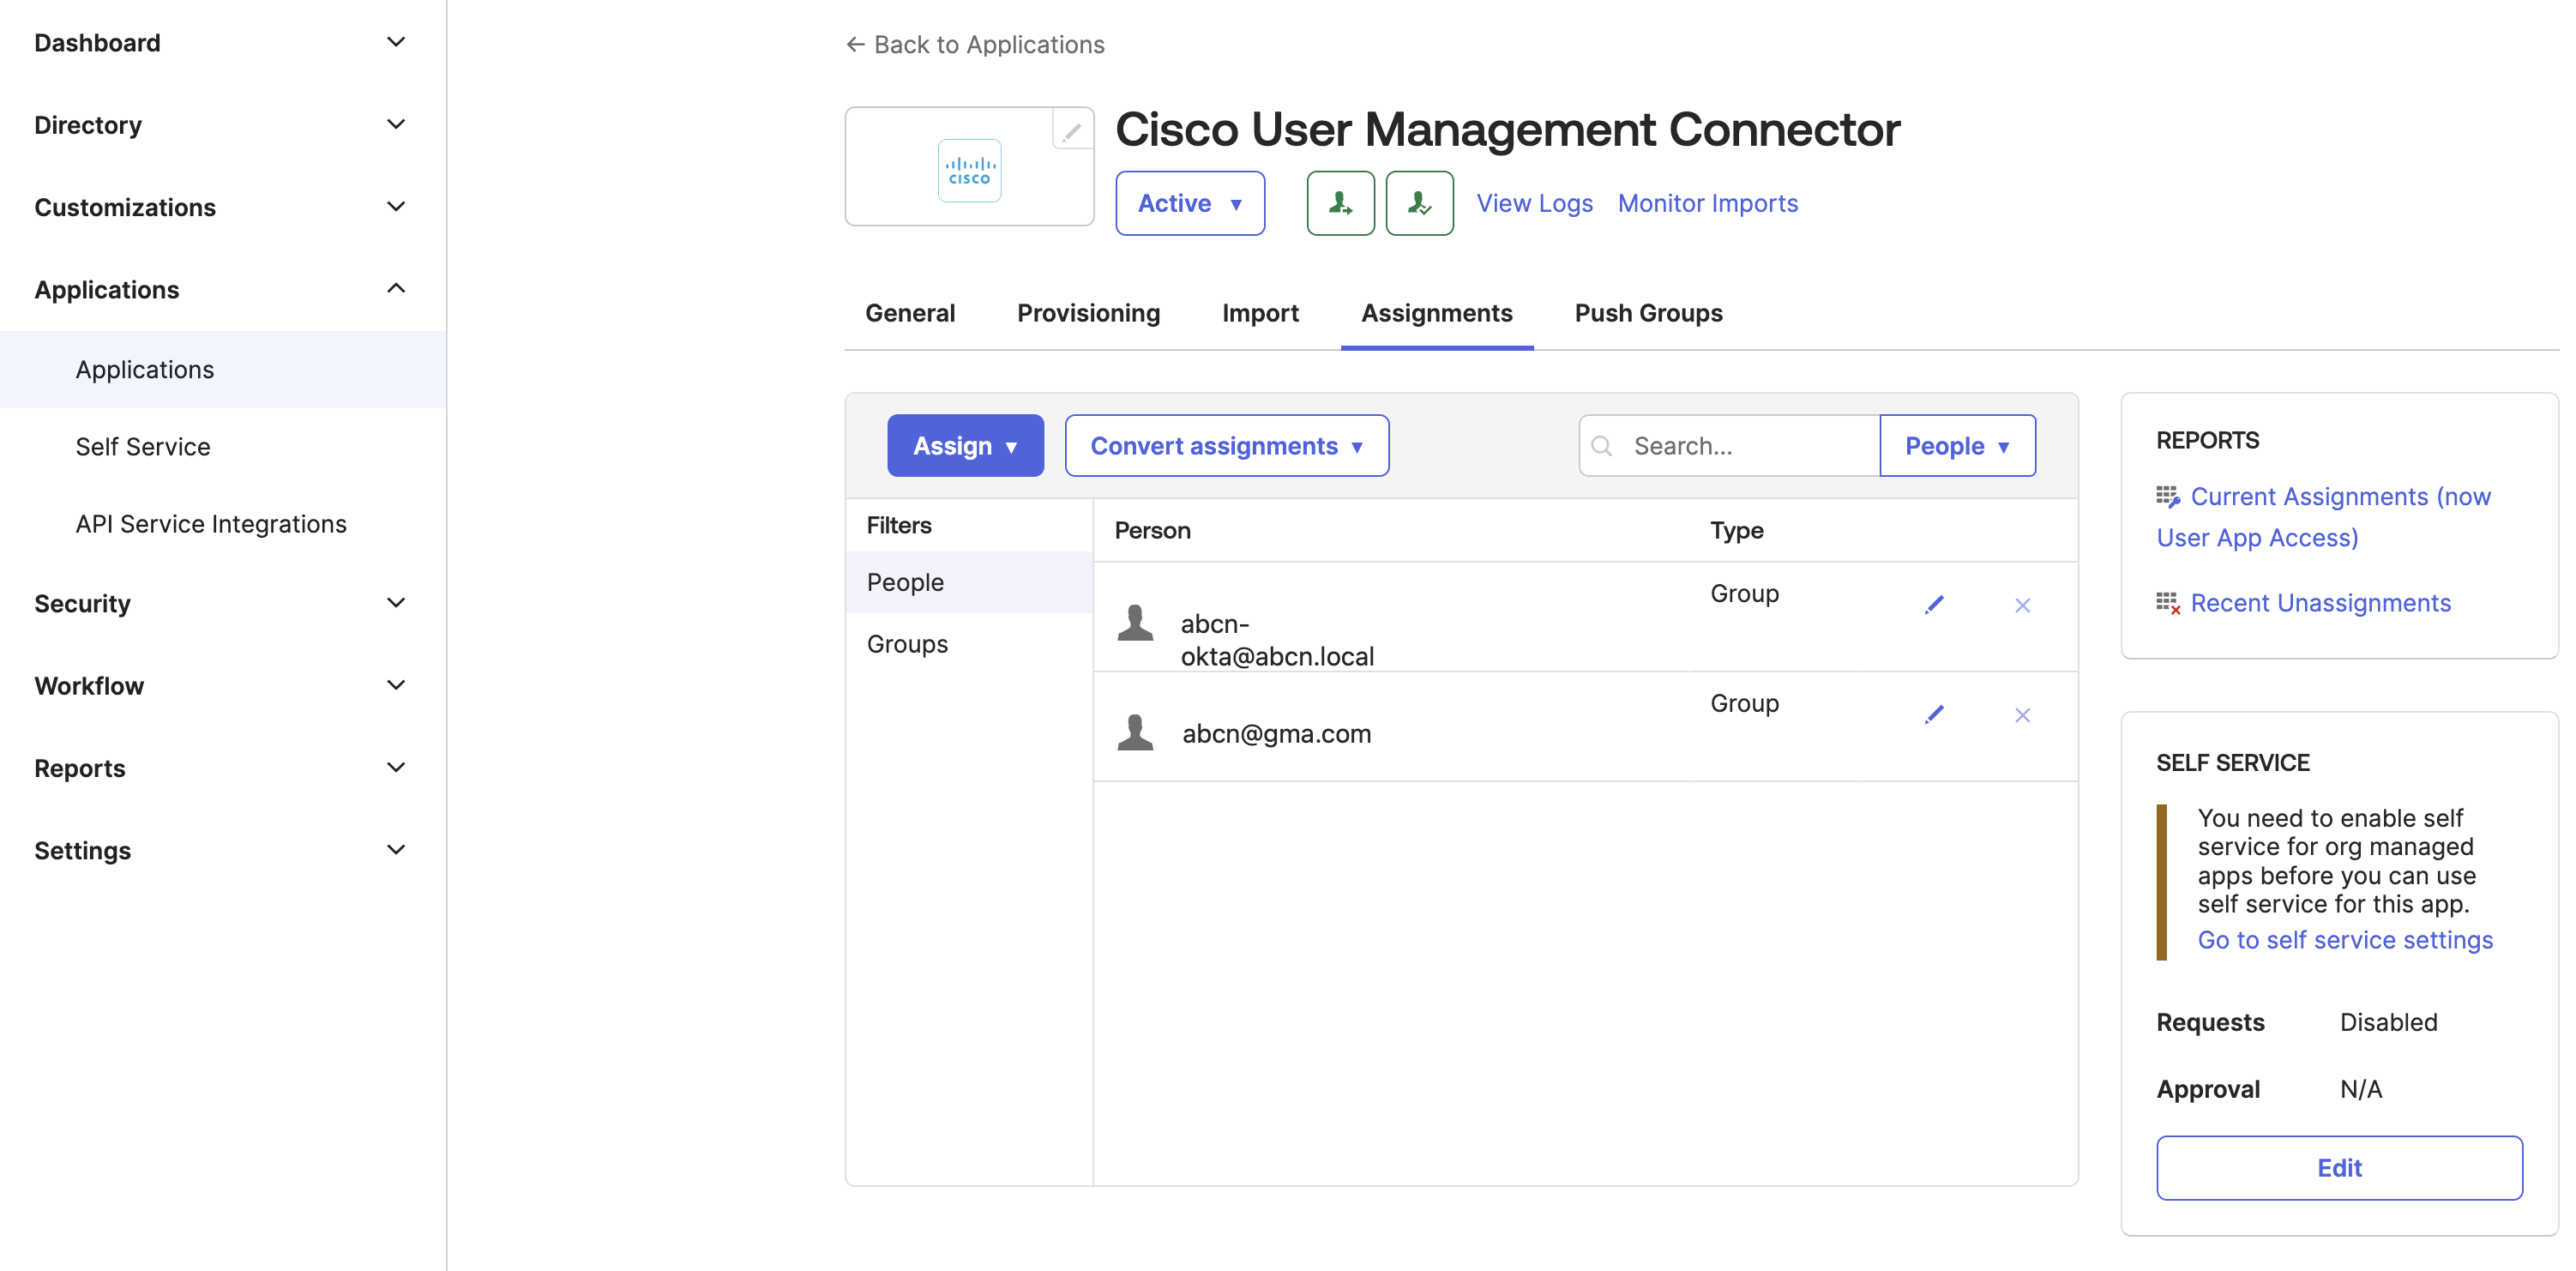
b. Navigate to Groups, and then click Assign.
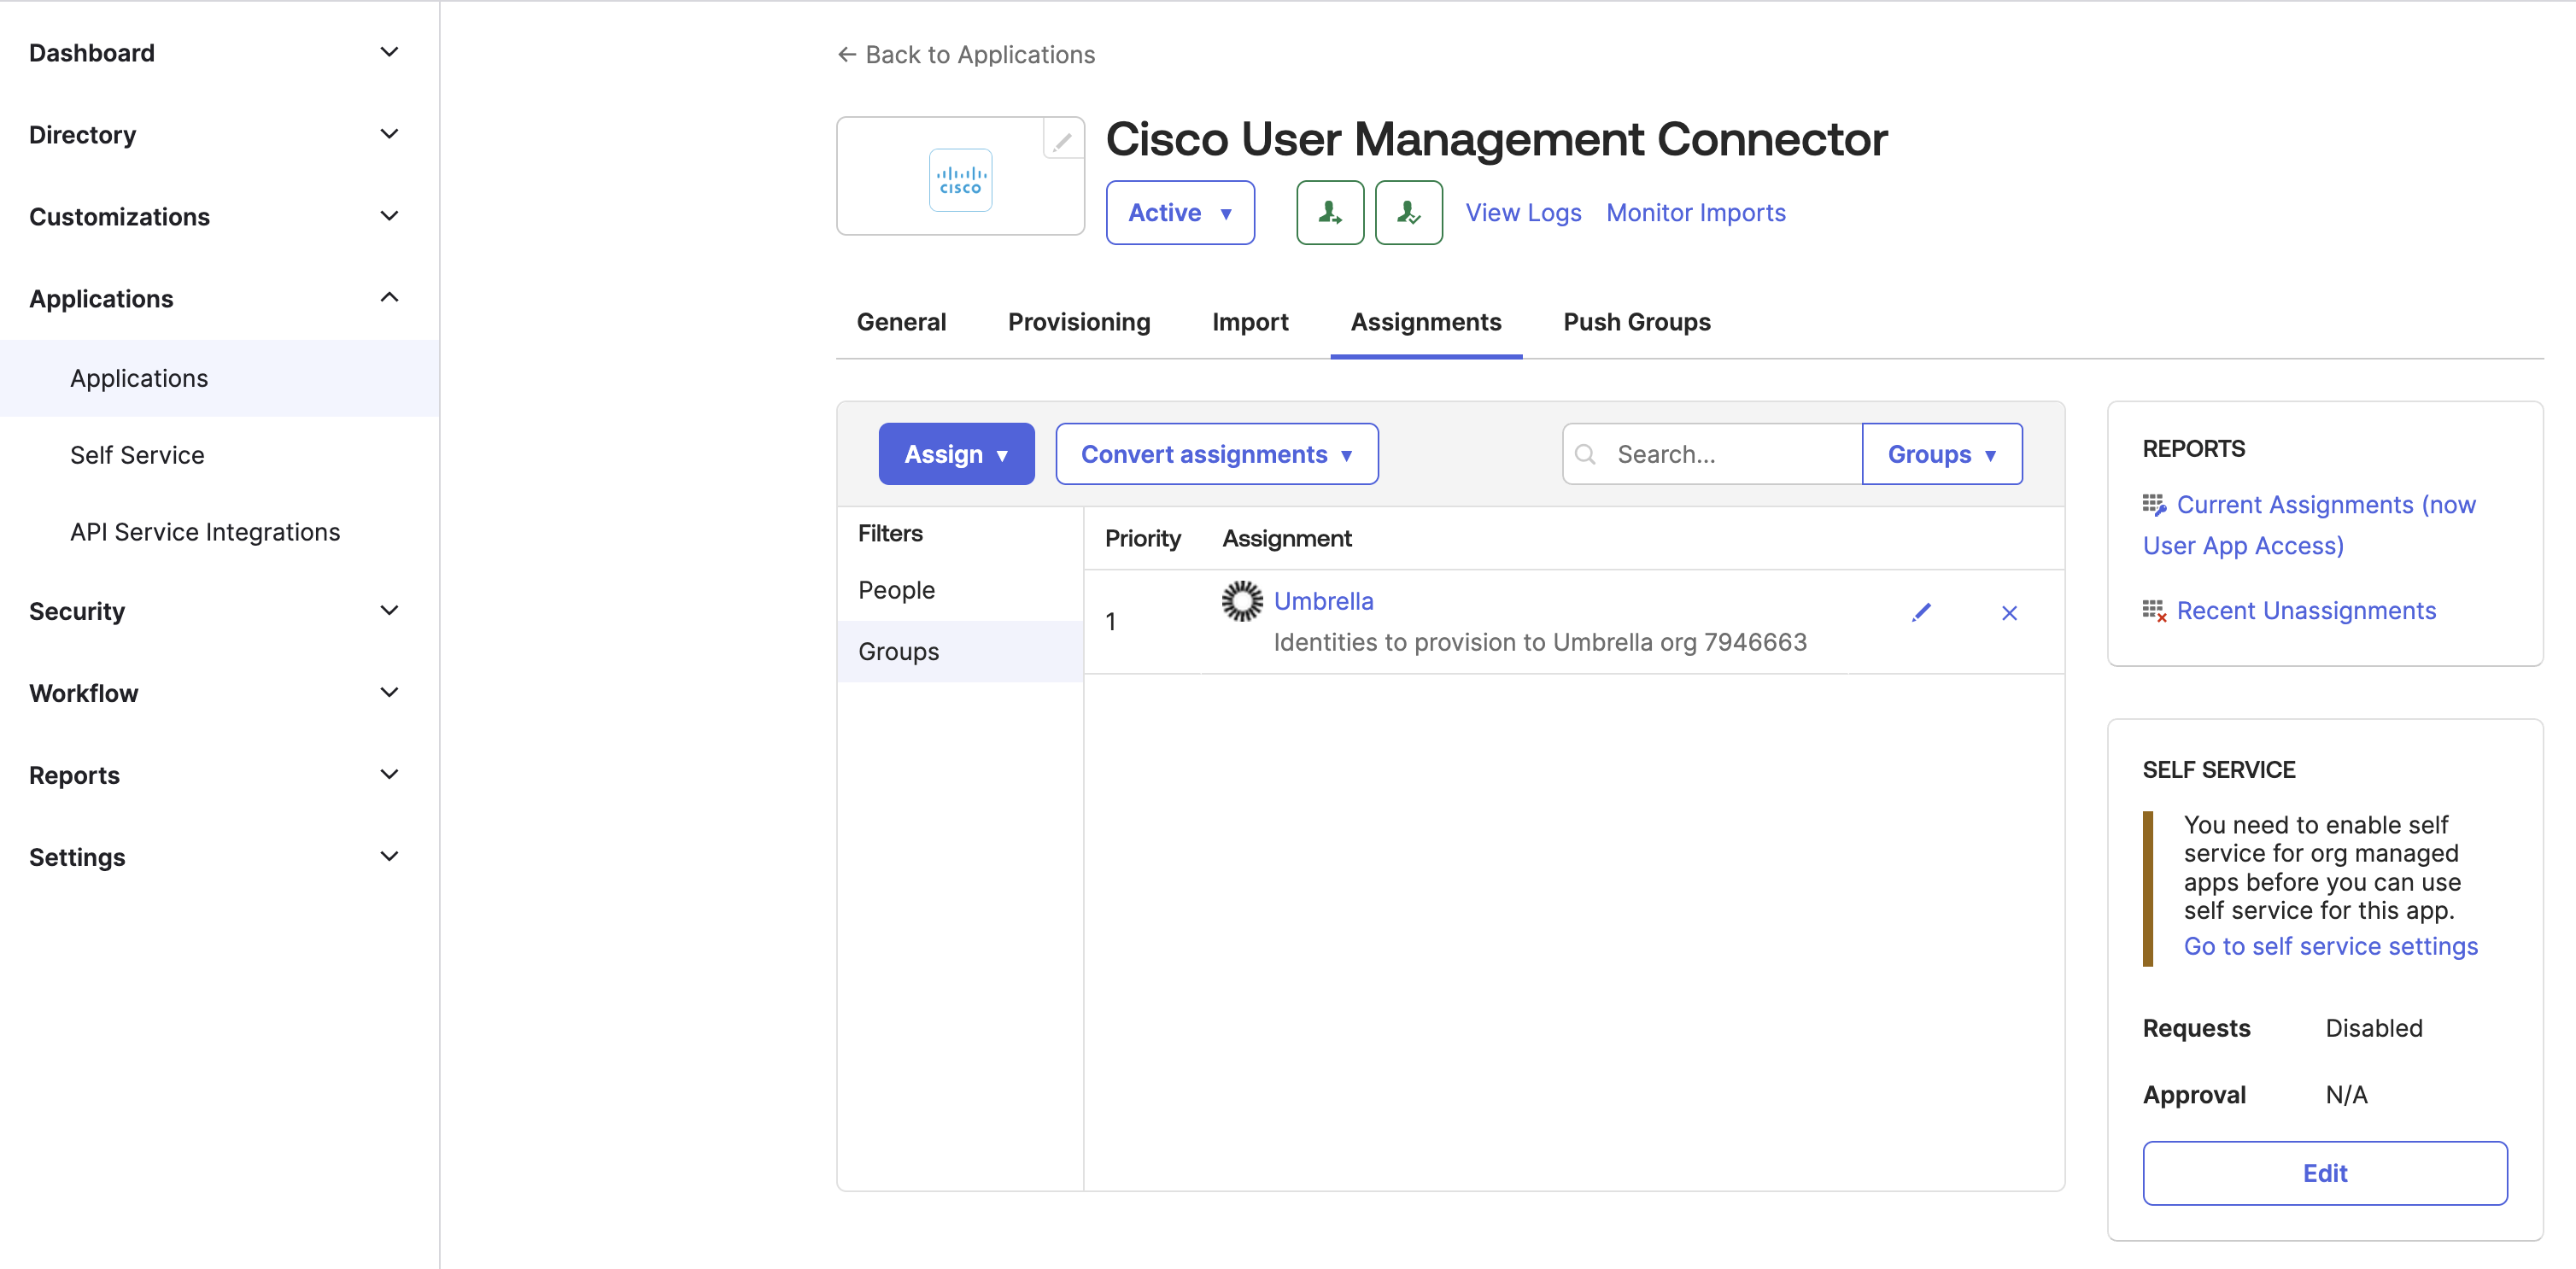
Important: Once users and groups are assigned, the app begins to provision the selected users to Secure Access. Wait for all users to show up in Secure Access before starting to push groups. The amount of time that it takes to sync groups and provision users with Secure Access depends on the number of users provisioned. We recommend that you confirm that all selected users provision from Okta to Secure Access.
Step 7 – Push Users or Groups from the App to Secure Access
-
Click the Push Groups tab in the app.
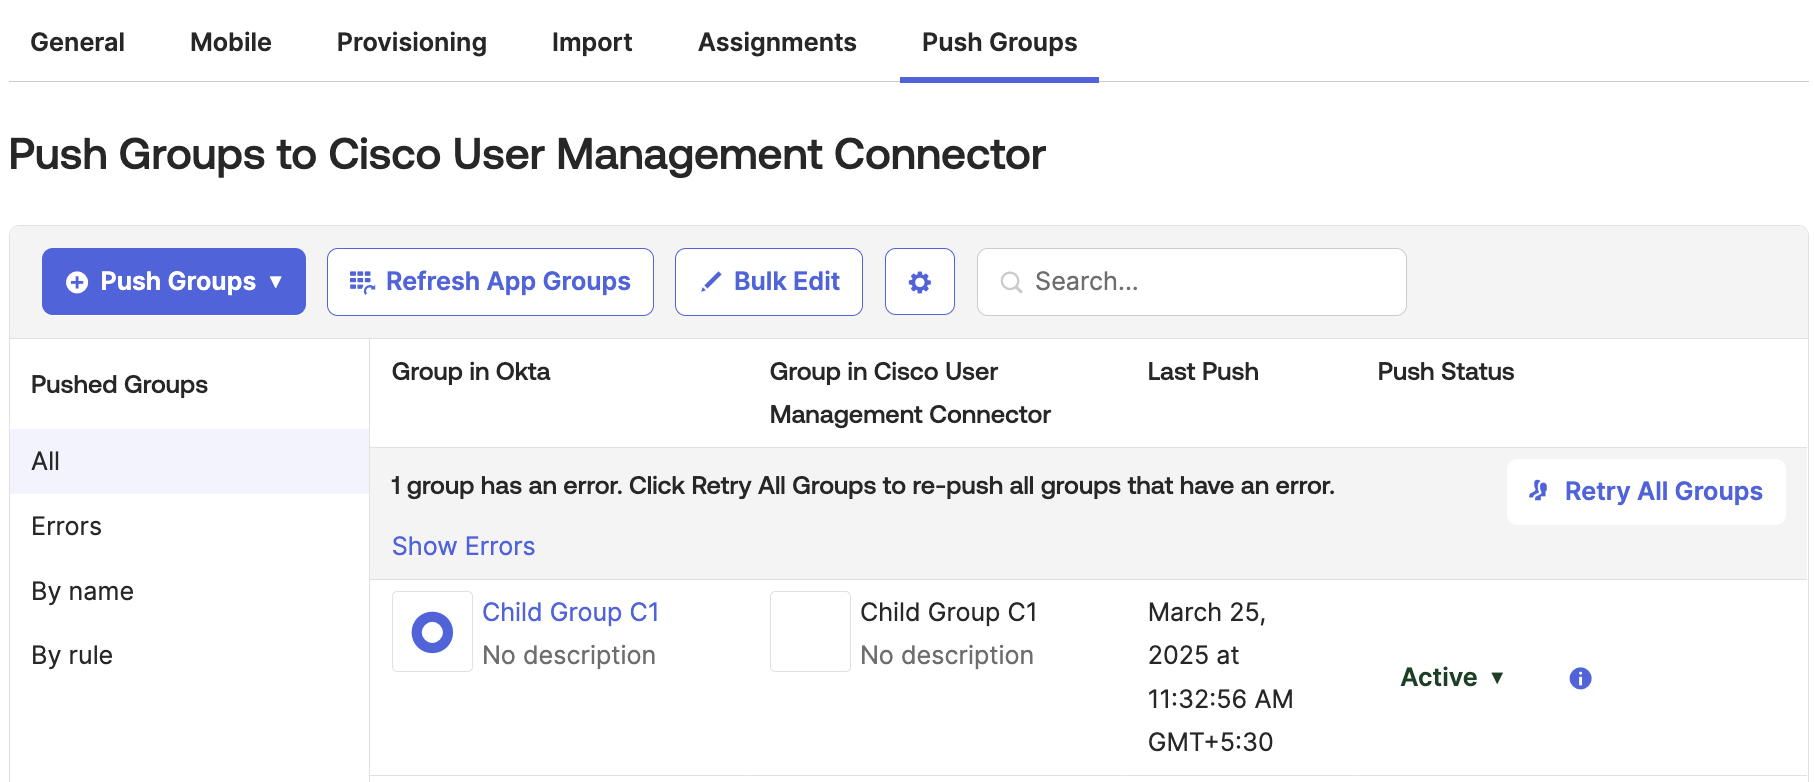
-
Sync specific groups to Secure Access.
Note: Pushing a group from Okta provisions the group in Secure Access only, and does not sync any users.If you push a group from Okta to Secure Access and the group includes users, then the app adds to the group in Secure Access any users assigned to the Okta app directly or in a group.
Note: Okta does not recommend pushing groups that are assigned to the app. If you have assigned the Everyone group to the app, you should not push the same group.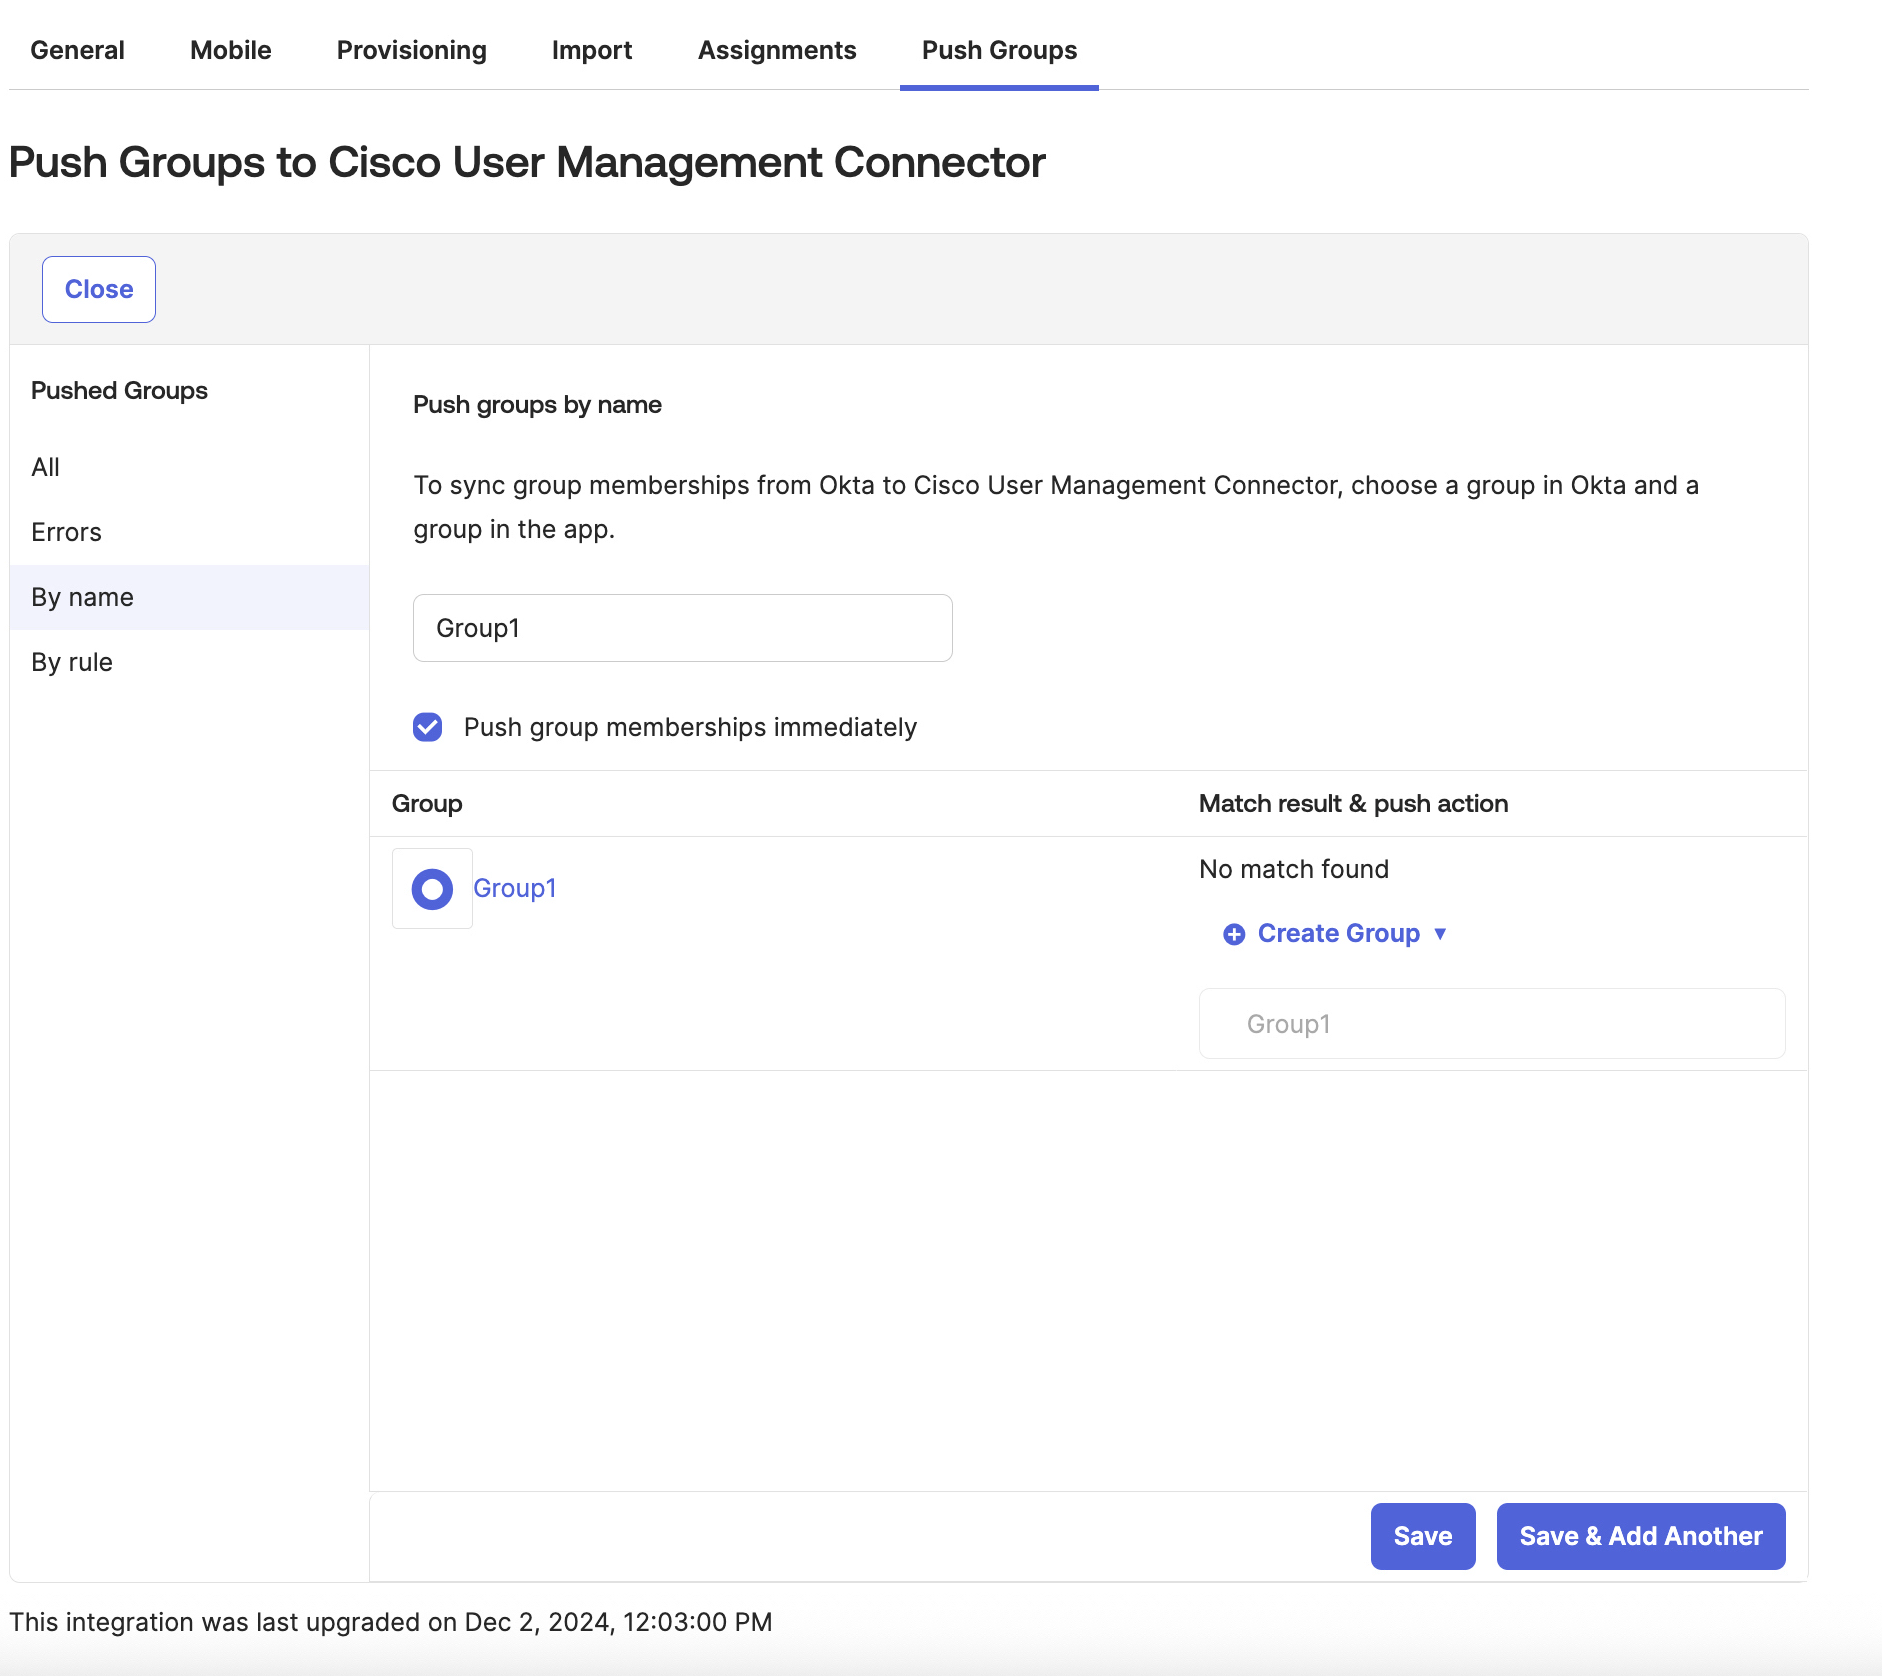
-
Click Save or Save & Add Another.
Step 8 – View Logs in the App
From the Cisco User Management Connector app in your instance of Okta, view the provisioning logs.
-
Navigate to View Logs on the Cisco User Management Connector app in Okta.
The app displays the progress of the provisioning.
View Provisioned Users and Groups in Secure Access
- Navigate to Connect > Users and Groups to view the users and groups provisioned from Okta.
- For more information, see View User Details.
- For more information, see View Group Details.
Refresh SCIM Token
To avoid disrupting the provisioning of users and groups, we recommend that you refresh the SCIM token in Secure Access at least once every 90 days and immediately copy the new token to the Cisco User Management Connector app in Okta. For more information about generating the SCIM token, see Add a Cloud Identity Provider.
The administrators in the Secure Access organization are responsible for refreshing the SCIM token. Secure Access does not perform this action.
Configure Identity Providers < Provision Users and Groups from Okta > Provision Users and Groups from Microsoft Entra ID
Updated 13 days ago