Add an AI Guardrails Rule to the Data Loss Prevention Policy
AI guardrails rules operate within the data loss prevention policy to monitor prompts, responses, and files embedded in prompts exchanged with AI applications. The rules define what types of data to monitor, and whether content should be blocked or only monitored.
An AI Guardrails rule must have at least one of the following two criteria defined:
- Data Classifications — Include files that match data classification of your own making or a built-in data classification provided by Secure Access.
- File Size — Include files that meet custom size criteria.
Prerequisites
- HTTPS Inspection must be enabled either on the default Access policy, or at least one access policy rule where the same identity is configured in an AI guardrails rule. For example, if the resource "Network A" is configured for an AI guardrails rule, it must also be configured for an access policy rule where HTTPS is enabled. For more information, see Manage Traffic Decryption and Manage Security Profiles.
- Full Admin user role. For more information, see Manage Accounts.
Procedure
- Navigate to Secure > Policy > Data Loss Prevention Policy, click Add Rule, and choose AI Guardrails Rule.
- Under Add New AI Guardrails Rule, give your rule a meaningful name and description.

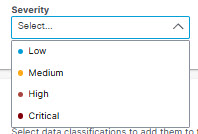
- Choose a severity for your rule based on the risk involved or importance within the ruleset.
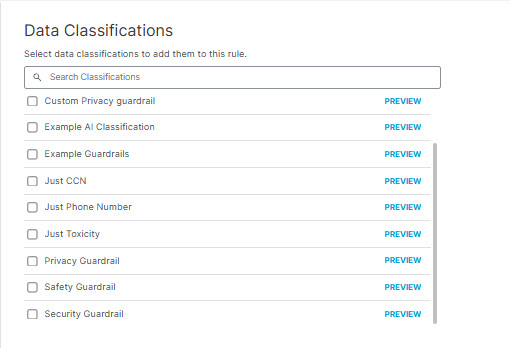
- Select AI guardrails classifications to apply this rule. You can choose a guardrails classification of your own making, or a built-in guardrails classification provided by Secure Access. (For more information, see Manage AI Guardrails Data Classifications.) Hover over PREVIEW to view data identifiers associated with each AI guardrails classification.
- The File Size area has two use cases:
- In a rule that specifies a custom file size but no other criteria, DLP applies the rule action to files that match the file size criteria, regardless of content. (This may be useful in situations where you want to exclude certain low-risk files below a certain size from inspection, so as not to waste processing time on insignificant events.)
- In a rule that specifies a custom file size along with other criteria such as Data Classification, the DLP applies the rule action to files that match the other criteria within the file size specified up to the first 50 MB of plain text. (Secure Access does not scan file content beyond the first 50 MB regardless of the file size specified here.)
In the File Size area choose from two options:
- All Sizes to scan up to the first 50 MB of plain text of all files that meet other criteria defined by this policy. (A rule that specifies All Sizes must also specify Data Classifications.)
- Custom Size to specify the minimum and maximum size limits the system will scan for files that meet other inclusion criteria defined by this rule, if there are any. If the file size exceeds the first 50 MB of the file, Secure Access scans only up to the first 50 MB of plain text in the file. (I.e., if you specify a minimum file size greater than 50 MB, Secure Access will not scan for other criteria specified in the rule.)
You can choose to apply the rule action only to files that are greater than a minimum size you specify, or to files that are within a range of sizes you specify. (If you specify a maximum size without specifying a minimum size, the minimum size defaults to 0.) You can specify file sizes in KB or MB.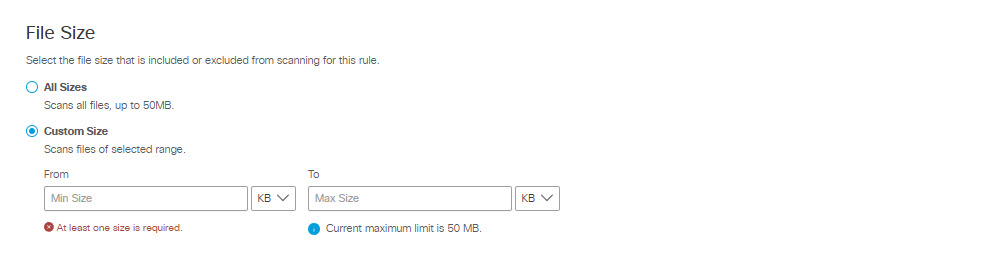
- Select Identities to apply to this rule.
- Select entire identity categories to include, or expand categories to select individual identities. Search for user name or by group name. Selected identities will appear in the box on the right.
Note: It is not possible to search for an application with fewer than three letters in its name—for example, "QQ" or "YY." These applications must be manually selected from the hierarchy under their respective categories, or wildcarded in search—for example, "QQ*". This behavior is by design.
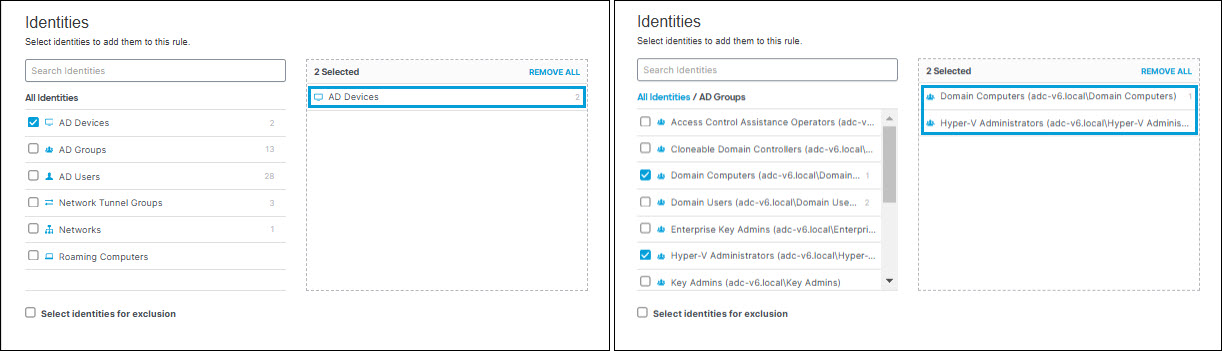
- Select Select identities for exclusion to exclude selected identities. Similarly to selecting identities for inclusion, you can select entire identity categories to exclude, or expand categories to select individual identities. Search for user name or by group name. Selected identities will appear in the box on the right.
Note: When an identity is selected for both inclusion and exclusion in a rule, it will automatically be excluded. Excluded identities always override included identities. Similarly, if an identity category is included on both an inclusion list and an exclusion list, the identity category will be excluded.
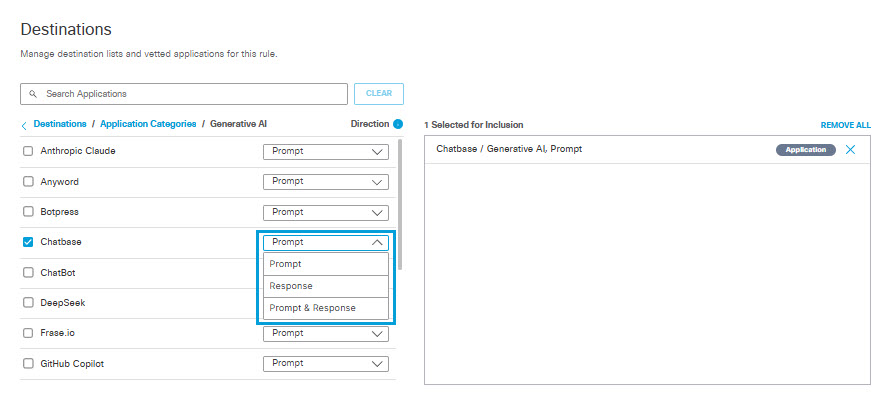
- Under Destinations, expand the destination categories and and check the boxes for the applications you want to add to the rule. You can search for an application by entering at least three consecutive letters from the application name in the search box.
Note: It is not possible to search for an application with fewer than three letters in its name—for example, "QQ" or "YY." These applications must be manually selected from the hierarchy under their respective categories, or wildcarded in search—for example, "QQ*". This behavior is by design.
For each application you can scan one of three traffic options: Prompt (from your system to the AI application), Response (from the AI application to your system), or Prompt & Response.
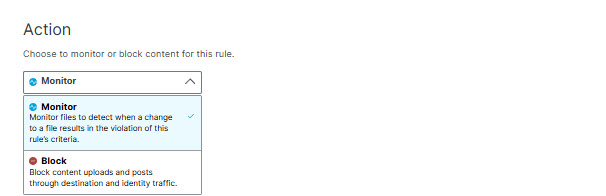
- Under Action, from the drop-down list, choose Monitor or Block.
- Monitor—Monitor file uploads and data submitted in web forms.
The rule will search for content that matches supported workflows (See Supported Applications) and policy-configured destinations and identities. - Block—Block file uploads.
The rule will search for content that matches supported workflows (See Supported Applications) and the policy-configured destinations and identities. When content matches these workflows, the rule blocks the content.
- Under User Notifications you can enable and configure an email notification to be sent to a user who performs an action that triggers a violation of the rule. You can use a default email template provided by the system, or create your own custom template.
Note: The system gets the "send to" address for the email from UPN field in the authenticated active directory. Some identity configurations may not be able to provide the end user's email address, in which case the system will be unable to send the email. These cases include:
- The user uses network or tunnel identities, in which case the user's IP address will be available to the system, but not the email address.
- The user did not authenticate through active directory, so the system has no information about the user.
- The user's email address is not stored in the UPN field in the authenticated active directory.
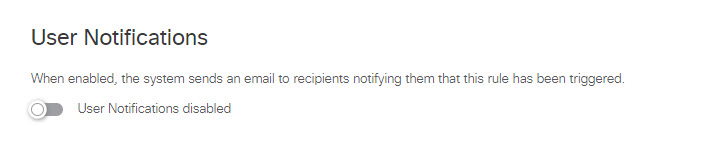
i. Enable user notifications.
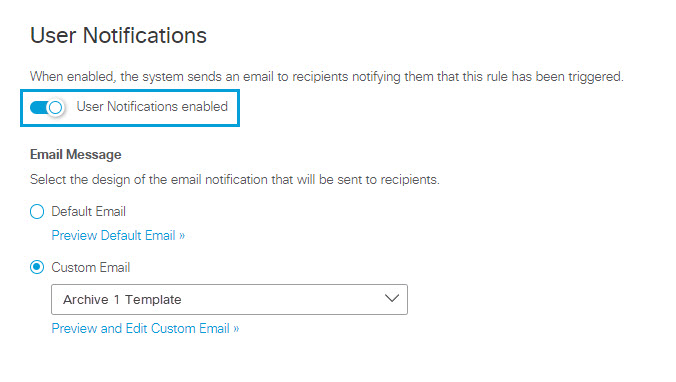
ii. Choose the email template:
To Use the Default Email Template:
a. Click Default Email.
b. To preview the content of the email that will be send to users, click on Preview Default Email. You can review the email subject line and text, but you cannot change it.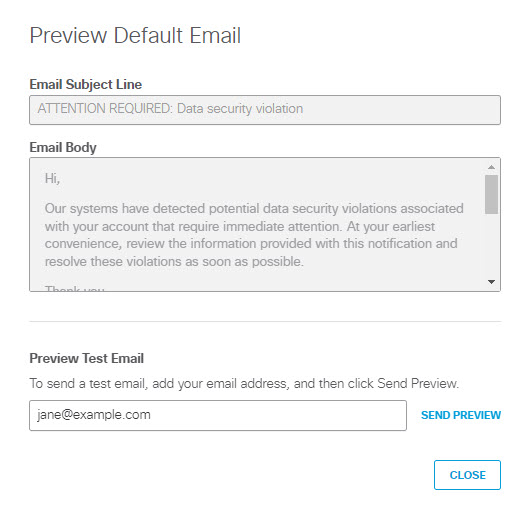
iii. (Optional) To send a test copy of the email to an address of your choosing, enter an address in Preview Test Email and click SEND PREVIEW to send the message. (By default the system uses the email address of the logged in user.)
iv. Click CLOSE to return to the Data Loss Prevention Policy page.To Use a Custom Email Template:
a. Click Custom Email.
b. From the drop down menu, select an existing custom template, or choose CREATE CUSTOM TEMPLATE. If you select an existing custom template, you can click Preview and Edit Custom Email to review and change the template.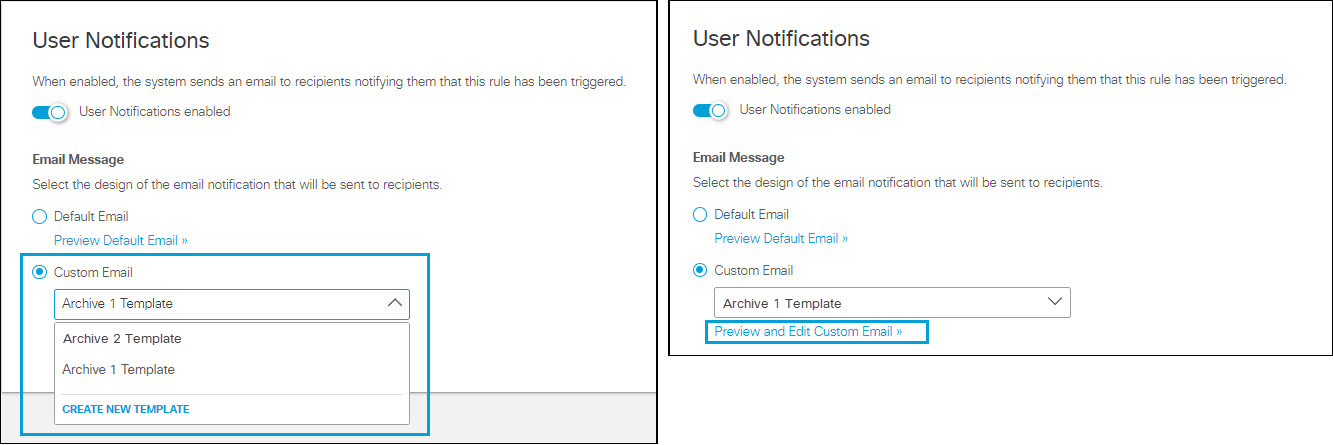
c. When you choose to create or edit a custom template for email notifications of policy violations you will see one of these two dialogs, which are almost identical:
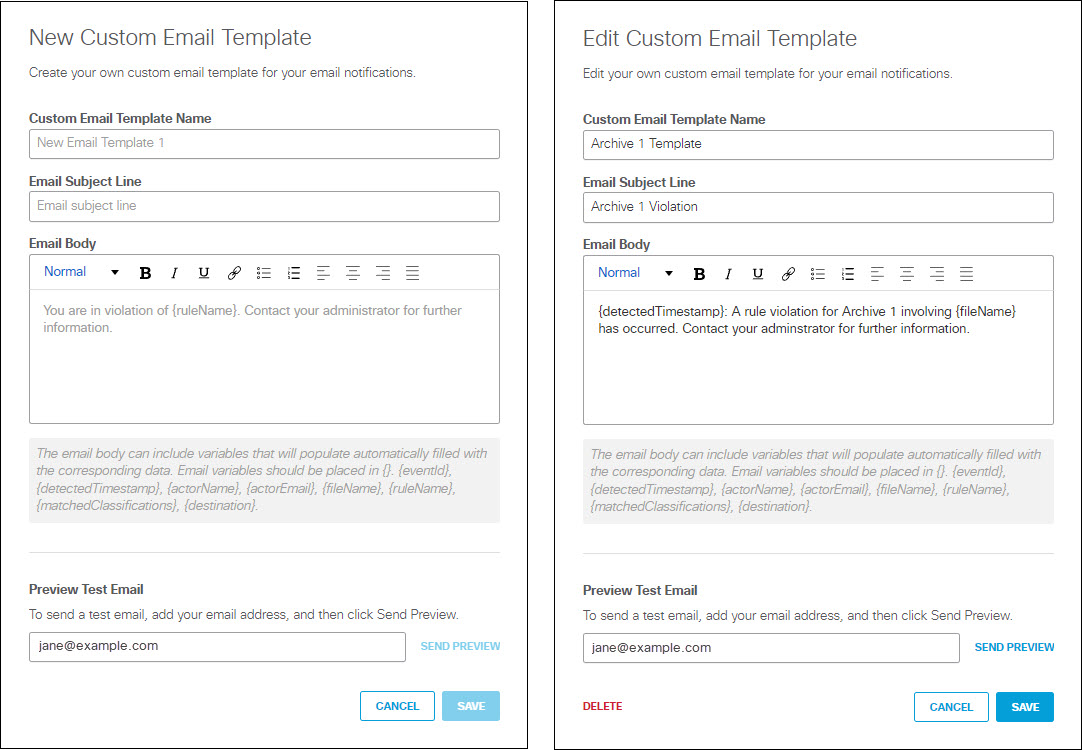
The Edit Custom Email Template includes a DELETE link which you can use to delete a custom template that is no longer needed. You may not delete a template that is in use by any rule.
To create a new template or change an existing template:
A. Enter a unique Custom Email Template Name.
B. Enter an Email Subject Line.
C. Enter the text of the email in the Email Body text box.
The email text can include the following variables, which you must enclose in braces ( {} ):
- {eventId} - The unique identifier the system generates for the policy violation event.
- (detectedTimestamp} - The date and time the violation was detected, formatted as shown in this example: "Oct 1, 2023 at 14:04 UTC"
- (actorName} - Name of the user whose action triggered the violation. (Secure Access gets this information from the authenticated Active Directory.)
- {actorEmail} - Email address of the user whose action triggered the violation. (Secure Access gets this information from the authenticated Active Directory.)
- {fileName} - Name of the data file that triggered the violation.
- {ruleName} - Name of the rule that was triggered.
- {matchedClassifications} - The guardrails classifications associated with the violation. (See Manage AI Guardrails Data Classifications.)
- {destination} - URL or IP address of the intended destination for the monitored request.
Note: The system replaces a variable with blank text if there is no value assigned to the variable or if an invalid variable name appears within the braces.
D. (Optional) To send a test copy of the email to an address of your choosing, enter an address in Preview Test Email and click SEND PREVIEW to send the message. (By default the system uses the email address of the logged in user.)
E. Click SAVE to return to return to the Data Loss Prevention Policy page.
- Click Save.
Note: All fields must have options selected to save.
Add a SaaS API Rule to the Data Loss Prevention Policy < Add a Real Time Rule to the Data Loss Prevention Policy > Discovery Scan
Updated about 2 months ago