Add an IP Pool
VPN profiles require that you configure at least one IP address pool in order to be fully-functional. Secure Access provides IP pool configurations to organize the parameters used to secure the request and response traffic of your VPN profiles. Typically, IP pools would be used to reserve resources for particular users or groups or to make sure that certain ranges are used for particular purposes
Table of Contents
Prerequisites
- Full Admin user role. For more information, see Manage Accounts.
Procedure
Add an IP pool that is used to manage a set of IP addresses for your VPN profile. Optionally, add a RADIUS group for VPN profiles.
Add an IP Pool
To configure IP address pools for remote access VPNs, complete the following steps:
- Navigate to Connect > End User Connectivity > Virtual Private Network.
- Under Regions and IP Pools, click Manage.
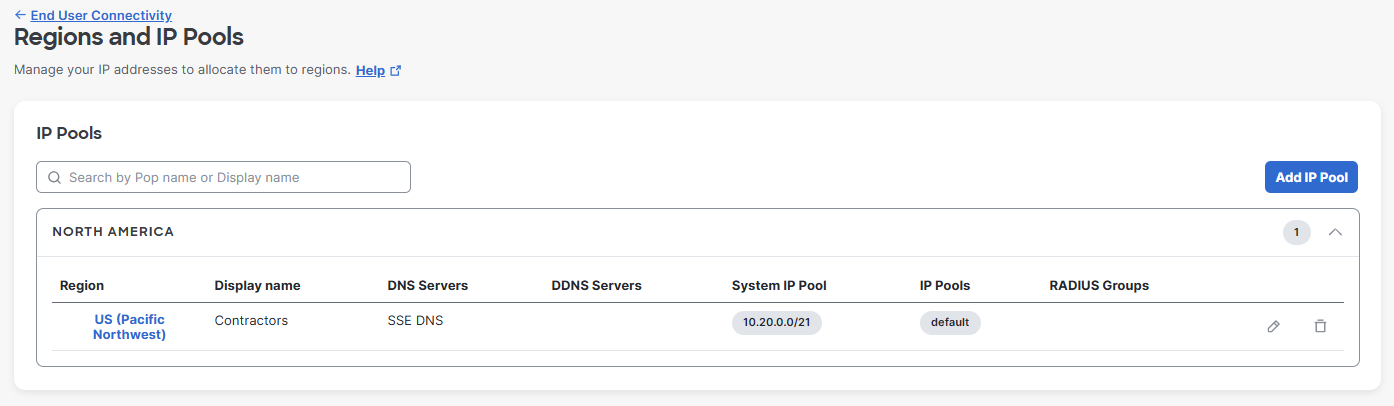
This opens the Regions and IP Pools pane. Each region requires unique IP pools for endpoint device remote access VPN connections.
-
Click Add IP Pool to add a set of IP addresses for a VPN profile.
-
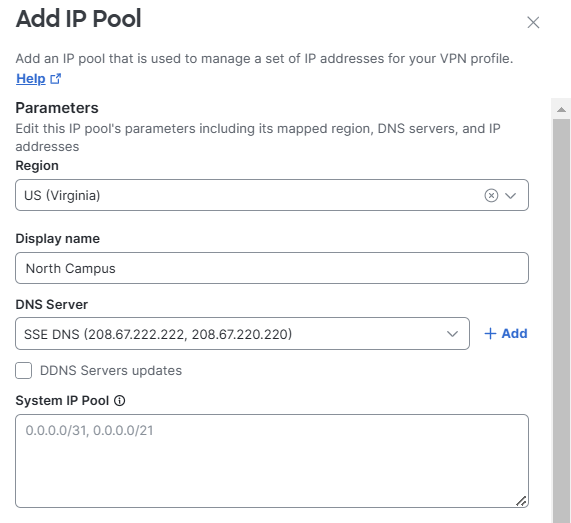
Configure the Parameters for this IP pool, including its mapped region, DNS servers, and IP addresses.
-
Select a Region for this IP pool from the drop-down.
-
Enter a Display Name for the region.
-
Choose a pair of DNS Servers from the drop-down, or click Add to add a new DNS pair.
-
Add a System IP Pool for administrative access to remote services. The System IP Pool is the network from which Secure Access as a system obtains an IP address to talk to services hosted in customer data centers.
- You can add IP ranges from /28 to /21, up to five subnets.
- Note that the subnets added for System IPs limit the overall amount of IPs available to the regional IP pools.
-
-
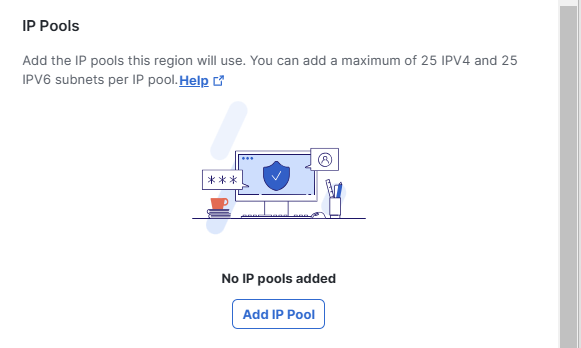
Scroll down to IP Pools and click Add IP Pool to add IP pools for the selected region.
-
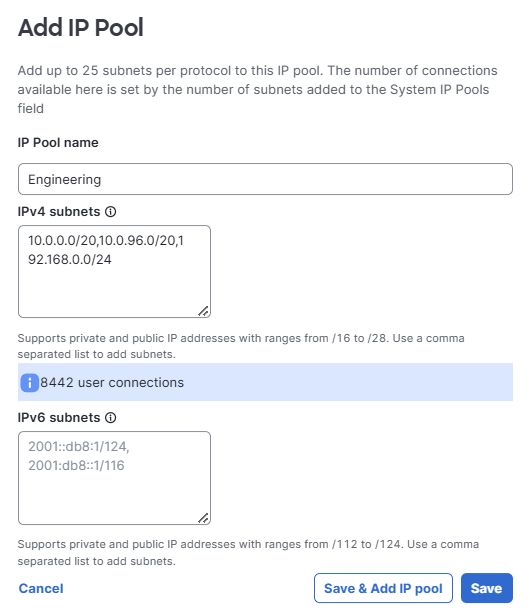
Configure the Add IP Pool parameters:
-
Add a meaningful IP Pool name. An distinctive, easily recognized name is helpful when assigning IP pools and configuring VPN profiles.
-
Add IPv4 subnets for use with remote access VPN endpoints. Each endpoint will be assigned an IP address from the defined IP pool. Supports ranges from /28 to /16. You can add multiple comma-separated ranges.
-
Optionally, you can add IPv6 subnets for use with remote access VPN endpoints. Each endpoint will be assigned an IP address from the defined IP pool. Supports ranges from /112 to /124. You can add multiple comma-separated ranges.
-
-
Click Save & Add IP Pool when you are done. Click Save to save any edits to an IP address pool.
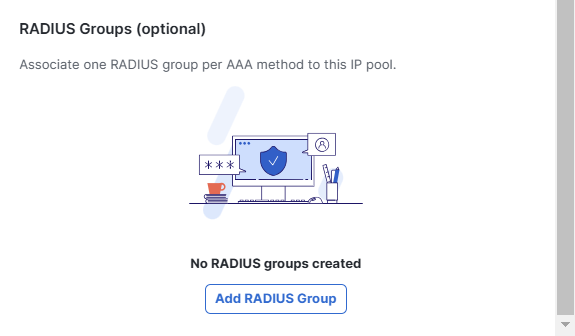
Add a RADIUS Group (optional)
This section describes how to configure a RADIUS group and add servers to the group. This RADIUS group can be applied to the IP pool being configured and mapped to other IP pools.
-
Optionally, scroll down to RADIUS Groups (optional) and click Add RADIUS Group associate a RADIUS group to this IP pool.
-
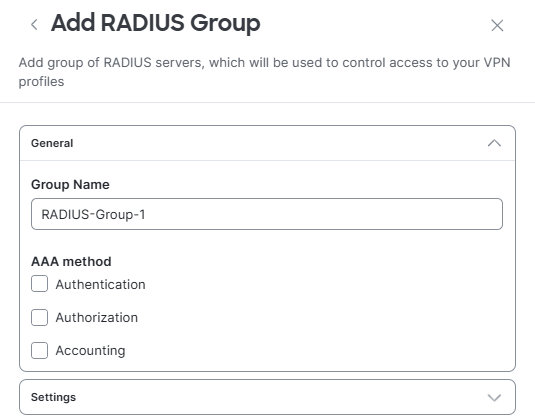
Enter a meaningful Group Name for this RADIUS group.
-
Choose the AAA methods to apply to this RADIUS Group. Choose at least one method. Note: If both the Authentication and Authorization methods are selected, the same port number must be used.
-
Authentication - Enter the RADIUS authentication Port number. The valid range is from 1 to 65535.
The default is 1812.Check Microsoft CHAPv2 to use Microsoft Challenge Handshake Authentication Protocol Version 2 as the authentication method.

-
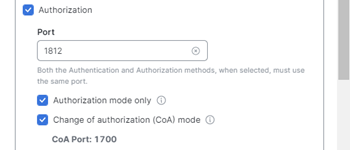
Authorization- Enter the RADIUS authorization Port number. The valid range is from 1 to 65535.
The default is 1812.When you check Authorization mode only, no common password is required.
When you check Change of authorization (CoA) mode, the RADIUS server group will be registered for CoA notification. If you enable CoA, the listening port for RADIUS CoA requests uses the default of 1700. Select this option when using this server group for ISE Policy Enforcement in remote access VPNs.
-
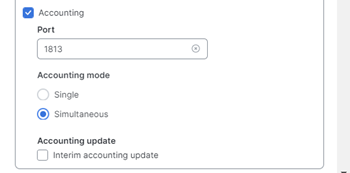
Accounting- Enter the RADIUS accounting Port number. The valid range is from 1 to 65535. The default is 1813.
Select the Accounting mode, either Single or Simultaneous. In single mode, accounting data is sent to only one server. In simultaneous mode, accounting data to all servers in the group.
For Accounting update, select Interim accounting update to enable the periodic generation of RADIUS interim-accounting-update messages.
-
-
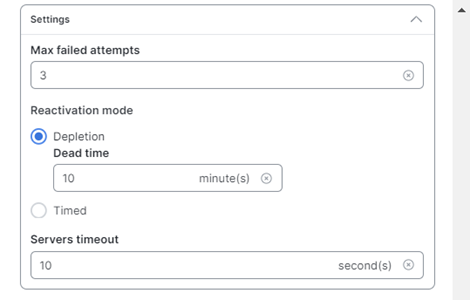
Configure the method (Reactivation mode) by which failed servers in a group are reactivated:
- Set the Max failed attempts to specify the maximum number of failed AAA transactions with a RADIUS server in the group before trying the next server. The range is from 1 and 5. The default is 3.
- Choose Depletion, Dead time to reactivate failed servers only after all of the servers in the group are inactive.
This is the default reactivation mode. Specify the amount of time, between 0 and 1440 minutes, that
elapses between the disabling of the last server in the group and the subsequent reenabling of all servers.
Deadtime applies only if you configure fallback to the local database; authentication is attempted locally
until the deadtime elapses. The default is 10 minutes. - Choose Timed to reactivate failed servers after 30 seconds of down time.
- Set the Servers timeout setting. Enter the number of seconds to wait for a response from a RADIUS server (in seconds). The default is 10 seconds.
-
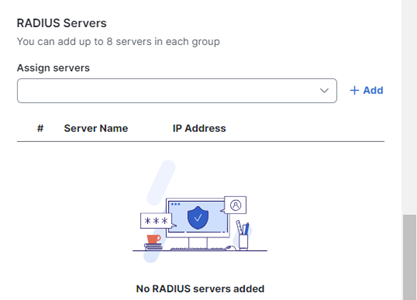
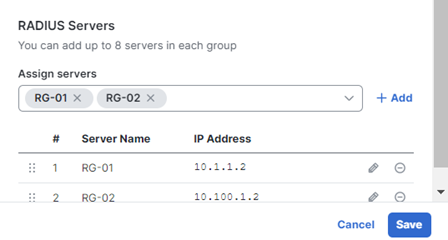
Scroll down to RADIUS Servers and click Add.
You can add up to eight servers to each RADIUS group.
-
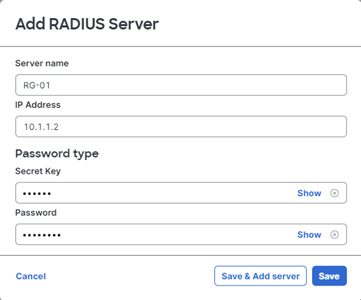
Enter a meaningful Server name, an IP Address, and a Secret Key/Password combination and click Save & Add server.
-
Click Save when you are done adding servers to complete the RADIUS Group.
Manage IP Pools < Add an IP Pool > Manage RADIUS Servers and Groups
Updated 6 months ago