Manage Secure ICAP
You can forward the payload of Realtime DLP violations to on-premises DLP solutions using the secure Internet Content Adaptation Protocol (ICAP). Through ICAP, Secure Access DLP sends the payload that triggers a Realtime rule violation to an on-premises DLP.
To add Secure ICAP integration, define the ICAP server information in Secure Access as described in this topic.
Once you have established an ICAP connection, by default the payload of all active Realtime DLP rule violations will be sent over ICAP. You can disable this on a rule-by-rule basis; see Add a Real Time Rule to the Data Loss Prevention Policy for more information.
Prerequisites
- Full Admin user role. For more information, see Manage Accounts.
- You must have the ICAP server endpoint URI.
- You must have the SSL certificate for the ICAP server.
- To prevent abuse of the API connection, we recommend you allow only the following IP addresses to your firewall:
- 3.234.7.118
- 54.90.48.200
- 54.153.85.86
- 184.72.63.136
- 50.18.191.74
In addition, EU customers should add the following IP addresses to that list:
- 3.120.233.38
- 3.65.158.141
- 18.168.8.192
- 18.132.93.175
Secure ICAP Integration
- Navigate to Admin > Authentication.
- Expand the ICAP section and click Add Secure ICAP Endpoint.
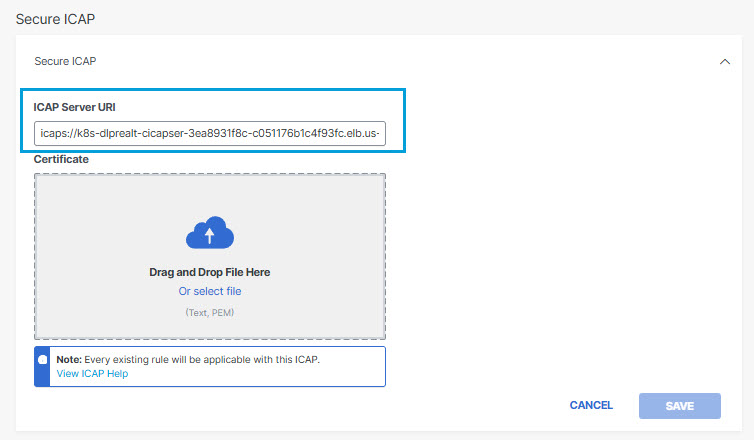
- Enter the ICAP Server Endpoint URI. (For example, icaps://k8s-dlprealt-cicapser-3ea8931f8c-c051176b1c4f93fc.elb.us-west-1.amazonaws.com:11344/echo)

- Provide the ICAP server Certificate that will be used when the ICAP server requests client authentication. Use one of the following methods:
Drag and drop the certificate from your local system to the designated place on the screen.
-or-
Click Or select file, navigate to the certificate on your local system, and select the file to upload.

- Click Save.
- The display will reflect when the connection is successfully established.

Modify an ICAP Server Connection
- Navigate to Admin > Authentication.
- Click EDIT next to the displayed ICAP server connection information.

- Enter new values for the ICAP Server Endpoint URI, the server Certificate, or both. (See Steps 3 and 4 of Secure ICAP Integration ).
- Click SAVE.
- The system will attempt to reestablish the connection to the ICAP server with the new parameters and report success or failure.
Disconnect from an ICAP Server
- Navigate to Admin > Authentication.
- Choose the ICAP server connection to disconnect and click REVOKE.

- Click DELETE to confirm your choice.

- The system will delete the URI and certificate for the connection; the connection will no longer be available for real time rules that have information sharing through ICAP enabled.
Individual Data Identifiers < Manage Secure ICAP > Manage SaaS API Data Loss Prevention
Updated 5 months ago

