Deploy the Secure Access PAC File for Windows
The Cisco Secure Access secure web gateway (SWG) requires that you deploy a proxy auto-config (PAC) file URL on a user device's browser to successfully reach web resources. If you are behind a firewall, you may also need to deploy the Secure Access's PAC file on the browser so that it points to the correct proxy server. A PAC file is only used with the Secure Access Internet Security.
After an organization's administrator adds bypass domains in Secure Access, the Secure Access PAC file contains the list of configured bypass domains. Web traffic to these domains is not sent to the SWG. For more information, see Manage Internet Security Bypass.
Table of Contents
- Prerequisites
- Copy URL for Default PAC File or Custom PAC File
- Deploy the Secure Access PAC File URL for Chrome and Edge Browsers
- Deploy the Secure Access PAC File URL for Firefox
Prerequisites
- Full Admin user role. For more information, see Manage Accounts.
- To download the Secure Access PAC file or custom PAC files on a user device in the organization, the device must either:
- Connect to Secure Access on a Registered Network or Network Tunnel, or
- Deploy the Cisco Secure Client with the Umbrella Roaming Security module on the user device.
Supported Versions of the Secure Client for PAC Files
You must have a version of the Cisco Secure Client that supports the integration of PAC Files. For information about downloading the Cisco Secure Client software packages, see Download Cisco Secure Client.
For Windows, download and deploy the Cisco Secure Client version 5.1.8.105 (cisco-secure-client-win-5.1.8.105-predeploy-k9.msi) or newer.
Copy URL for Default PAC File or Custom PAC File
Copy the URL for the default Secure Access PAC file or a custom PAC file that you uploaded to Secure Access.
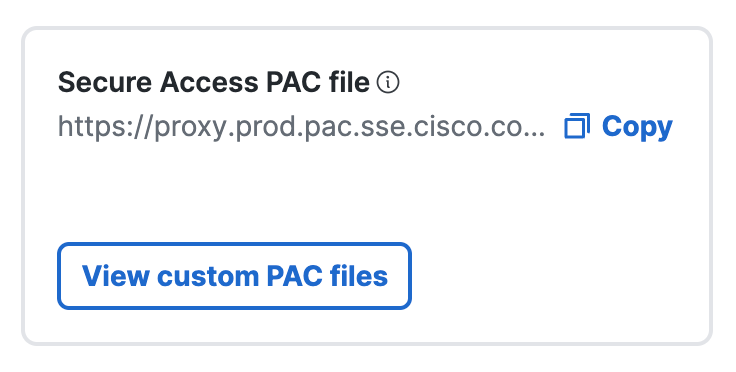
Copy URL for the the Secure Access PAC File
- Navigate to Connect > End User Connectivity > Internet Security.
- For Secure Access PAC file, click Copy to get the URL for the Secure Access PAC file.
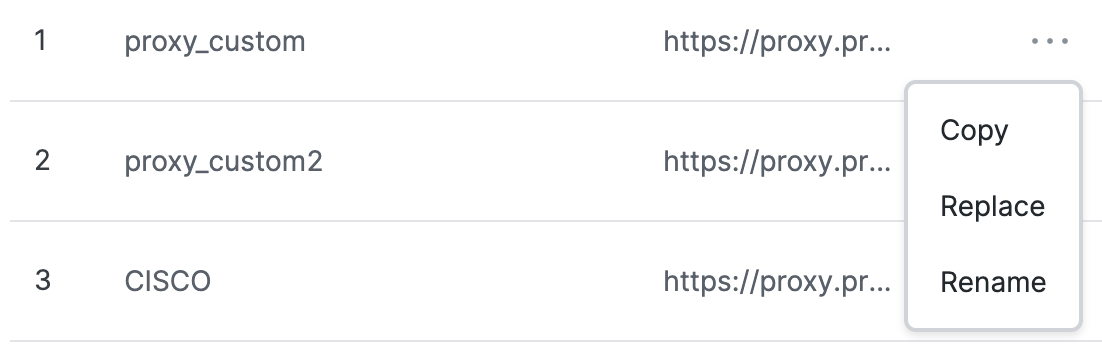
Copy URL for Custom PAC File
-
Navigate to Connect > End User Connectivity > Internet Security.
-
Click View the custom PAC files.
-
Navigate to a custom PAC file, and then click the ellipsis (...).
-
Click Copy, and then copy the URL for the custom PAC file.
Procedure
Note: Operating system (OS) and browser functionality can change at any time. We can not guarantee that these third-party procedures will remain accurate. For more information on deploying a PAC file URL to your browser, see your OS and browser's Help.
Deploy the Secure Access PAC File URL for Chrome and Edge Browsers
Get the URL for the Secure Access PAC file or a custom PAC file. For more information, see Copy URL for Default PAC File or Custom PAC File.
- In Windows, navigate to Start > Settings > Network & internet > Proxy.
- For Automatic proxy setup, click Set up.
- Set Use setup script to On.
- For Script Address, paste the Secure Access PAC file URL.
- Click Save.
Deploy the Secure Access PAC File URL for Firefox
Get the URL for the Secure Access PAC file or a custom PAC file. For more information, see Copy URL for Default PAC File or Custom PAC File.
- In Firefox, navigate to Settings, scroll to Network Settings, and then click Settings.

- Select Automatic Proxy Configuration URL and paste the Secure Access PAC file URL.
- Click OK.
Manage PAC Files < Deploy the Secure Access PAC File for Windows > Deploy the Secure Access PAC File for macOS
Updated 5 months ago