Configure Cisco Secure Client Settings
You can configure the Cisco Secure Access Internet Security in Secure Access for end users.
Note: User devices must have the Cisco Secure Client deployed with the Umbrella Roaming Security module or deploy a PAC file for the browsers in the environment.
This guide describes the steps to enable the DNS and web security settings and advanced internet security settings in Secure Access for the end user devices in the organization.
Table of Contents
Prerequisites
- Full Admin user role. For more information, see Manage Accounts.
Procedure
Configure the Cisco Secure Client internet security settings. The advanced internet settings contains several fields that provide additional control over user authentication, traffic bypass, and VPN compatibility.
- Navigate to Connect > End User Connectivity.
- On the End User Connectivity page, click the Internet Security tab.

- Select a tab and then options on that tab:
- DNS and Web Security
- Advanced
Configure Security Settings
Configure DNS and Web Security
Configure DNS and web security settings for the Cisco Secure Client.
Note: The Secure Access DNS-layer security is always enabled on the Cisco Secure Client.
The Cisco Secure Client with the Umbrella Roaming Security module steers web traffic on ports 80/443 to the Secure Web Gateway (SWG). All web traffic is evaluated against the organization's policy and Internet Access rules when a VPN connection is not established.
Note: You can override this option on individual roaming devices.
- Enable the Web Security (port 80/443 traffic only) toggle button.

Configure Advanced Security Settings
Use Active Directory for Access Policy
Enable the Cisco Secure Client to synchronize users and groups identities with the Secure Access Active Directory (AD) Connector. Secure Access applies Access rules for user identities, which are associated with devices that have deployed the Cisco Secure Client.
- Enable the Use Active Directory for Access Policy toggle button.

Third Party VPN Compatibility
Improve compatibility for third-party VPN clients on Windows 10 only, or if the local DNS is not resolving resources.
The Cisco Secure Client with the Umbrella Roaming Security module works with most VPN software. However, the Cisco Secure Client with the Umbrella Roaming Security module and other VPN profiles may not resolve local DNS queries correctly on a VPN connection with Windows 10. The local LAN may bind above the VPN, failing to resolve local DNS requests over the tunnel. Select this setting to apply the legacy binding order behavior.
- Enable the Third Party VPN Compatibility toggle button.

DNS Protection
Choose one of the following options to provide DNS protection:
- Full Protection: Provides protection for single stack IPv4 network, dual stack IPv4 and IPv6 network, and single stack IPv6 network.
- Limited Protection: Provides protection for single stack IPv4 network, and dual stack IPv4 and IPv6 network.
- Legacy Protection: Provides protection for single stack IPv4 network only.

The previous dashboard configuration for IPv6 DNS protection allowed enabling protection over IPv6.

This earlier configuration is now replaced with the new DNS protection options described above.
- If the earlier IPv6 DNS protection configuration was disabled, the new configuration defaults to Legacy Protection.
- If the earlier IPv6 DNS protection configuration was enabled, the new configuration defaults to Limited Protection.
Note : For optimal security, we recommend using the Full Protection configuration, available in Cisco Secure Client 5.1.10.233 (MR 10) or later.
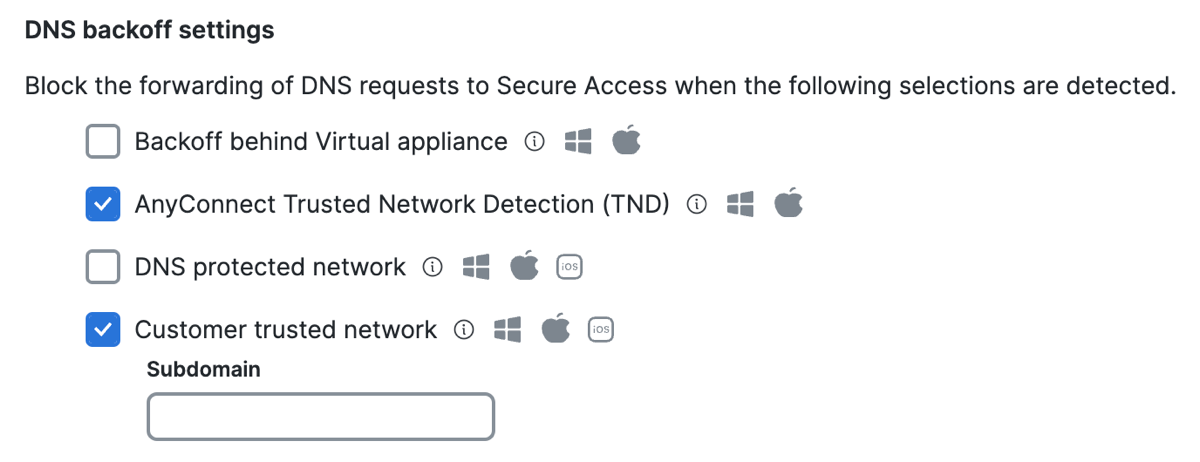
DNS Backoff Settings
Bypass DNS traffic from Secure Access for the following contexts:
- Select Backoff behind Virtual appliance.
When enabled and the Cisco Secure Client detects a Secure Access Virtual Appliance (VA), DNS traffic goes through the local network instead of redirecting to Secure Access. - Select AnyConnect Trusted Network Detection (TND) to disable DNS traffic forwarding from an endpoint to Secure Access if the network is trusted. This setting requires that you have the Trusted Network Detection (TND) setting enabled in the AnyConnect VPN profile for the user devices.
- Select DNS protected network to disable DNS traffic forwarding while on a network protected by Secure Access.
Relies on the protection of the network. To trigger this setting, you must register the public network in Secure Access and add the network to a rule that has a higher priority than the roaming devices. In addition, the local DNS server egress network must have the same network registration as straight out from the computer to 208.67.222.222. - Select Customer trusted network to disable DNS redirects to Secure Access if the domain name added to the Subdomain field is found on the network and resolves to an RFC-1918 local IP address.
- For Subdomain—enter a domain that Secure Access uses to query the local DNS server.
Note: You must enable Customer trusted network to add the subdomain.
- For Subdomain—enter a domain that Secure Access uses to query the local DNS server.

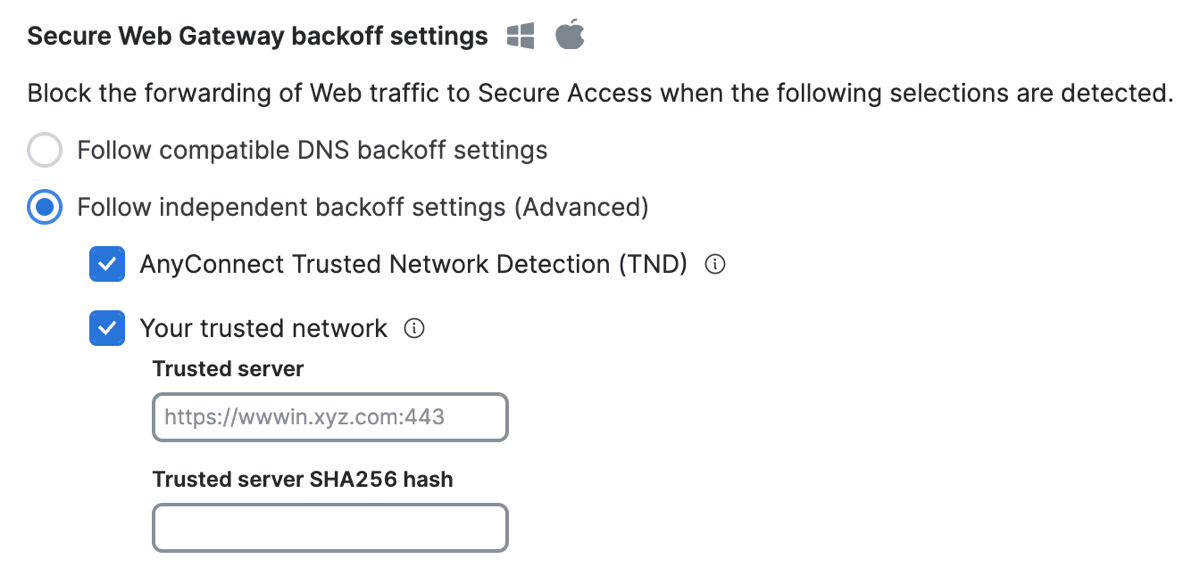
Secure Web Gateway Backoff Settings
-
Select Follow compatible DNS backoff settings.
Enable this option to allow the Cisco Secure Client with the Umbrella Roaming Security module to follow the DNS backoff behavior for any of these DNS backoff settings: Customer trusted network or AnyConnect Trusted Network Detection (TND).

-
Select Follow independent backoff settings (Advanced).
Note: The AnyConnect Trusted Network Detection (TND) and Your trusted network options are only supported with user devices that have version 5.1.3.62 or higher of the Cisco Secure Client with the Umbrella Roaming Security module deployed. For information about downloading the Cisco Secure Client software packages, see Cisco Secure Client Version 5.1.3.62 .
Bypass Web traffic from Secure Access for the following contexts:
- Select AnyConnect Trusted Network Detection (TND) to disable web traffic forwarding from an endpoint to Secure Access if the network is trusted. This setting requires that you have the Trusted Network Detection (TND) setting enabled in the AnyConnect VPN profile for the user devices.
- Select Your Trusted network to enable endpoints to detect an organization's trusted network, which is identified by the Trusted server and Trusted server SHA256 hash fields. When the endpoint detects trusted networks, traffic from the endpoints bypass Secure Access and the endpoints rely on the network protections.
- For Trusted server, enter the URL (
<domain>:<port>) of the trusted network server, which hosts the trusted server certificate.
This option disables redirects to Secure Access when on the trusted network identified by the trusted network server. - For Trusted server SHA256 hash , enter the SHA256 hash for the trusted network server's certificate.
The ID of the trusted network server's certificate must match the configured SHA256 hash.
- For Trusted server, enter the URL (

Delete Destination for Internet Security Bypass < Configure Cisco Secure Client Settings > Manage PAC Files
Updated about 2 months ago
