Prepare Your AD Environment
The integration of Active Directory (AD) with a Secure Access Virtual Appliance (VA) requires that you register the deployed AD domain controllers or the Windows Event Log Collector and AD domains in Secure Access. You must also deploy the Cisco AD Connector. For information about the AD Connector, see Manage AD Connectors.
You must have at least one VA deployed in the environment. For information about the Secure Access VAs, see Get Started with Virtual Appliances.
This guide describes how to register AD domain controllers or a centralized Windows Event Log Collector and AD domains in Secure Access.
About the AD Connector and Logon Events
For each end-user on the AD domains, the AD Connector forwards the logon events to the deployed VAs. The AD Connector can read logon events for users from the AD domain controllers at the site or a centralized Windows Event Log Collector. You can use an existing deployment of a centralized Windows Event Log Collector where domain controllers forward logon events for multiple AD domains or AD forests. For more information, see Support for Multiple AD Domains and AD Forests.
The domain controller or centralized Windows Event Log Collector record logon events by end users. The user's IP and username are made available through the AD Connector to the VA. The VA is a conditional DNS forwarder. The VA forwards DNS requests to the Secure Access DNS resolvers or, if bypass domains have been configured, forwards DNS requests to the organization's internal DNS servers. Secure Access applies the access rules in the policy to the DNS traffic and displays the end user identity information with the request in the reports and logs.
Note: You must deploy the VA, AD Connector, and domain controllers or centralized Windows Event Log Collector at the same Site registered with Secure Access. For information about Sites, see Manage Sites.
Table of Contents
Prerequisites
- Full Admin user role. For more information, see Manage Accounts.
- For information about the requirements for deploying the AD Connector, see Prerequisites for AD Connector and VAs.
- Deploy at least one Secure Access Virtual Appliance. For more information, see Get Started with Virtual Appliances.
Additional Prerequisites for the Windows Event Log Collector
- The Cisco AD Connector account (Cisco_Connector or custom account as configured) should be added to the local Event Log Readers group on the Windows Event Log Collector machine.
- On the Windows Event Log Collector machine, enable these firewall rules, which allow the server where you deployed the AD Connector to read the Windows event logs:
- Remote Event Log Management (NP-In)
- Remote Event Log Management (RPC)
- Remote Event Log Management (RPC-EPMAP)
- Review all network access requirements. For more information, see AD Connector Communication Flow and Troubleshooting.
Procedure
To integrate AD with a Secure Access VA, complete one of the procedures:
Integrate AD with Domain Controllers
Download the Windows Configuration script from Secure Access, and then run the script to add an AD domain controller in Secure Access.
- Support for Multiple AD Domains and AD Forests
- Verify Auditing of Logon Events on Domain Controllers
- Download the Windows Configuration Script for Domain Controllers
- Run the Configuration Script on the Domain Controllers
- Add a Domain Controller in Secure Access
- View the Registered AD Components in Secure Access
Support for Multiple AD Domains and AD Forests
Using domain controllers, you can integrate multiple AD domains or AD forests with Secure Access. For each AD domain that integrates with Secure Access, deploy the Cisco AD Connector plus an additional AD Connector for redundancy.
Verify Auditing of Logon Events on Domain Controllers
The AD integration with domain controllers requires each domain controller to audit logon events.
On each domain controller (excluding read-only domain controllers), enable the Audit account logon events to include Success and Failure if it is set to No Auditing.
By default, this group policy is set to log Success logon events and you should not modify it. Secure Access requires the Audit account logon events setting so that it knows whether a user has logged in successfully and can then compare that logon to subsequent events generated by that user.
If the Audit Policy is not set, the Windows Configuration Script for Domain Controller displays this error message:
"ERROR: "


-----------------------------------------------------------------------------

Your Group Policy for this Domain Controller is set to NOT audit successful logon events!

You MUST edit the following Group Policy for all DCs:


Computer Configuration\Policies\Windows Settings\Security Settings\Local Policies\Audit Policy\Audit logon events


Define that policy to audit Success attempts, gpupdate, and re-run this script!
Download the Windows Configuration Script for Domain Controllers
The Windows Configuration Script automates the permissions for the Cisco_Connector user.
In Secure Access, download the Windows Configuration Script for Domain Controller script to the domain controllers in your environments.
- Navigate to Connect > Users and Groups > Users, click Configuration Management > Integrate directories, and then click Active Directory.
After an initial AD deployment, navigate to Connect > Users and Groups > Users, click Configuration Management, and expand Active Directory. - For Windows Configuration Script for Domain Controller, click Download.

- Download and save the configuration script to a location on the machine where you plan to run it.
Note: The configuration script is written in Visual Basic Script and is in plain text.
Run the Windows Configuration Script for the Domain Controllers
Run the Windows Configuration Script for Domain Controller script on all of the domain controllers at each site, (excluding read-only domain controllers (RODCs)) and for each domain that will integrate with Secure Access. The configuration script prepares the domain controllers to communicate with the AD Connector. When you run the script, the domain controller should register with Secure Access.
- As an administrator, open an elevated command prompt.
Important: Before running the script, you must create the Cisco_Connector user account. Also, there are several Group Policies that affect system operation that may need manual configuration. The script displays the status of these settings and, if needed, provides instructions on how to change them. - Locate the Windows Configuration Script for Domain Controller file and run the script in the command prompt.
Note: Substitute the Windows configuration script filename (including the .wsf file extension) in the cscript command.
cscript <Windows Configuration Script filename with extension> or cscript <Windows Configuration Script filename with extension> --username <sAMAccountName for custom user>
Important: The script displays your current configuration, and then offers to auto-configure the domain controller. If the auto-configure steps are successful, the script offers to registers the domain controller with Secure Access. Registration only occurs if you accept this offer.
Repeat the steps to add your domain controllers in Secure Access. It is essential that each domain controller in each AD domain environment has the configuration script run on it in order for the service to work as expected, both for high availability and overall reliability.
Note: The configuration script is not an application or service. If you change the IP address or hostname of the domain controller, remove the previous instance of the domain controller and re-register the domain controller.
Add a Domain Controller in Secure Access
Note: The configuration script attempts to automatically register the domain controller with Secure Access. This requires the domain controller to support outbound connectivity to Secure Access. If your domain controller can support outbound connectivity to the Internet, ensure that network connectivity requirements are met for the domain controller to automatically register with Secure Access. For more information, see AD Connector Communication Flow and Troubleshooting.
If the script did not register the domain controller with Secure Access, then add the information for each domain controller in Secure Access. After you add the domain controller, the domain controller syncs with Secure Access and you can view the status of the domain controller.
- Navigate to Connect > Users and Groups > Users, click Configuration Management > Integrate directories, and then click Active Directory.
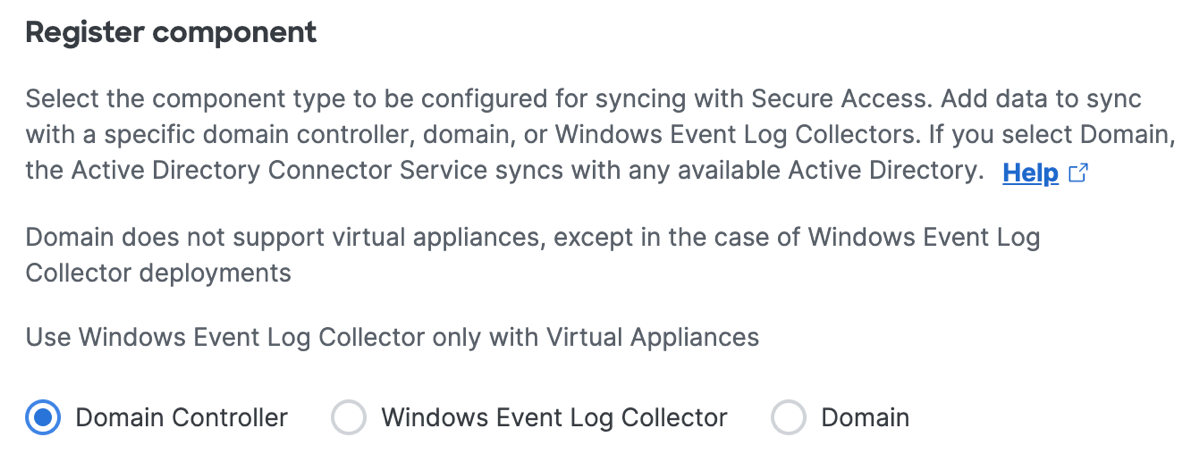
- Click Next, and then choose Domain Controller.

-
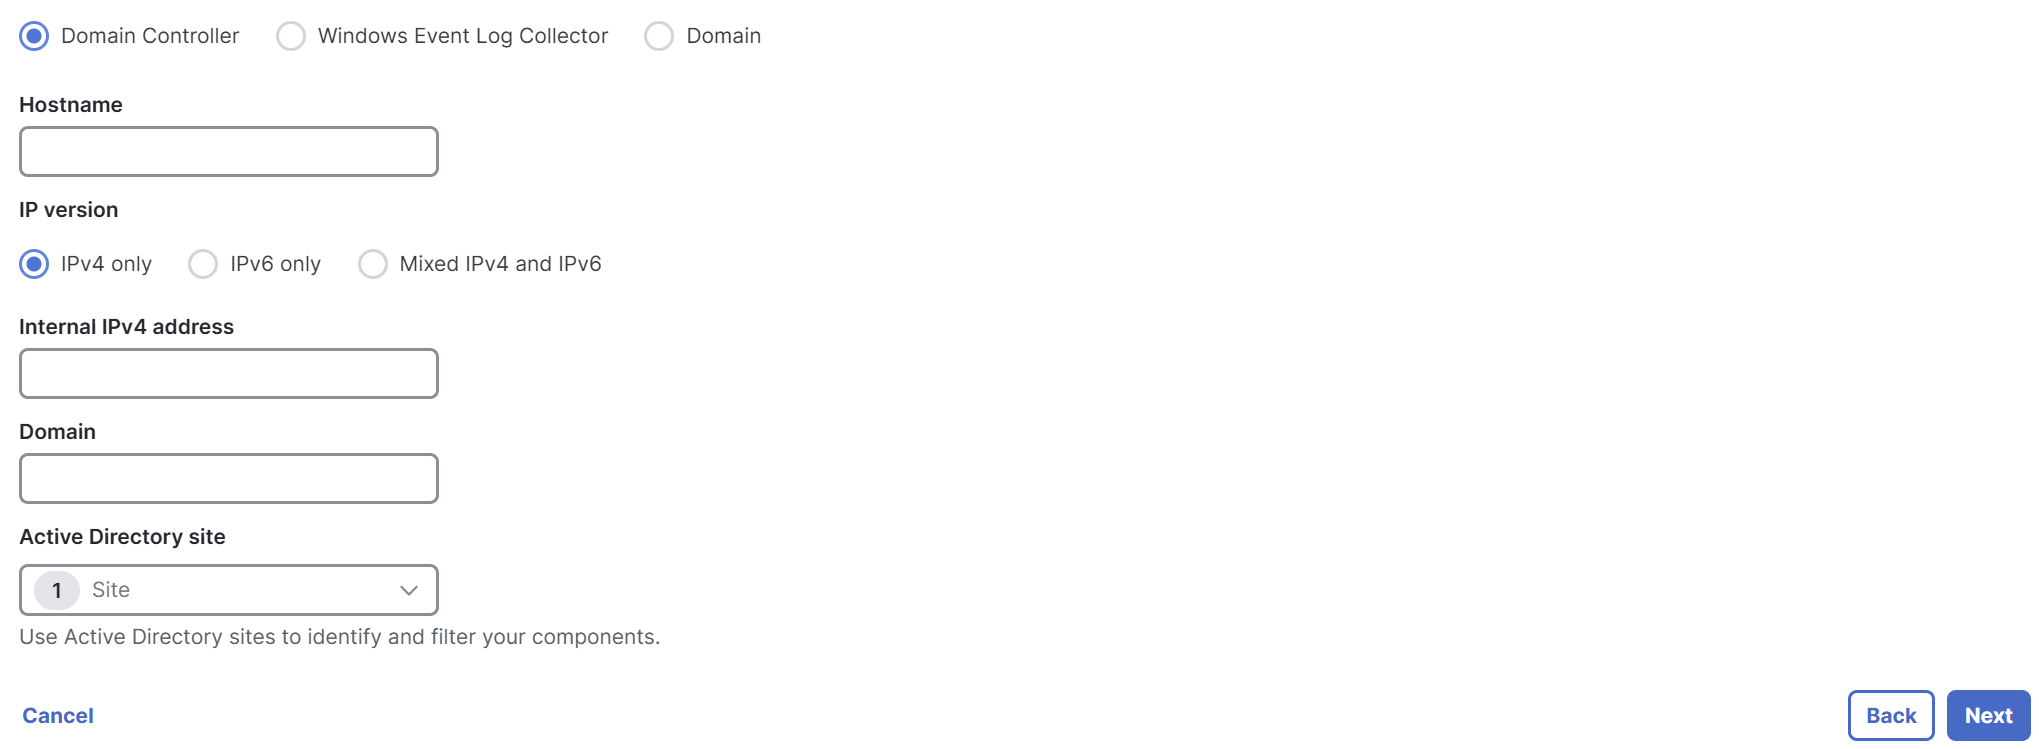
Enter the following details for the domain controller.
- Hostname—The hostname of the server where the domain controller is deployed.
- IP version—The IP address version to use. You can use IPv4 only, IPv6 only, or Mixed IPv4 and IPv6.
- Internal IPv4 address / Internal IPv6 address / both —The private IP address of the server where the domain controller is deployed. This field becomes available based on the IP version selection.
- Domain—The domain where the domain controller receives the events.
-
For Active Directory site, choose a Secure Access site to associate with the domain controller, and then click Next. For information about Sites, see Manage Sites.

-
Deploy the AD Connector. For more information, see Connect Active Directory to VAs.
-
On Installed Active Directory components, click Done.
View the Registered AD Components in Secure Access
You can view the status for each deployed AD component in Secure Access. Secure Access displays the hostname of the server where the domain controller is deployed and where you ran the configuration script. If you configured multiple sites and deployed VAs, make sure that the AD server is in the same site as the VAs that will receive DNS queries from the users in that AD domain.
For information about viewing the deployed AD components, see View AD Components in Secure Access.
Integrate AD with a Centralized Windows Event Log Collector
Note: Before you begin, set up a centralized Windows Event Log Collector in your environment. For more information, refer to Microsoft's documentation.
Add a centralized Windows Event Log Collector and AD domains in Secure Access. After you add the Windows Event Log Collector and AD domains, the AD Connector can forward the logon events to the VAs that are deployed in the environment.
- Step 1 – Add the Windows Event Log Collector in Secure Access
- Step 2 – Add the AD Domains in Secure Access
Step 1 – Add the Windows Event Log Collector in Secure Access
Add the configuration details for the centralized Windows Event Log Collector in Secure Access.
- Navigate to Connect > Users and Groups > Users, click Configuration Management > Integrate directories, and then click Active Directory.
- Click Next, and then choose Windows Event Log Collector.

-
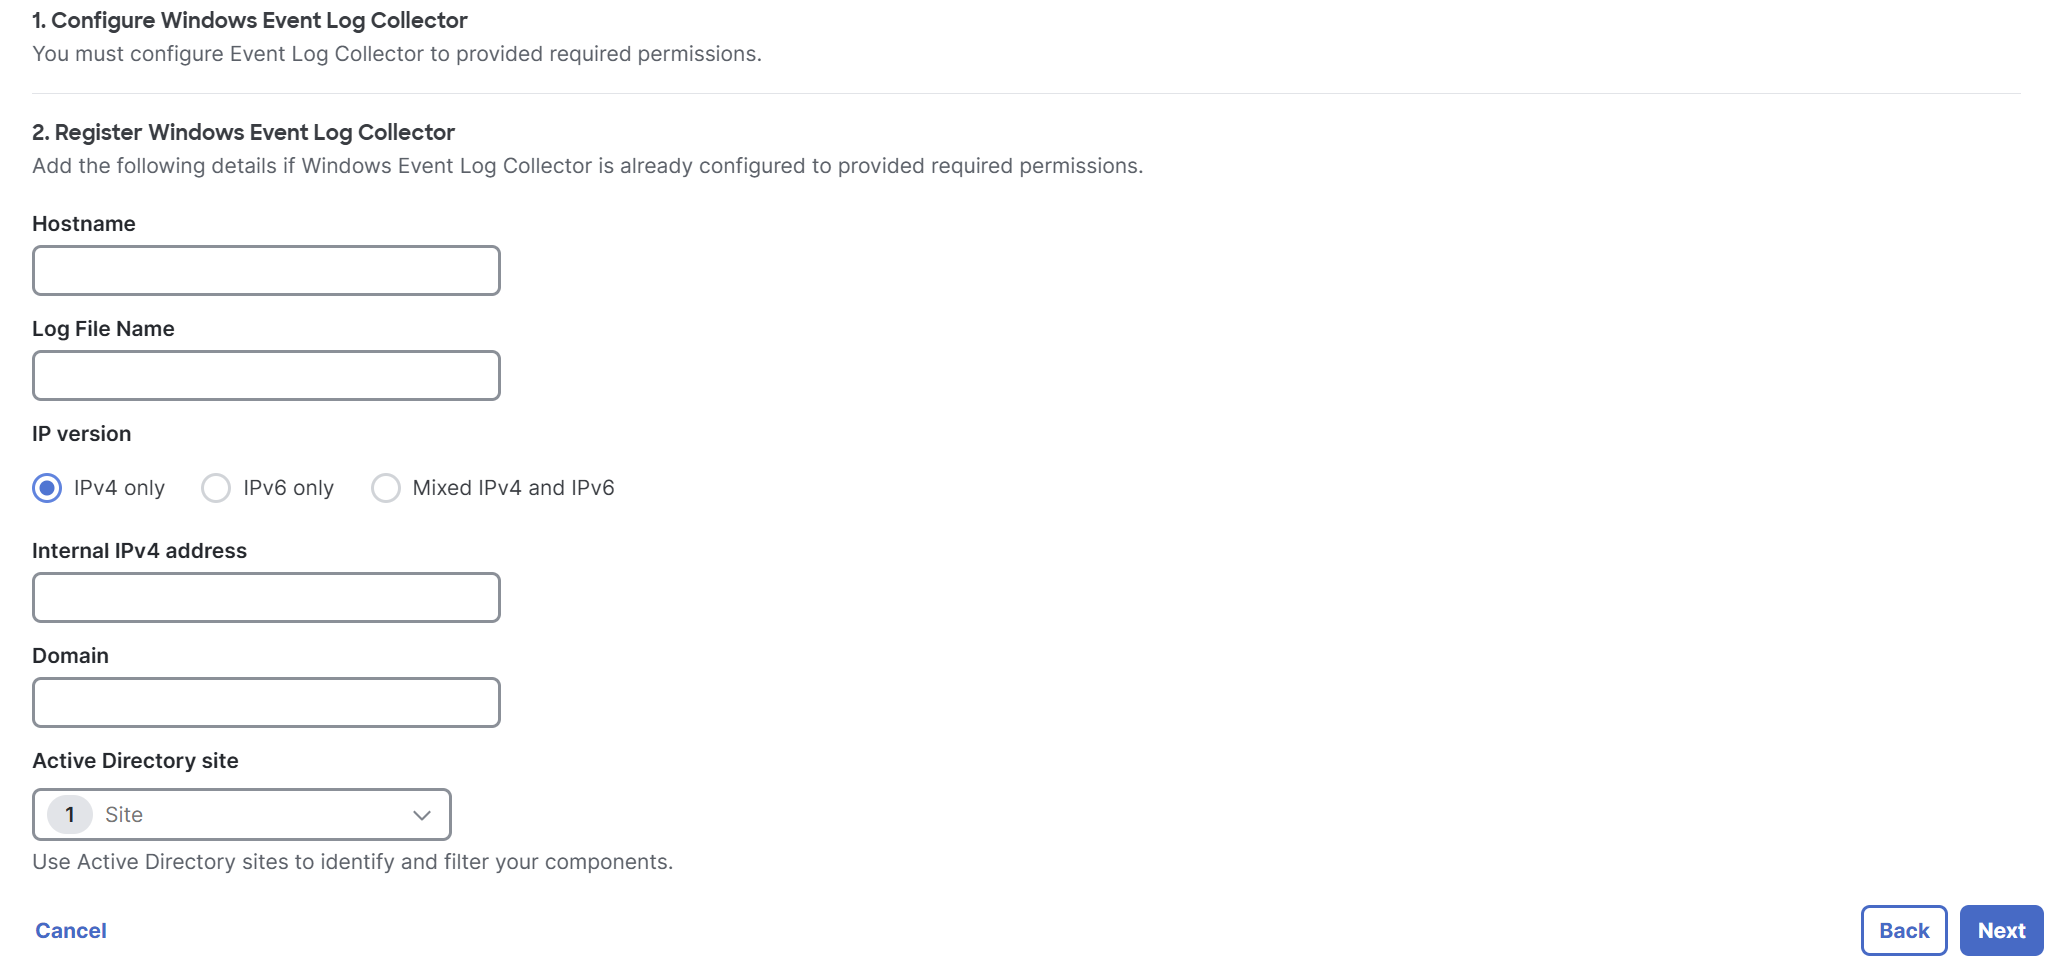
Enter the following details for the deployed Windows Event Log Collector:
- Hostname—The hostname of the server where the Windows Event Log Collector is deployed.
- Log File Name—The name of the central log file for the Windows Event Log Collector.
- IP version—The IP address version to use. You can use IPv4 only, IPv6 only, or Mixed IPv4 and IPv6.
- Internal IPv4 address / Internal IPv6 address / both —The private IP address of the server where the domain controller is deployed. This field becomes available based on the IP version selection.
- Domain—The domain where the Windows Event Log Collector receives the events.
-
For Active Directory site, select a Secure Access site that is associated with the Windows Event Log Collector, and then click Next.

-
Deploy the AD Connector. For more information, see Connect Active Directory to VAs.
-
On Installed Active Directory components, click Done.

Step 2 – Add the AD Domains in Secure Access
In Secure Access, add the AD domain where logon events occur and are sent to the Windows Event Log Collector. You must register each AD domain to enable the AD Connector to get the list of AD users and groups from the AD domains.
-
Navigate to Connect > Users and Groups > Users, click Configuration Management > Integrate directories, and then click Active Directory.
-
Click Next, and then choose, and then choose Domain.

-
For Domain, enter the AD domain.
-
For Active Directory site, choose a Secure Access site where the VA and domain controller are also deployed, and then click Next. For information about Sites, see Manage Sites.

-
On Installed Active Directory components, click Done.
Prerequisites for AD Connectors and VAs < Prepare Your Active Directory Environment > Connect Active Directory to VAs
Updated 6 days ago
