Manage CA Certificates for VPN Connections and Zero Trust Access Enrollment
Secure Access authenticates users and devices using the organization's Certificate Authority (CA) certificate.
Certificates described in this section are used for the following purposes:
- When devices connect to networks using virtual private networks (VPNs).
- To enroll in Zero Trust Access (ZTA) using certificates or to renew ZTA enrollment. For more information, see Enroll Devices in Zero Trust Access Using Certificates.
Table of Contents
- Prerequisites
- Procedures
- View Notifications About Expired CA Certificates for client authentication
- Upload Certificate Authority (CA) Certificates for client authentication
- View Uploaded CA Certificates
- Manage Certificate Revocation Settings
- View the CA Certificate Details
- Change the Purpose of an Uploaded CA Certificate
- Delete a Client Authentication CA Certificate
- Expired CA Certificates
Prerequisites
- Full Admin user role. For more information, see Manage Accounts.
Install an Identity Certificate on User Devices
Install on the user devices in your organization an identity certificate signed by your corporate Certificate Authority (CA) and validated by the certificate you will upload.
Procedures
View Notifications About Expired CA Certificates for Client Authentication
- Navigate to Secure > Certificates > Client authentication.
- Secure Access displays a banner if a certificate has expired or will expire within 90 days:

Upload Certificate Authority (CA) Certificates for client authentication
- Navigate to Secure > Certificates > Client authentication.
- Click Upload certificate.
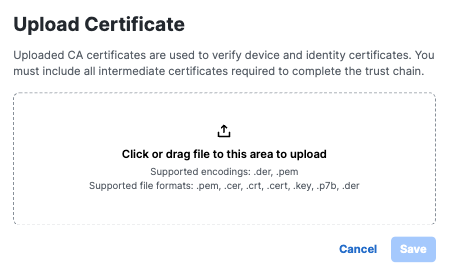
- Upload your signed CA root certificate.
- Select VPN Authentication or ZTA enrollment or both purposes for the certificate.
Certificates must have at least one purpose selected. - (Optional) Configure certificate revocation settings.
For details, see Manage Certificate Revocation Settings. - Click Save.
- If you enabled ZTA enrollment, download and distribute the configuration file that is generated after you click Save. See Enroll Devices in Zero Trust Access Using Certificates.
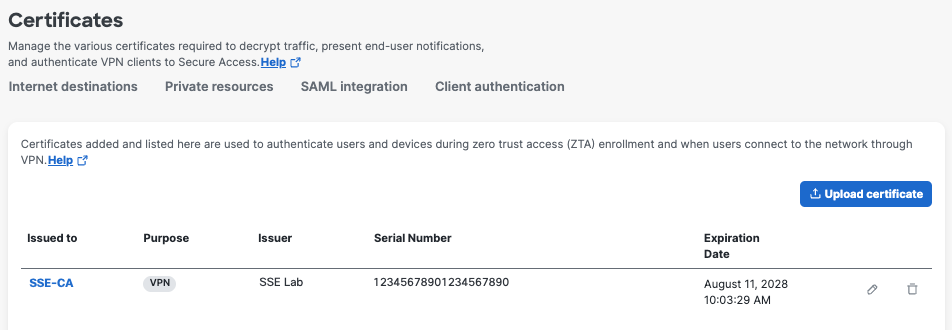
View Uploaded CA Certificates
- Navigate to Secure > Certificates > Client authentication.
Secure Access lists the certificates uploaded by your organization.

Issued to—The name issued to the CA certificate.
Purpose —Whether the certificate is used for VPN authentication or Zero Trust Access enrollment or both.
Issuer—The CA that issued the certificate.
Serial Number—The serial number of the certificate.
Expiration Date—The date when the certificate is no longer valid.
Manage Certificate Revocation Settings
- Navigate to Secure > Certificates > Client authentication.
- Click a CA certificate Issued to link to open the certificate details.

- For Revocation settings, enable Check for revocation.
- For Protocol, check Online Certificate Status Protocol,
a. Check Use AIA from certificate.
b. Check Manual. - For Protocol, check Use CRL distribution point (CDP) from certificate.
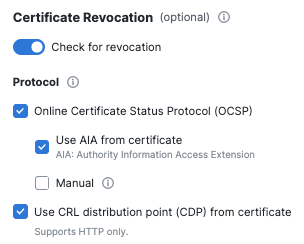
- Click Save.
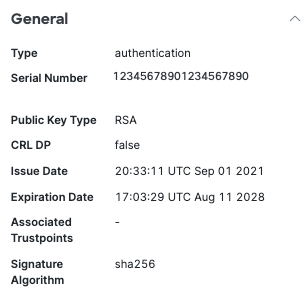
View CA Certificate Details
- Click a certificate name to view details.
- General certificate details:
Type—The type of the certificate.
Serial Number—The serial number of the certificate
Purpose —Whether the certificate is used for VPN authentication or Zero Trust Access enrollment or both.
Public Key Type—The type of the public key.
CRL DP—Certificate Revocation List (CRL) Distribution Point. The location where you can check the revocation of the certifcate.
Issue Date—The date from which the certificate is valid.
Expiration Date—The date when the certificate is not valid.
Associated Trustpoints
Signature Algorithm—The cryptographic hash algorithm (Secure Hashing Algorithm 256).
- Issued to certificate details.
The entity that uses the certificate to build a trust relationship with Secure Access.
Common Name—The fully-qualified domain name that is secured by the certificate.
Organization—The organization that is issued the certificate.
Country—The country where the certificate was issued specified in the two-character country code.

-
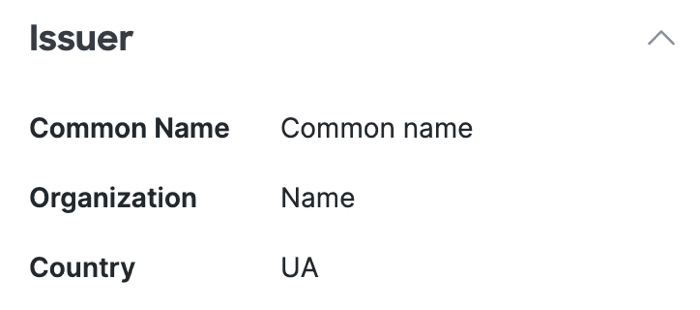
Issuer certificate details.
The issuer is the entity (trusted authority) that issues the certificate.Common Name—The fully-qualified domain name that is secured by the certificate.
Organization—The organization that issued the certificate.
Country—The country where the certificate was issued specified in the two-character country code.
Change the Purpose of an Uploaded CA Certificate
Certificates must have at least one purpose selected.
Deselecting a purpose is the equivalent of deleting a certificate that is used for that purpose. For the effects of doing so, see Delete a CA Certificate, below.
If you enable "ZTA enrollment", a new configuration file is generated after you click Save. You must download and distribute this file to user devices that will depend on this certificate for Zero Trust Access certificate-based enrollment.
If your organization has a Cisco-provided CA certificate intended to authenticate VPN connections: This certificate cannot be used for Zero Trust Access enrollment and the option is not available for that certificate.
To change the purpose of a CA certificate:
- Navigate to Secure > Certificates > Client authentication.
- Click the pencil icon to modify the certificate.
- Click Save.
- If you enabled ZTA enrollment, download and distribute the newly generated configuration file to user devices.
Delete a Client Authentication CA Certificate
Deleting a CA certificate has different effects depending on the configured purpose of the certificate:
- Deleting a CA certificate used for VPN authentication immediately prevents access.
- Deleting a CA certificate used for Zero Trust Access enrollment prevents new enrollments and enrollment renewals authenticated by that certificate, but does not terminate existing connections or immediately prevent further access. See Unenroll a Device from Zero Trust Access.
To delete a CA certificate:
- Navigate to Secure > Certificates > Client authentication.
- To remove a certificate, follow the steps in one of the options:
a. Click on a certificate Issued to link to open the certificate details, and then click Delete. Click Delete again to confirm the removal of the certificate.
b. Click on the delete icon to Delete. Click Delete again to confirm the removal of the certificate.
Expired Certificates
For certificates used for Zero Trust Access enrollment: If a CA certificate expires and you replace it, you must re-generate the configuration file and distribute it to all user devices that use Zero Trust Access.
VPN Certificates for User and Device Authentication < Manage CA Certificates for VPN Connections > Manage the Data Loss Prevention Policy
Updated 2 months ago