Add Network Resources
A Registered Network resource represents a single public static or dynamic IP address, or a range of IP addresses. Cisco Secure Access supports both IPv4 and IPv6 for static IP addresses and only IPv4 for dynamic IP addresses. In Secure Access, all traffic originating from the public IP space is identified as coming from that network. The public IP space or IP range defines the scope of the network resource.
To start protecting your public networks managed by your organization, add network resources to Secure Access. Once you've configured and added a network resource, build policy rules to extend Secure Access's protection to any device that connects to the internet from behind that network. For more information about Secure Access policy rules, see Manage the Access Policy.
Note: The Secure Access policy supports the use of PAC files with a public static network. For more information about PAC files, see Manage PAC Files.
Table of Contents
Prerequisites
- Full Admin user role. For more information, see Manage Accounts.
- Your network's IP address is unique within Secure Access.
- Determine if you have a dynamic IP address. For more information, see Dynamic IP Address—IPv4 Only.
Dynamic IP Address—IPv4 Only
Secure Access supports dynamic IP addresses only over IPv4. Most home, small school, and small business networks are provisioned typically by Internet Service Providers (ISPs) with a dynamic IP address (IPv4) when defining each unique internet network.
If you have a dynamic IP address, the public IP of your network changes over time when the lease for that IP address changes. An internet service provider (ISP) provides a dynamic IP address to your device temporarily. Your IP may stay the same for some time period, but the lease eventually expires and is given to another customer of your ISP. When your IP address registered with Secure Access changes, Secure Access's security settings no longer apply. These settings no longer match your account information and you must update the network resource's IP.
Note: Most Dynamic DNS (DDNS) clients work toward keeping your network updated. Secure Access does not support third-party DDNS clients.
Procedure
Add a network resource where the network has a public static IP address or IP address range, or a dynamic IP address.
Note: We recommend that you register all of your organization's networks with Secure Access at the same time. Pre-registering networks ensures that all IP spaces that belong to your organization are added to Secure Access. If you have more than one public egress IP in your organization, configure a network resource for each IP address. You must point your network's DNS to the Secure Access DNS global resolvers. Until your DNS traffic is connected to the Secure Access DNS resolvers, your networks are not protected and traffic is not logged in the Activity Search report.
- Step 1 – Select the Network
- Step 2 – Configure the Network Resource
- Step 3 – Change the DNS Settings on Your Relevant Network Device
- Step 4 – Apply a Policy Rule to the Network Resource
- Step 5 – Test Your Network
Step 1 – Select the Network
First, determine the IP address of your network.
- Go to http://www.whatismyip.com.
Your IPv4 and IPv6 IP addresses and location are displayed. - In Secure Access, navigate to Resources > Registered Networks.
The public IP address of your network is listed at the top of the page.
Note: Depending on your package, if you attempt to add a network other than the one currently being used to access Secure Access, Secure Access may prompt you to contact Support for manual verification. If this occurs, you'll also need manual verification from Support for IPv4 ranges larger than a /29 network and IPv6 ranges than a /56 network. Verification cases are created automatically and you'll receive an update as soon as it's reviewed. For more information about your current package, see Determine Your Current Package.
Step 2 – Configure the Network Resource
Before you begin, determine if you have an IPv4 dynamic IP address. Secure Access only supports dynamic IP addresses for IPv4. Most home, small school, and small business networks are provisioned typically by Internet Service Providers (ISPs) with a dynamic IP address (IPv4) when defining each unique internet network.
Note: If possible, add the network resource from the IP address used to sign into Secure Access. Otherwise, Secure Access sends an email to the user account and requires that you visit a link from the IP address of the network that you are registering.
- Navigate to Resources > Registered Networks and click Add.
- Give your network resource a descriptive Network Name.
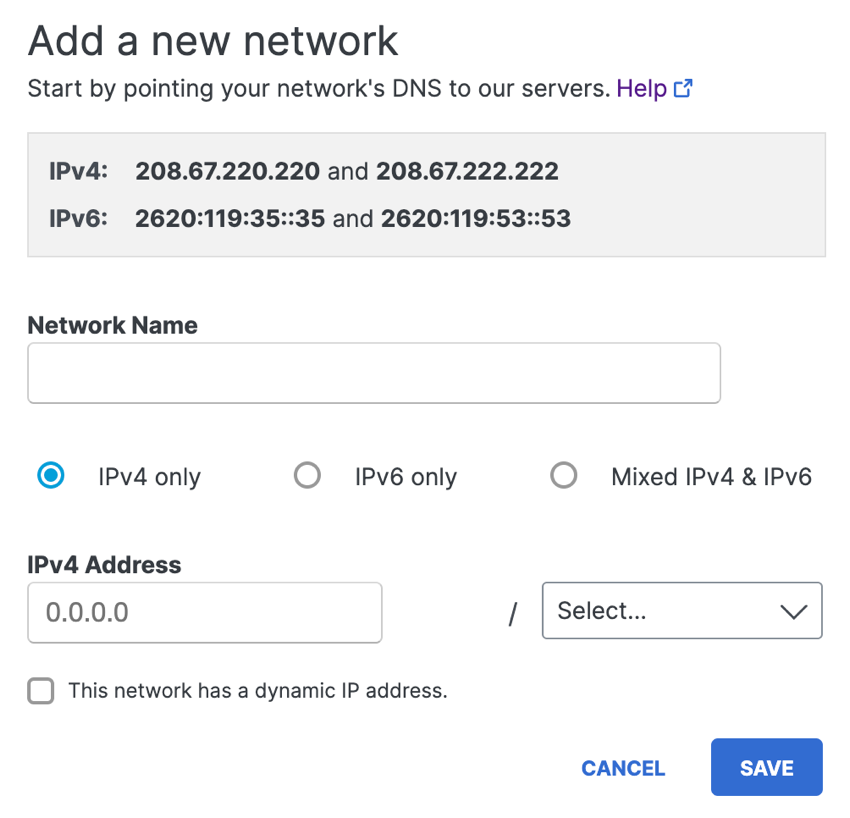
- Choose an internet protocol: IPv4, IPv6, or Mixed IPv4 & IPv6 .
Select a protocol based on the IP address where you have configured your router. - Add the network's IP address and choose a subnet mask.
- For IPv4 only, if you have a dynamic IP address, check This network has a dynamic IP address.
- Click Save.
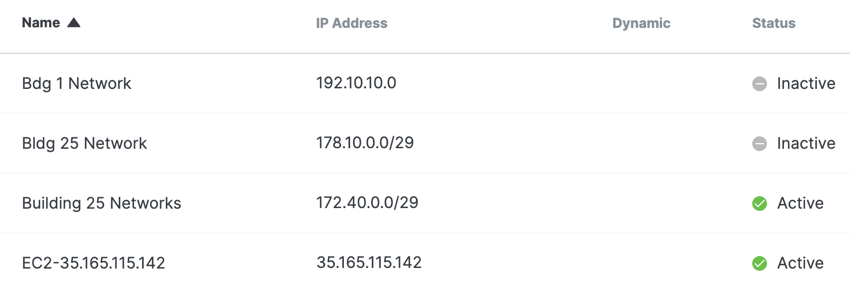
Once Secure Access validates your IP address, the network resource is listed at Resources > Registered Networks. Initially, Secure Access lists the status of your network as Inactive. When Secure Access receives DNS traffic from the network, the network resource's status changes to Active.
Step 3 – Change the DNS Settings on Your Relevant Network Device
You only need to change the DNS settings on your edge DNS equipment, typically a DNS or DHCP server, or a router—a DSL router or cable modem if that's the only router in your network. For information about how to configure devices including laptops or routers, see Point Your DNS to Cisco Secure Access.
Note: The device where you test the network must have retrieved a new set of DNS servers from the DNS/DHCP server or router, or you must change the device's DNS settings manually before verifying the configuration of the network resource.
Step 4 – Apply a Policy Rule to the Network Resource
Add the network resource to an existing Secure Access policy rule or create a new policy rule and apply the rule to the network resource. If you do not add the network resource to a policy rule, Secure Access applies the Default policy rule to protect the network resource.
Step 5 – Test Your Network
Verify that your network's DNS connections are routed through Cisco Secure Access's global network.
Note: You may need to restart your client's network interface or your device.
Manage Registered Networks < Add Network Resources > Point Your DNS to Cisco Secure Access
Updated 3 months ago