Deploy a Connector in Azure
A resource connector is a lightweight service deployed in a virtual machine in your cloud environment. A resource connector manages the network communications to a configured private resource. Cisco Secure Access provides a pre-configured resource connector image for Azure.
Follow the steps in this guide to deploy the Cisco Secure Access resource connector image on Azure and create your resource connector instances.
Save Your Private SSH Key
After you generate an SSH key pair required for access to the resource connector, you must save your SSH key in your environment. Cisco cannot recover your SSH key and you will lose remote access and the capability to manage the resource connector.
Table of Contents
- Prerequisites
- UEFI Secure Boot Environment for Resource Connector Images
- Deployment Requirements
- Procedure
Prerequisites
Gather the required information and meet the requirements to deploy resource connectors on Azure. For more information, see Requirements and Prerequisites for Resource Connectors and Connector Groups.
- A user account on Azure.
- Create the connector group in the region nearest to the geographical location where you will deploy these connectors. For more information, see Add Resource Connector Groups.
- All connectors in a group must use the same environment, for example: Azure.
- Obtain the connector image from the Microsoft Azure Marketplace. For more information, see Get Connector Images on the Azure Marketplace.
- Copy the provisioning key for the specific connector group where you will deploy these connectors.
For more information, see Provisioning Keys for Resource Connectors.
UEFI Secure Boot Environment for Resource Connector Images
The Secure Access Resource Connector images for Azure support UEFI Secure Boot, which provides a trusted boot environment for the connector instance.
We recommend that you deploy your Resource Connector instances with the UEFI Secure Boot environment.
Deployment Requirements
- You can deploy Resource Connector images in Azure on x64 architectures.
- For production environments, we recommend these instance types:
- F4s Standard
- F4s Standard v2
- F8s Standard v2
Procedure
Perform the following tasks once per connector instance. You can use the Cisco Secure Access Resource Connector image to create multiple connector instances. You must deploy each connector instance independently.
Important
Do not clone the connector instances.
- Step 1 – Get Connector Images on Microsoft Azure Marketplace
- Step 2 – Configure the Resource Connector Virtual Machine
- Step 3 – Connect to Resource Connector Instance
Step 1 – Get Connector Images on Microsoft Azure Marketplace
- Sign in to Azure and then navigate to the Microsoft Azure Marketplace at
https://portal.azure.com/#view/Microsoft_Azure_Marketplace/GalleryItemDetailsBladeNopdl/id/cisco.cisco-resource-connector. - Select the Cisco Secure Access Resource Connector plan, and then click Create to configure the resource connector virtual machine.
Note: You can reach the Microsoft Azure Marketplace and Cisco Secure Access Resource Connector images from Secure Access. Navigate to Connect > Network Connections > Connector Groups and then click Connector Image for Microsoft Azure.
Step 2 – Configure the Resource Connector Virtual Machine
Create a resource connector virtual machine on Azure.
-
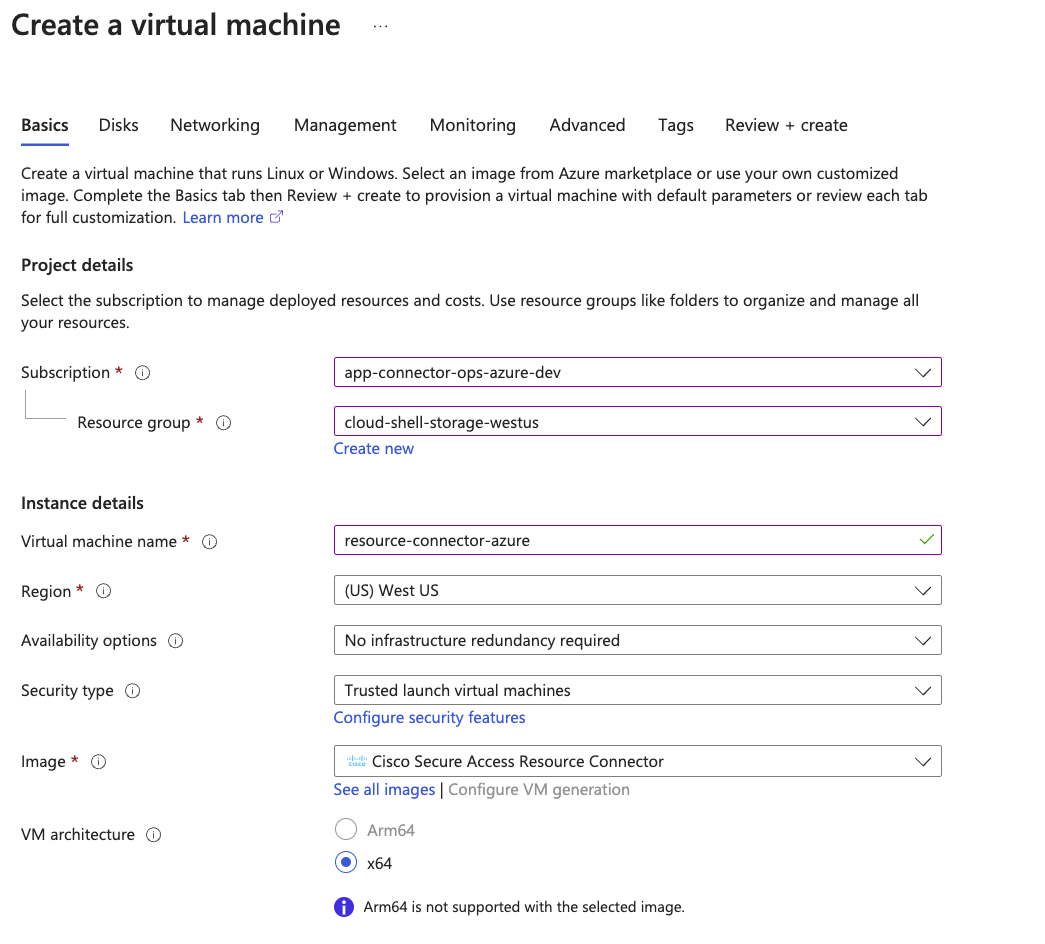
On Create a virtual machine, click the Basics tab.
Note: For Disks, Networking, Management, Monitoring, and Tags, you can modify the settings for you cloud environment or keep the default selections.
-
Navigate to Project details.
a. Choose your Subscription and Resource Group.
- Navigate to Instance details.
a. For Virtual machine name, enter a name for the virtual machine.
b. For Region, choose the region where the private resource is deployed in your cloud environment.c. For Security type, use the default setting: Trusted launch virtual machines.
The Trusted launch virtual machines default setting selects the Enable secure boot option. For more information, see UEFI Secure Boot Environment for Resource Connector Images.
d. For VM architecture, choose the x64 architecture for the virtual machine.
e. For Size, choose Recommended by image publisher types.Note: You do not have to configure the image. Image is preselected.
-
Navigate to Administrator account.
a. For Authentication type, choose SSH public key.
b. For Username, use the default setting: azureuser. The azureuser username is an internal account that does not have login access. You must deploy the VM with the username azureuser.
Note: You can only log into the resource connector instance with the username acadmin.
c. Choose an existing SSH key pair or generate an SSH key pair to enable access to the connector instance.
Save your SSH key to your local system.
SSH access to the resource connector VM is required in order to troubleshoot an issue or get information about the connector to provide to Support. -
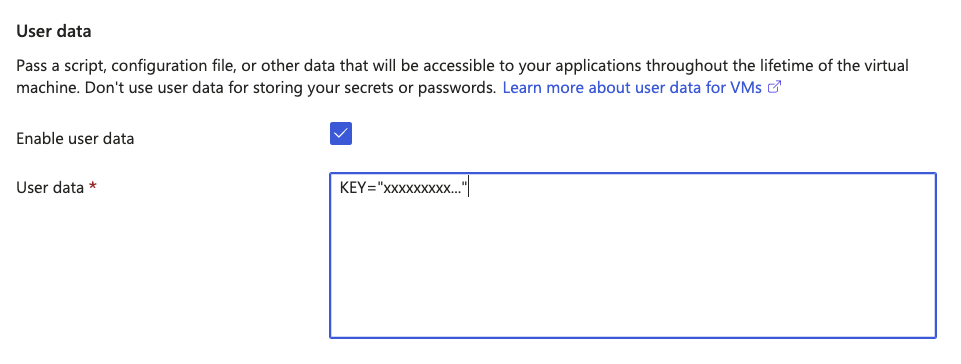
Click the Advanced tab.
a. Check Enable user data.
b. For User data, in the text box, type KEY="" and paste the provisioning key that you copied from the connector group in Secure Access between the quotation marks, with no spaces anywhere in the text box. For more information about creating connector provisioning keys, see Provisioning Keys for Resource Connectors.
-
Navigate to the Review + create tab.
a. Click Create to deploy the instance of the resource connector in the virtual machine. -
(Optional) Compare the ID of the deployed virtual machine on Azure with the Connector ID for the resource connector on Secure Access.
a. On Azure, navigate to Home > Virtual Machines and then click the name of a virtual machine. From a virtual machine, navigate to Overview, and then click JSON View.
The JSON View displays the properties of the deployed resource connector instance. The value of the vmId property is the ID of the virtual machine.
b. On Secure Access, navigate to Connect > Network Connections > Connector Groups.
Locate the resource connector by the Connector ID. Verify that the Connector ID for the deployed resource connector matches the ID of your virtual machine on Azure.

Step 3 – Connect to the Resource Connector Instance
-
Once the resource connector VM is up, you can connect to your instance using SSH.
Note: Log into the resource connector instance with the acadmin username. -
The resource connector establishes a network tunnel to the private resource.
-
The resource connector syncs automatically with Secure Access.
- You must confirm each connector instance to complete the connector configuration. For more information, see Add Connectors to a Connector Group: Confirm Connectors.
- If you do not see the connector in your deployed connectors list, see Troubleshoot Resource Connectors and Connector Groups.
Deploy a Connector in AWS < Deploy a Connector in Azure > Deploy a Connector in Docker
Updated 19 days ago
