Create an Indexed Document Match Identifier
Indexed Document Matching (IDM) is a data matching technique that detects data loss incidents involving sensitive information maintained in unstructured formats for all DLP-supported file types. IDMs enable Secure Access to scan documents used in a wide range of disciplines such as tax forms, merger and acquisition forms, medical records, bank statements, stock agreements, medical power of attorney forms, US patent files, non-disclosure agreements, resumes, source code, and more.
Secure Access performs Indexed Document Matching by creating hash fingerprints of text extracted from your sensitive documents, as opposed to leveraging pattern matching techniques. To create the fingerprints, you must download the DLP indexer and then run it against your documents from a command line prompt. The indexer extracts the document text, performs fingerprinting and indexing operations on it, then hashes the indexed text and uploads it to the Secure Access DLP. (Generally document text represents a low percentage of total document size, so indexing only text reduces the space required to store IDMs.)
Once you have run the indexer, you will have an Indexed Document Match Identifier associated with the documents. You will then be able to:
- Create a Data Classification that uses the IDM as a custom data identifier (as described in Create a Data Classification or Copy and Customize a Built-In Data Classification).
- Create a DLP rule that uses the Data Classification including that IDM Identifier. (For more information on DLP rules, see Manage the Data Loss Prevention Policy.)
With these configurations in place, Secure Access will be able to monitor and/or block transmission of unstructured files that match at least a user-configurable percentage of the data text indexed for the IDM.
NOTE: To see a summary of the indexer options available, invoke the indexer with the -h option. (java -jar <directory-path>\dlp-indexer.jar -h.)
Table of Contents
- Prerequisites
- Limitations
- Create an Indexed Document Match Identifier
- Monitor the Indexed Data Set and Re-Index as Needed
- Troubleshooting
Prerequisites
-
Full Admin user role. For more information, see Manage Accounts.
-
JVM version 17+
-
The source file(s) you index must be in one of the formats supported by the DLP policy, listed here.
Limitations
- The total amount of indexed text for all the IDMs in your organization must not exceed 1 GB. You can increase this limit at no cost; contact customer support. The DLP indexer displays an error message if you exceed your allotted quota.
- The data files must contain only 1 byte or 2 byte UTF-8 encoded characters, or Unicode characters.
- After you create an IDM Identifier, when you re-run the indexer using the same IDM Identifier, the indexer completely overwrites the previous index associated with that identifier. To add new data to an existing IDM, when you run the indexer again, include both the original data path and the new data path in the command to run the indexer.
Create an Indexed Document Match Identifier
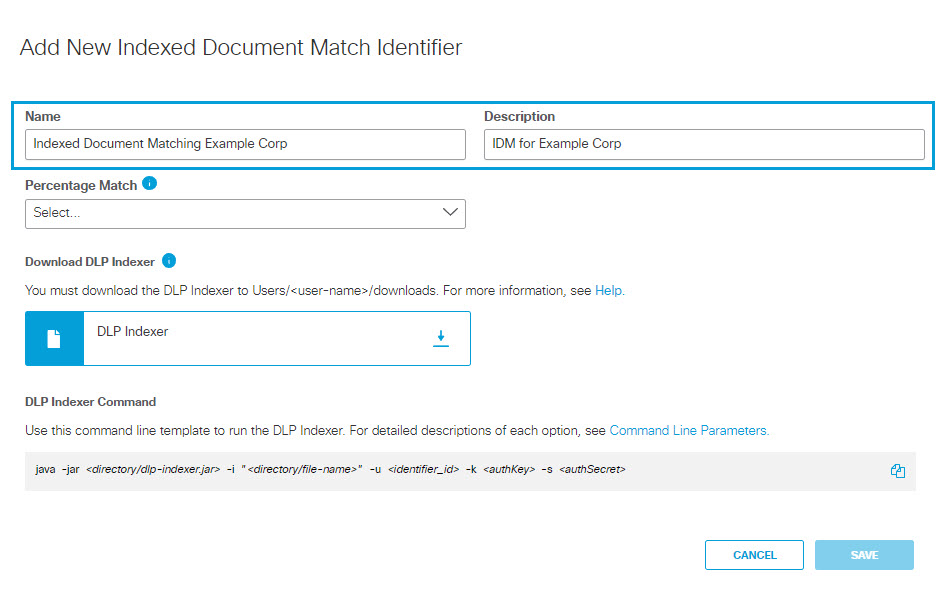
- Navigate to Secure > Settings > Data Classification > Indexed Document Matches and click ADD INDEXED DOCUMENT MATCH IDENTIFIER.
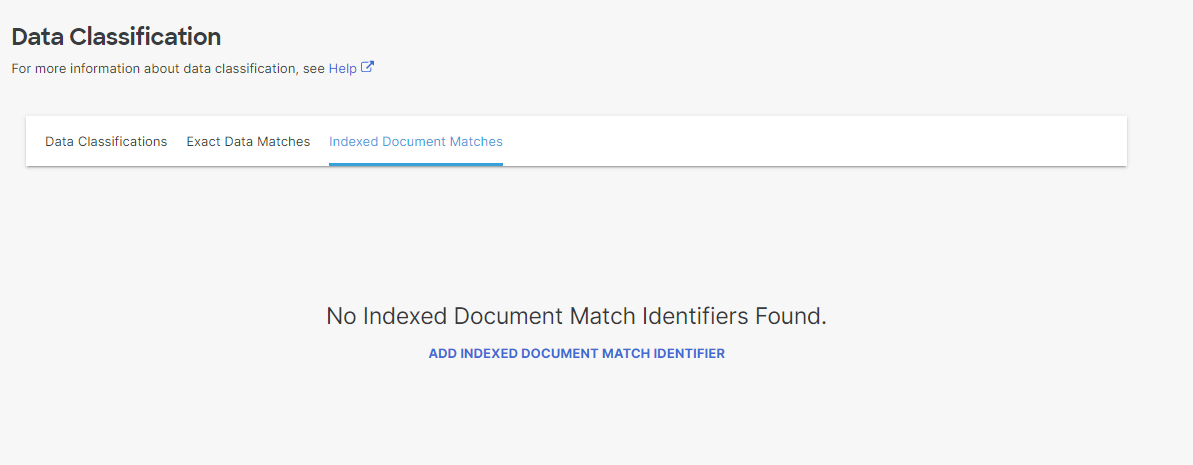
- Provide a name and description for the Indexed Document Match Identifier.
- Select the level of percentage match required for a scanned document to be considered a match against a document included in the IDM:
- High: 80% or more of the scanned document must match a document indexed for the IDM.
- Medium: 60% or more of the scanned document must match a document indexed for the IDM.
- Low: 20% or more of the scanned document must match a document indexed for the IDM.
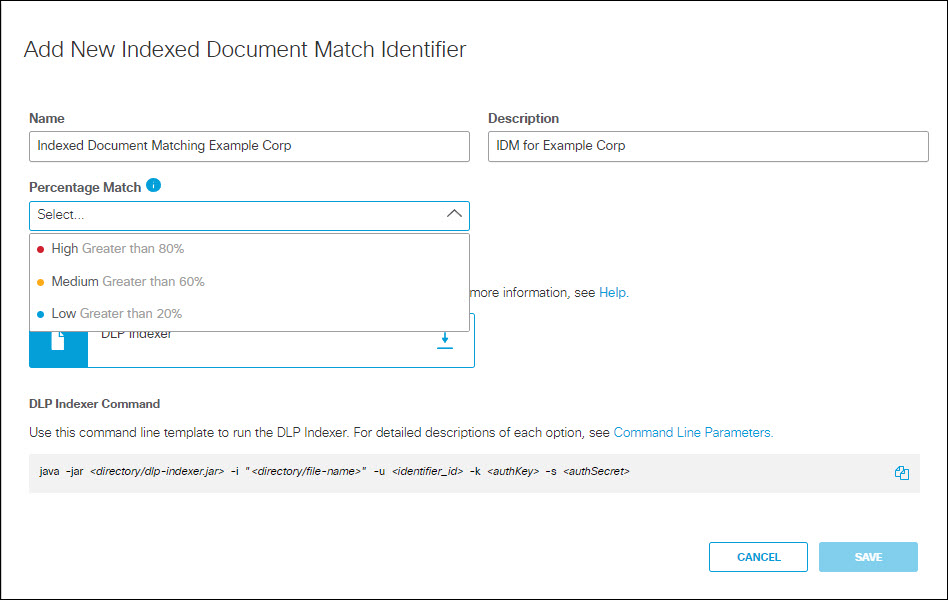
- If you have not already downloaded the DLP indexer, click the download icon to do so.
- Click Save.
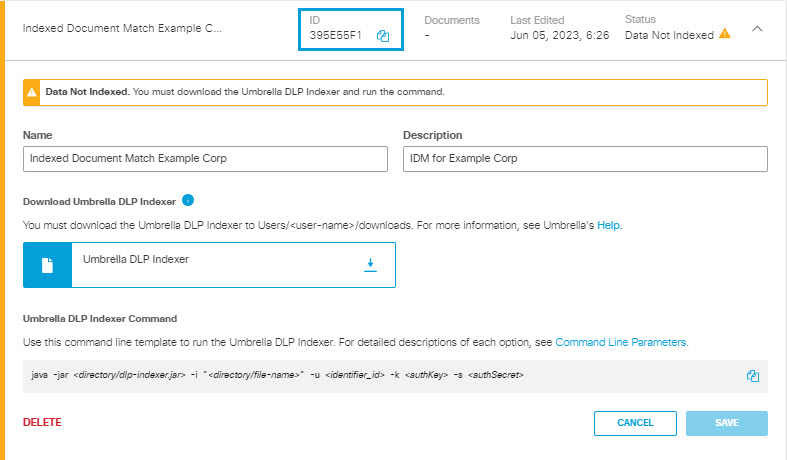
- The Indexed Document Match Identifier now has a status of Data Not Indexed. You can expand the listing to view the details about the IDM Identifier. After you have indexed the IDM Identifier, you will be able to add it to a Data Classification as a custom identifier. Make note of the ID for the Indexed Document Match Identifier; you will need it to run the DLP indexer.
Note: The display page does not display the full IDM Identifier ID; use the Copy icon to copy the ID.
- Create an API key and secret for the DLP indexer.
a. Navigate to Admin > API Keys and click Add.
b. Provide an API Key Name and Description for the API Key.
c. Select Policies > DLP Indexer for the scope and choose Read/Write for the permissions. Then click Create Key.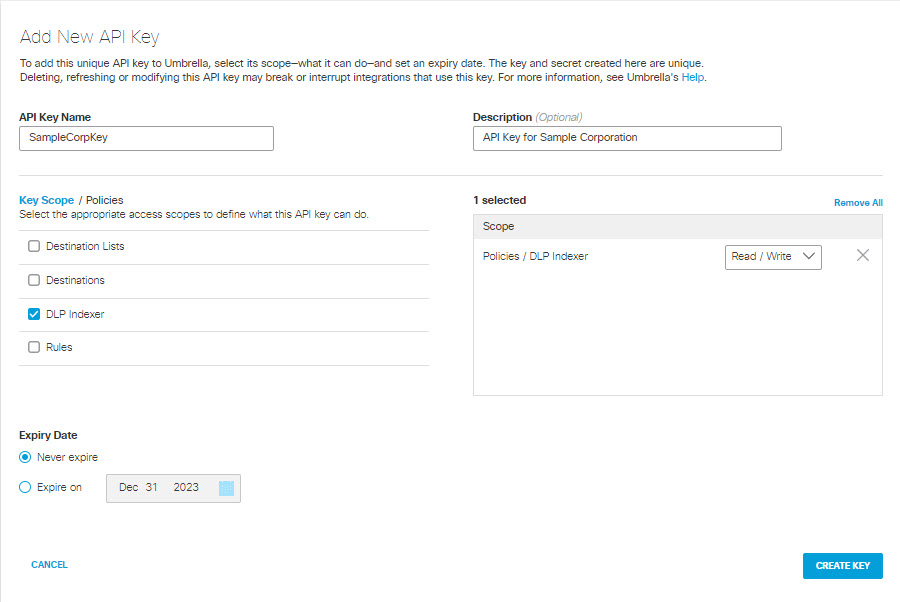
d. Copy and save the API Key and Secret somewhere safe, as you will need them to run the DLP indexer.

- Use the Secure Access DLP indexer to fingerprint your example files.
Run the indexer in a terminal window with the following command: java -jar <directory-path>\dlp-indexer.jar -i "<directory_paths or file-names separated by commas>" -u <IDM-id> -k <authKey > -s <authSecret>
where:
- <directory-path>\dlp-indexer.jar—the relative path to the location of the DLP indexer.
- <directory_paths or file-names separated by commas>—the relative path to the directory containing your data, or a comma-separated list of files or directories.
- <IDM_id>—the ID of the IDM Identifier retrievable from Secure Access UI. (See Step 6.)
- <authKey>—the API Key previously saved at Step 7d.
- <authSecret>—the API Secret previously saved at Step 7d.
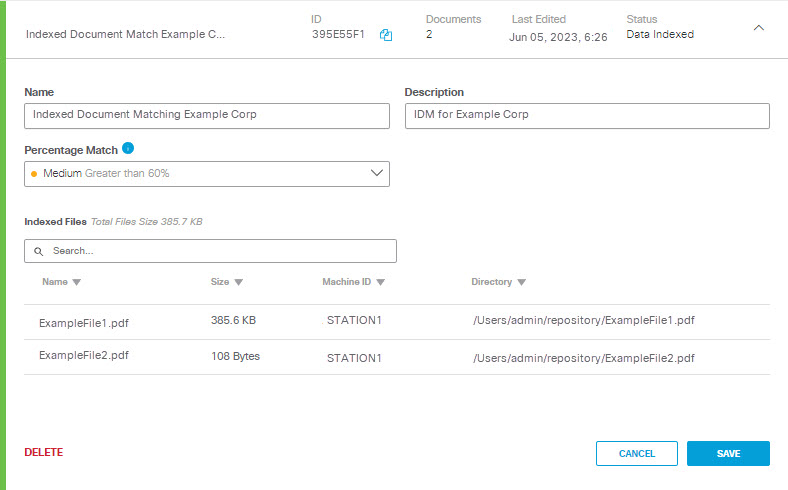
The Indexed Document Match Identifier now has a status of Data Indexed; expand the listing to see details about the indexed files. You can now add the IDM to a Data Classification.
If you change your source file or directories you need to run the indexer on that file or directory again using the same IDM Identifier ID, API Key, and API Secret. This ensures that policies configured to use the IDM are updated to reflect the new data fingerprints. For more information, see Monitor the Indexed Data Set and Re-Index as Needed.
Monitor the Indexed Data Set and Re-Index as Needed
As your source data changes, you need to re-index it using the same IDM Identifier to capture those changes so Secure Access will use them when scanning documents. You can automate the re-indexing process to trigger a re-index when the source data has changed. Using the indexer monitor option causes the indexer to perform an initial index, then monitor your source data for updates and re-index as necessary. This is a useful option in a dynamic environment. In monitor mode, after performing an initial index the indexer checks the source data for changes every ten minutes, and if a change is detected, re-indexes the data.
You can run the indexer in monitor mode as a background process to automatically rerun the DLP indexer periodically to update your source data to Secure Access.
Use the following command to start the indexer in monitor mode:
java -jar <directory-path>\dlp-indexer.jar -i "<directory_paths or file-names separated by commas>" -u <IDM-id> -k <authKey > -s <authSecret> -y -m
Where:
- <directory-path>\dlp-indexer.jar — the relative path to the location of the DLP indexer.
- <directory_paths or file-names separated by commas>—the relative path to the directory containing your data, or a comma-separated list of files or directories.
- <IDM_id>—the ID of the IDM Identifier retrievable from Secure Access UI. (See Step 6.)
- <authKey>— the API Key previously saved at Step 7d of Create an Indexed Document Match Identifier.
- <authSecret>— the API Secret previously saved at Step 7d of Create an Indexed Document Match Identifier.
- The -y argument causes the indexer to automatically overwrite an existing index.
When you run the indexer to re-index an existing IDM, it prompts for a yes/no confirmation before overwriting that IDM. Using the -y argument allows you to run the indexer without manually responding to the prompt.
- The -m argument causes the indexer to operate in monitor mode.
Troubleshooting
If the indexer reports a failure, examine the output error messages to determine the problem.
If the indexer returns an error message that reads, "Error: A JNI error has occurred, please check your installation and try again," check the following:
- Confirm you have the latest version of the Java Development Kit installed.
- Confirm that you have your PATH system variable set correctly:
- Check the location where you have Java installed.
- For Windows this is normally C:\Program Files\Java\jdk-\bin
- For Linux this is normally /usr/java/jdk-/bin
- Use the instructions here to set the PATH system variable appropriately for your operating system.
NOTE: If the data indexer fails to process the input file and returns a base64 encoded error code, provide that code to the Secure Access Support to assist you with troubleshooting.
Exact Data Match Field Types < Create an Indexed Document Match Identifier > Built-In Data Classifications
Updated about 1 month ago

