Deploy LDIF Files for AD Connector
The Cisco Active Directory (AD) Connector integrates with Cisco Secure Access to provision the organization's users and groups from AD. You can install and configure the AD Connector to provision users and groups using LDAP Interchange Format (LDIF) source files. Once you deploy the LDIF files on your server, the AD Connector syncs the users and groups in your organization with Secure Access.
For information about deploying the AD Connector with LDAP or LDAPS, see Connect Active Directory to Secure Access.
Table of Contents
- Best Practices for LDIF Source Deployments
- Requirements
- Known Limitations
- Prerequisites
- Procedure
- Troubleshooting
Best Practices for LDIF Source Deployments
- Do not combine manually provisioned (CSV file) users and groups with LDIF-based sourcing deployments.
If you use both deployment methods, you may add duplicate users and groups in your organization. - To migrate from the manually provisioned users and groups to LDIF-based sourcing, delete the CSV file with the users and groups that you uploaded to Secure Access.
- If you have multiple Active Directory deployments and choose to manually provision users and groups, we recommend that you deploy the AD Connector with LDIF source files.
- Once you provision users and groups with LDIF-based sourcing, we do not recommend that you delete the deployment and provision the users and groups using another deployment method.
- LDIF-based sourcing does not require Secure Access Domain Controllers.
Requirements
Requirements for deploying LDIF source files on your server:
- LDIF can support multiple domains.
- Create the LDIF files in the Text document format.
Known Limitations
- No support for selective groups-only sync.
- No support for incremental sync.
Prerequisites
- Full Admin user role. For more information, see Manage Accounts.
- For information about network requirements, and connector user account and server prerequisites, see Prerequisites for AD Connectors.
- Cisco AD Connector version 1.14.4 or newer.
Procedure
Download, install, and configure the Cisco AD Connector. Then, deploy the LDIF source files.
- Step 1 – Download the Active Directory Connector
- Step 2 – Install the Cisco AD Connector
- Step 3 – Deploy the LDIF Source Files
Step 1 – Download the Active Directory Connector
Download the Cisco AD Connector from Secure Access to your server.
Note: When you download the Cisco AD Connector software package, and if you did not configure API key credentials for the AD Connectors, Secure Access displays a warning message. We recommend that you configure API keys for your AD Connectors. For more information, see Configure Authentication for AD Connectors and VAs.
-
Configure a server to run the Cisco AD Connector, and then sign in to Secure Access on that server.
-
Navigate to Connect > Users and Groups > Users and click Provision Users, or navigate to Connect > Users and Groups > Groups and click Provision Groups.
-
For Provisioning Method, click Active Directory or expand Active Directory.
-
For Active Directory Connector, click Download to save the Cisco AD connector deployment package to the server. The deployment package is named: CiscoAuditClient_vX.X.X.zip.

Note: You must download the ZIP file to the local machine where you plan to run it, or copy it locally from another machine. We do not recommend that you install the Cisco AD Connector from a network drive or run the setup.msi directly from the compressed file.
Step 2 – Install the Cisco AD Connector
As an administrator, extract the contents of the ZIP file that you downloaded to a folder and then navigate to that folder.
If you run the Cisco AD Connector installer files from the root directory of your device, you may encounter installation errors.
-
Run setup.msi.
-
Enter the username of the Connector user (Cisco_Connector or custom username) and the password. For more information, see Prerequisites for AD Connectors.
-
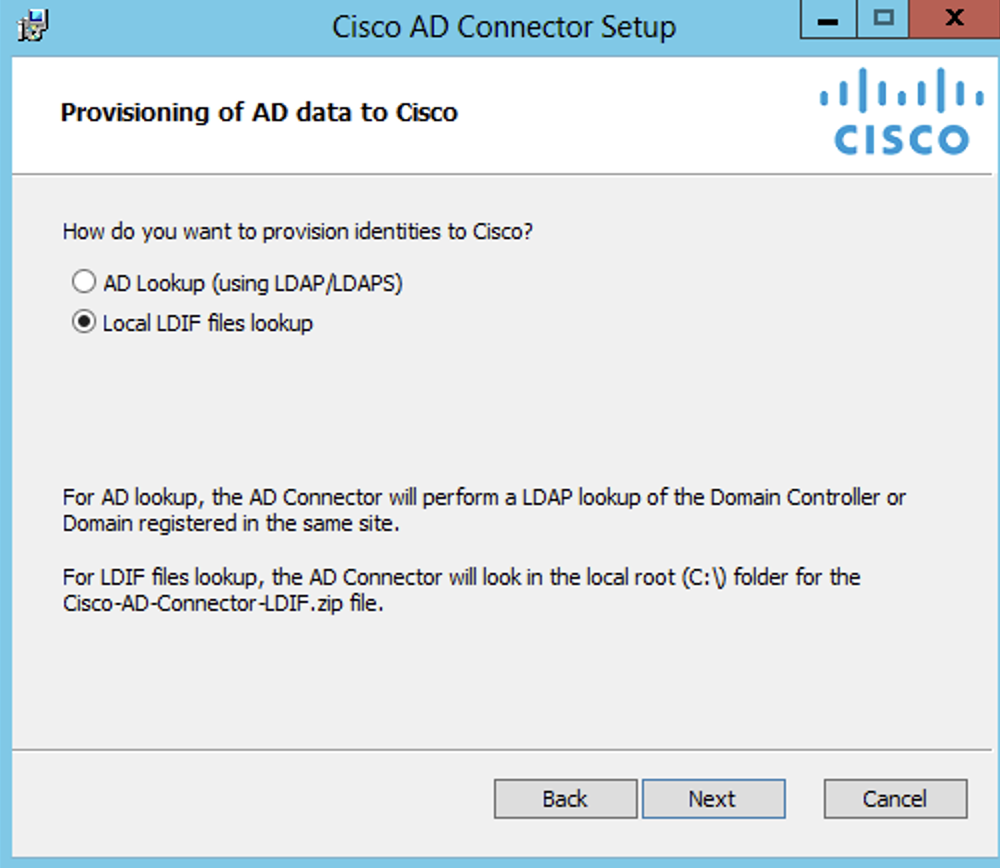
Select Local LDIF files lookup, and then click Next.
-
Follow the prompts in the setup, and then click Finish.

Step 3 – Deploy the LDIF Source Files
Deploy the LDIF source files on your server. For more information, see Best Practices for LDIF Source Deployments and Requirements.
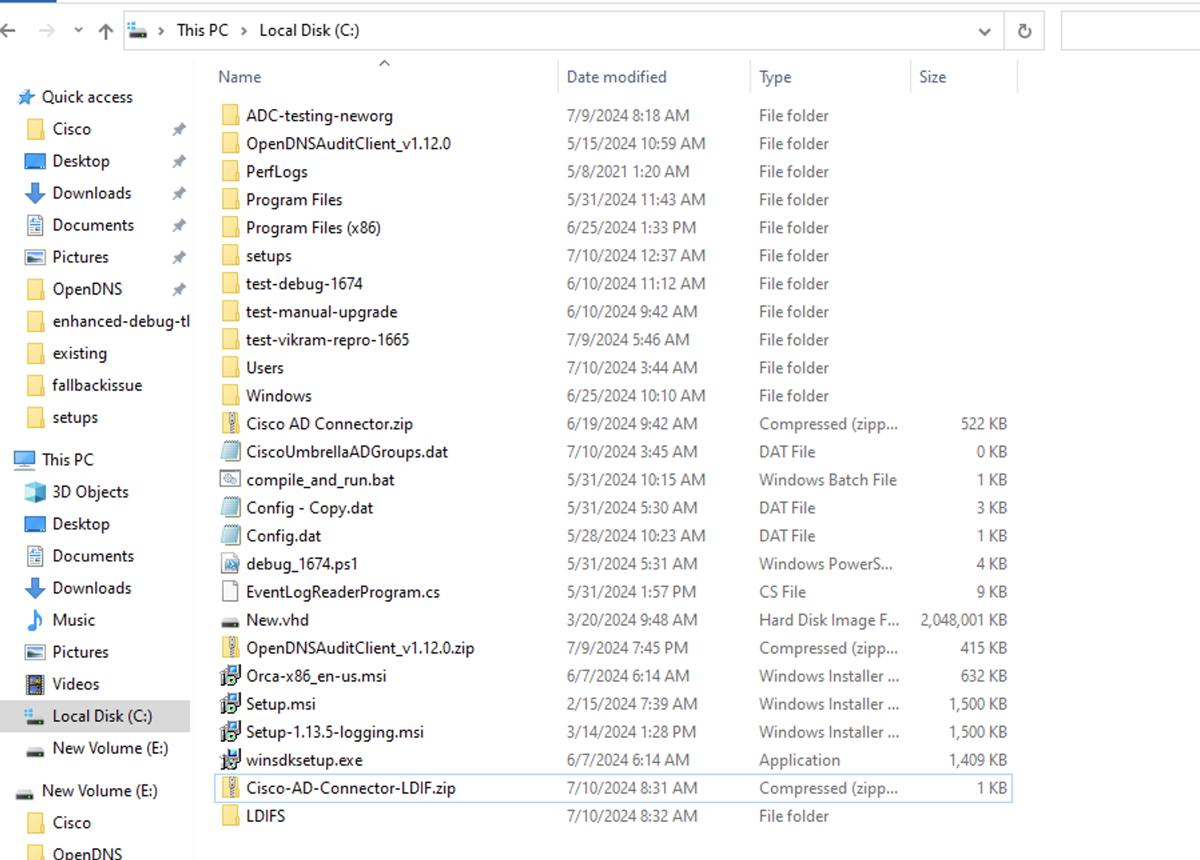
- Navigate to the C:\ drive on your server.
- Generate the LDIF files for the users and groups in your organization, and zip the files into a file. Name the file Cisco-AD-Connector-LDIF.zip.
- Base-64 encode the value of the objectGUID fields.
- Use two colons (::) to separate the objectGUID fields.
- For users, create an UserStruct.ldif file. The supported fields are:
- dn, objectGUID, sAMAccountName, userPrincipalName, memberOf, and primaryGroupID.
- For groups, create a GroupStruct.ldif file. The supported fields are:
- dn, objectGUID, sAMAccountName, userPrincipalName, memberOf, and primaryGroupToken.
- Once you create the ZIP file, the AD Connector automatically syncs the users and groups with Secure Access. Syncs occur every five minutes.

Troubleshooting
Various configuration conditions of the AD Connector with LDIF source files can result in provisioning errors.
Scenario 1
- You uploaded an Cisco-AD-Connector-LDIF.zip file with users and groups in a particular set of domains. Later, you uploaded another Cisco-AD-Connector-LDIF.zip file (with a different set of domains) and expected only the identities from these domains to be present. However, the identities from the domain of the previous upload were retained and not removed.
Possible Cause: This configuration is not supported.
Solution: Raise a request with Cisco Support.
Scenario 2
The Cisco-SSE-AD-Connector-LDIF.zip file is not found. The Cisco AD Connector can not sync the users and groups with Secure Access.
Solution: Ensure that the Cisco-AD-Connector-LDIF.zip file is located under the C:\ drive on the server.
Scenario 3
If one or both of the LDIF source files (UserStruct.ldif and GroupStruct.ldif) are not present or empty, then the Cisco AD Connector can not sync the users and groups with Secure Access.
Solution: Verify the contents in the Cisco-AD-Connector-LDIF.zip file and upload the file to the C:\ drive on the server.
Scenario 4
Ensure that all fields in the LDIF source files are valid with no inappropriate values. The dn field is required and should contain appropriate values.
Analyze Logs
You can find the Cisco AD Connector logs on the server in the C:\Program Files (x86)\Cisco\CiscoAD Connector\v1.14.4 folder. The log files are:
- For errors—CiscoAuditClient.error.log.
- For all events—CiscoAuditClient.log.
Connect Active Directory to Secure Access < Deploy LDIF Files for AD Connector > Change the Connector Account Password
Updated about 1 month ago
