Configure Okta for OpenID Connect
Secure Access supports the use of the OpenID Connect (OIDC) protocol to authenticate and authorize requests from user devices on networks or network tunnels with internet security enabled. Secure Access can also use OIDC to authenticate requests for private resources from user devices that connect with Zero Trust Access (ZTA).
To enable Secure Access to authenticate with OIDC, you must set up the integration of an OIDC identity provider (IdP) in Secure Access. On the organization's instance of Okta, configure an Okta ID OIDC app. Then to complete the integration, add the OIDC IdP metadata in Secure Access.
For information about provisioning users from Okta to Secure Access, see Provision Users and Groups from Okta.
Note: You cannot use the Okta SAML app to integrate OpenID Connect with Secure Access.
Table of Contents
Prerequisites
- Full Admin user role. For more information, see Manage Accounts.
- Configure an Okta OpenID Connect app integration in your instance of Okta. For information about configuring an OIDC app, see the Okta documentation.
Verify the UPN and preferred_username Mapping
In the Okta OIDC app, verify that the user principal name (UPN) maps to the preferred_username attribute. The Okta OIDC IdP app must send the UPN for the preferred_username claim in the ID token.
For information about provisioning users and groups in Secure Access, see Provision Users and Groups from Okta.
Procedure
- Step 1 – Choose an Authentication Method
- Step 2 – Add an Identity Provider
- Step 3 – Configure the Identity Provider's OIDC Metadata
- Step 4 – Add the OIDC Metadata in Secure Access
Step 1 – Choose an Authentication Method
For the authentication method, choose OpenID Connect (OIDC). For more information, see Add SSO Authentication Profiles.
-
Navigate to Connect > Users and User Groups, and then click Configuration management.

-
Navigate to SSO authentication, and then click Add SSO authentication.

-
For SSO Authentication Name, enter a unique name for the SSO authentication profile.

-
For Authentication Method, click OpenID Connect (OIDC).

-
For User Directory, choose the directory for the cloud IdP that provisions the users and groups.

-
Click Next.
Step 2 – Add an Identity Provider
Select the SSO authentication IdP, enter the redirect URI for the Relying party (Secure Access), and optionally choose how often a user will be asked to authenticate with Secure Access.
Save the Redirect URI and use this URI to configure the Okta OpenID Connect app integration. For information about the Redirect URI, see Configure Integrations with OIDC Identity Providers.
-
For Select a Provider, choose Okta.
-
For Redirect URI, click Copy.
Save the URI (https://fg.id.sse.cisco.com/gw/auth/oidc/callback). You will use this URI when you set up the integration of Secure Access in the Okta OIDC app.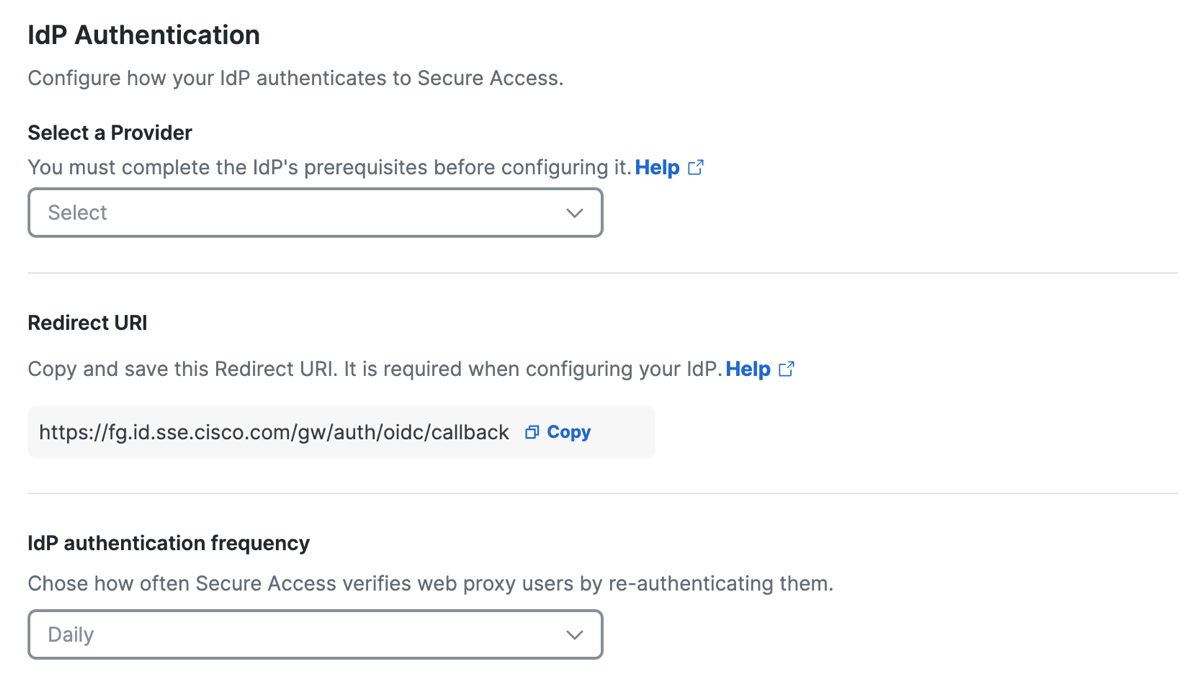
-
(Optional) For IdP authentication frequency, choose a time interval when a user must authenticate with Secure Access, or select Never.
The time intervals are: Daily, Weekly, or Monthly. -
Click Next.
Step 3 – Configure the Identity Provider's OIDC Metadata
For information about configuring the Okta OIDC app, see the Okta documentation.
- Step 3a – Add the Secure Access Redirect URI in Okta
- Step 3b – Configure the Core Grants in Okta
- Step 3c – Get the Okta OIDC Client ID and Secret
- Step 3d – Get the Okta OIDC Configuration URL
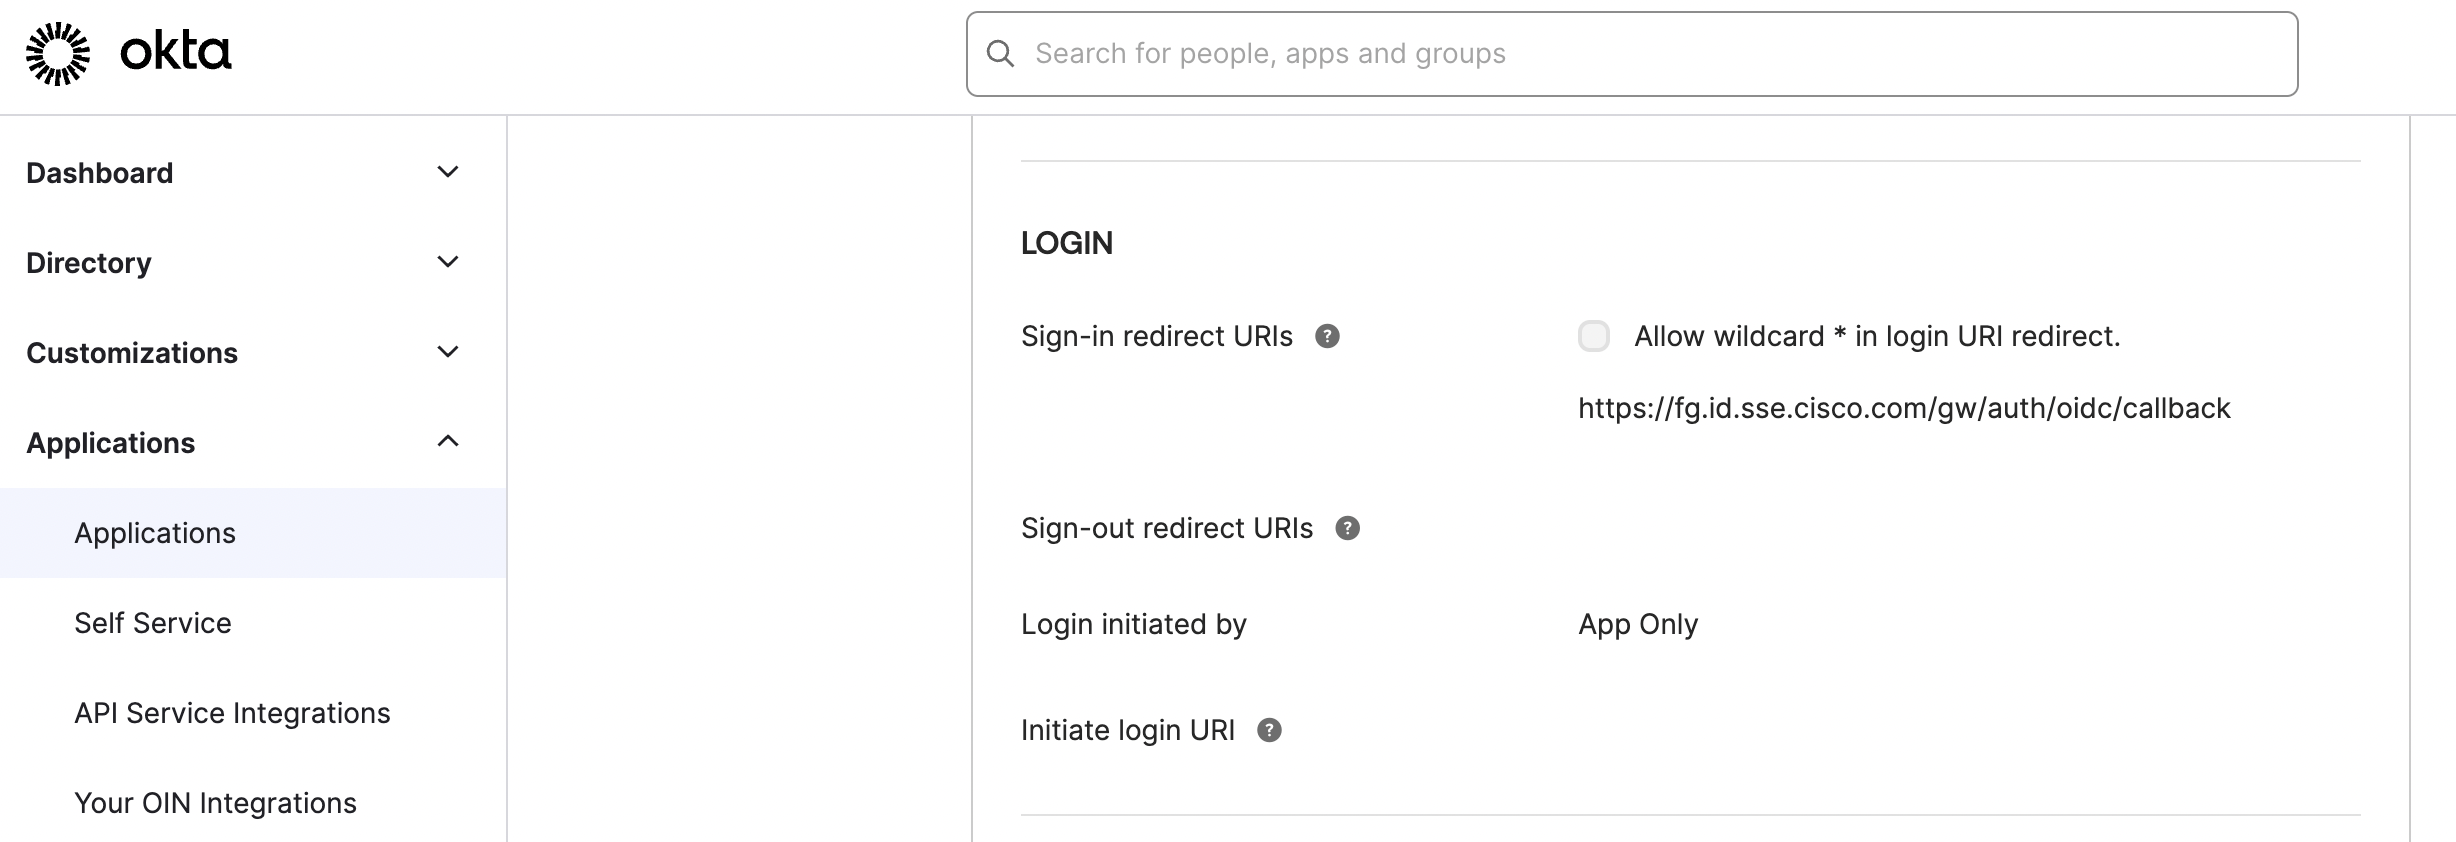
Step 3a – Add the Secure Access Redirect URI in Okta
-
Sign into your instance of Okta and navigate to the Okta OIDC app.
-
Navigate to Applications > Login.
-
For Sign-in redirect URIs, enter the Secure Access Redirect URI that you copied from Secure Access in Step 2. For more information, see Step 2 – Add an Identity Provider.
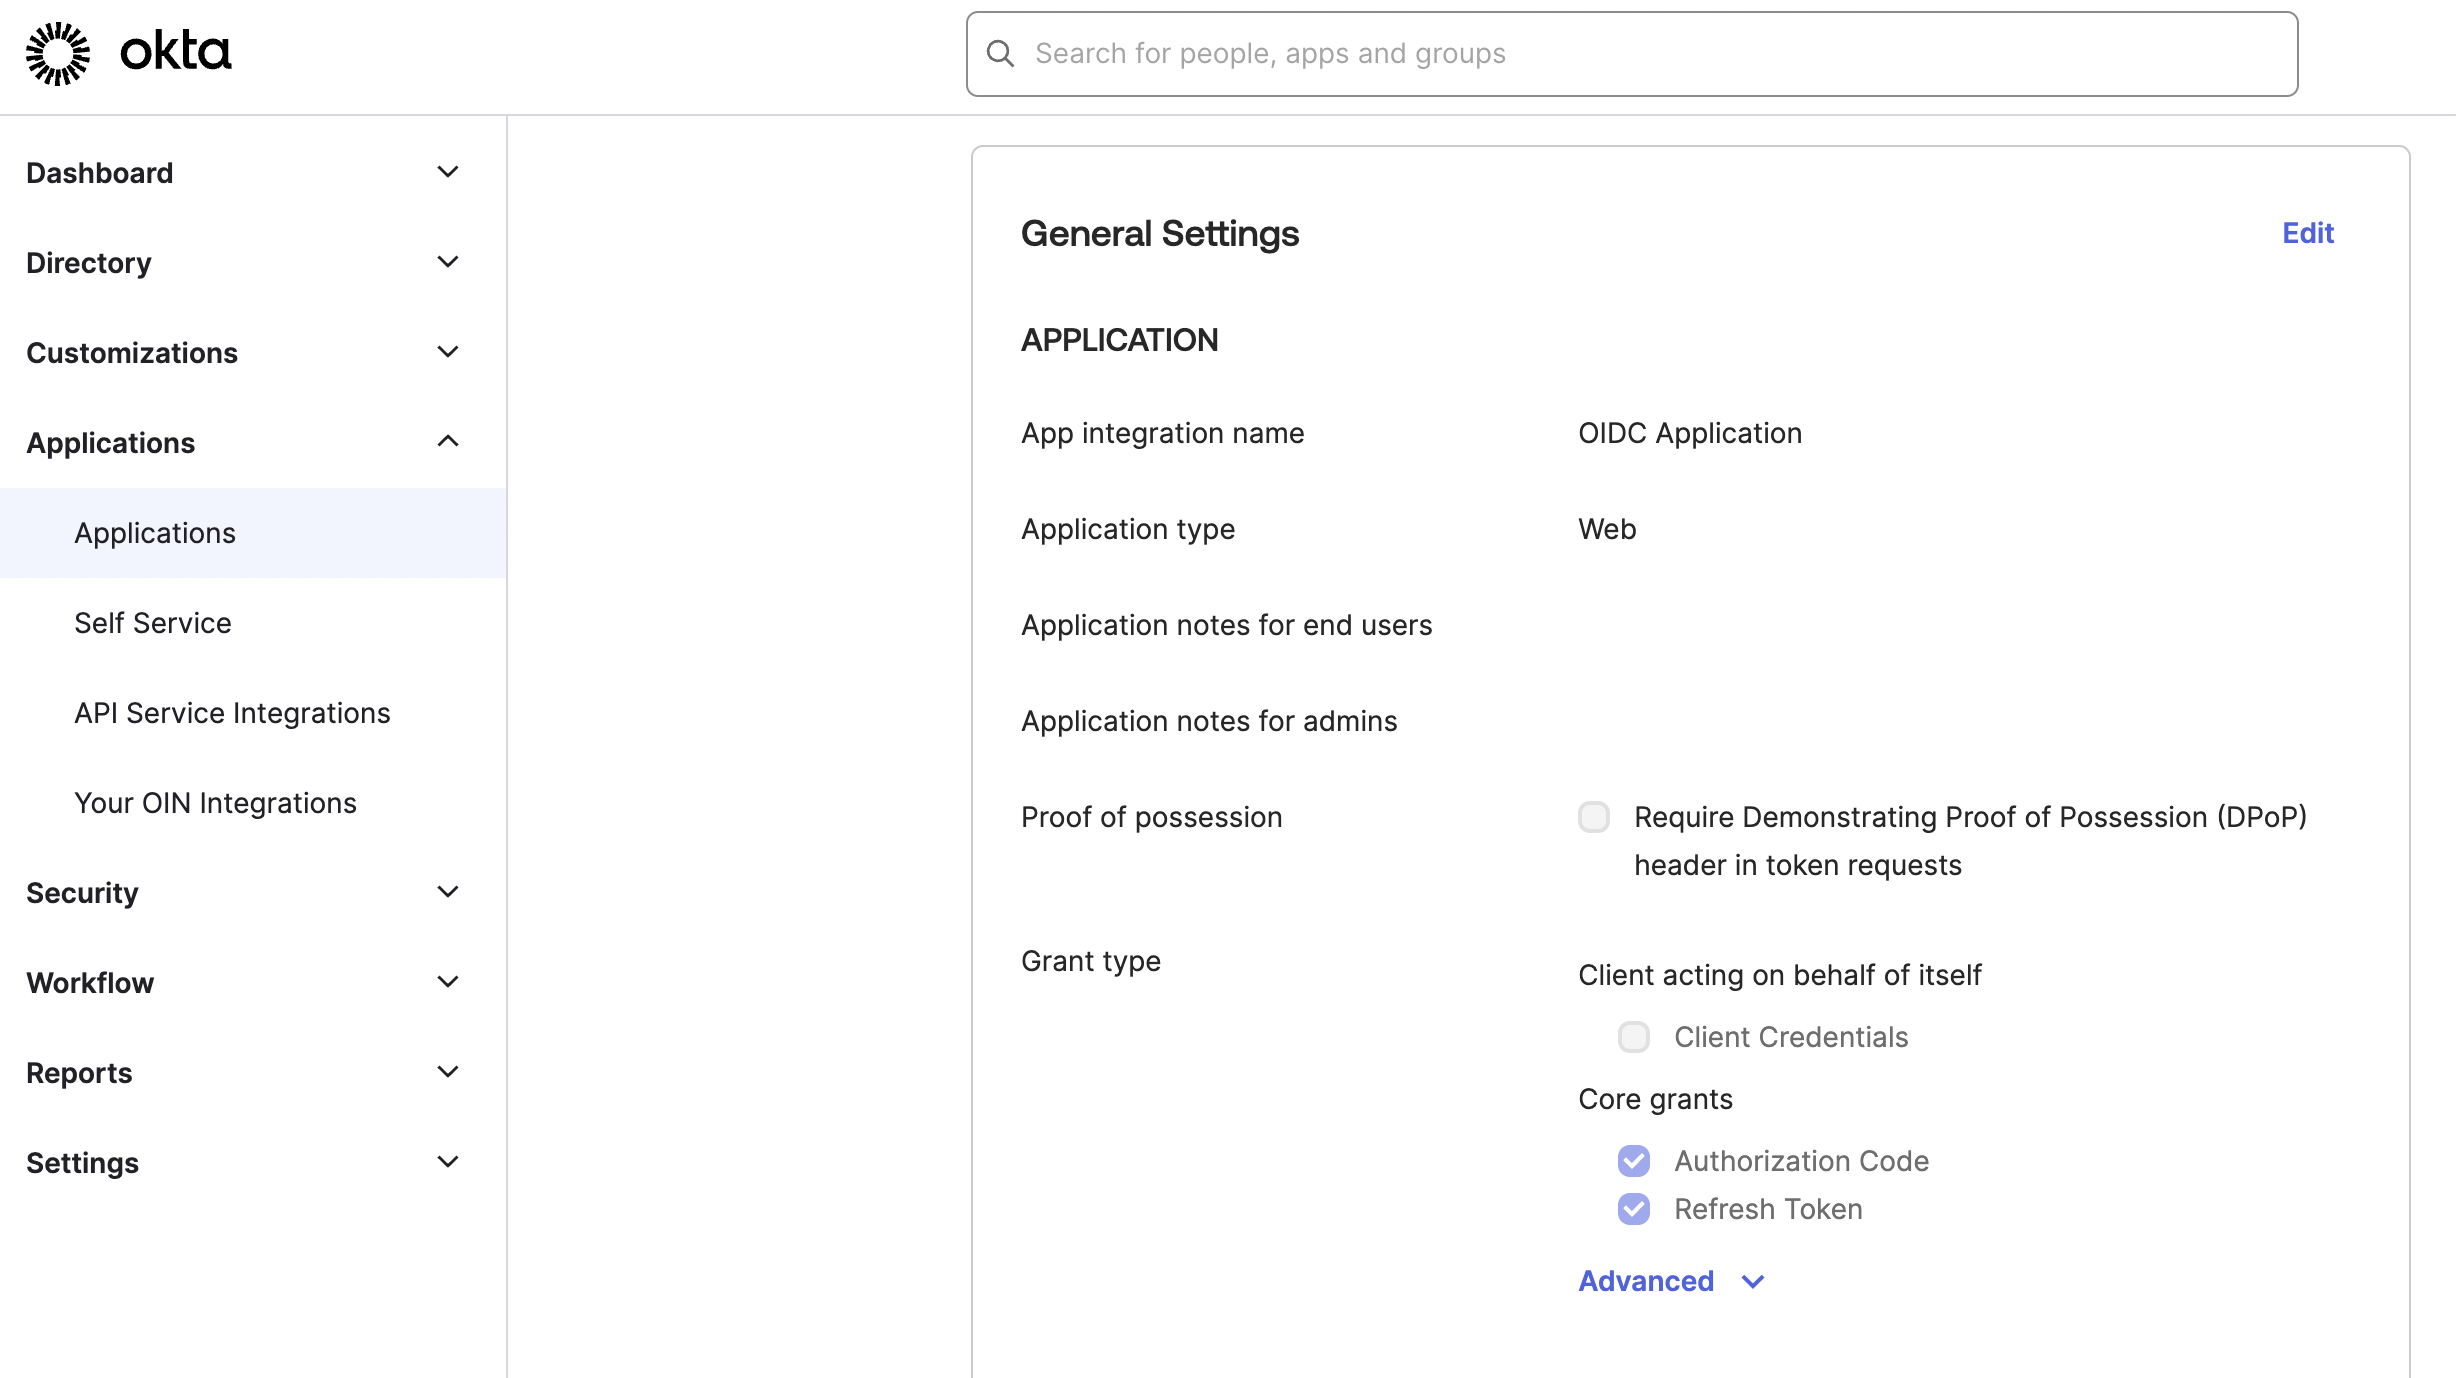
Step 3b – Configure the Core Grants in Okta
-
Sign into your instance of Okta and navigate to the Okta OIDC app.
-
Navigate to Applications > General Settings.
-
For Application, navigate to Grant type, and then click Authorization Code and Refresh Token.
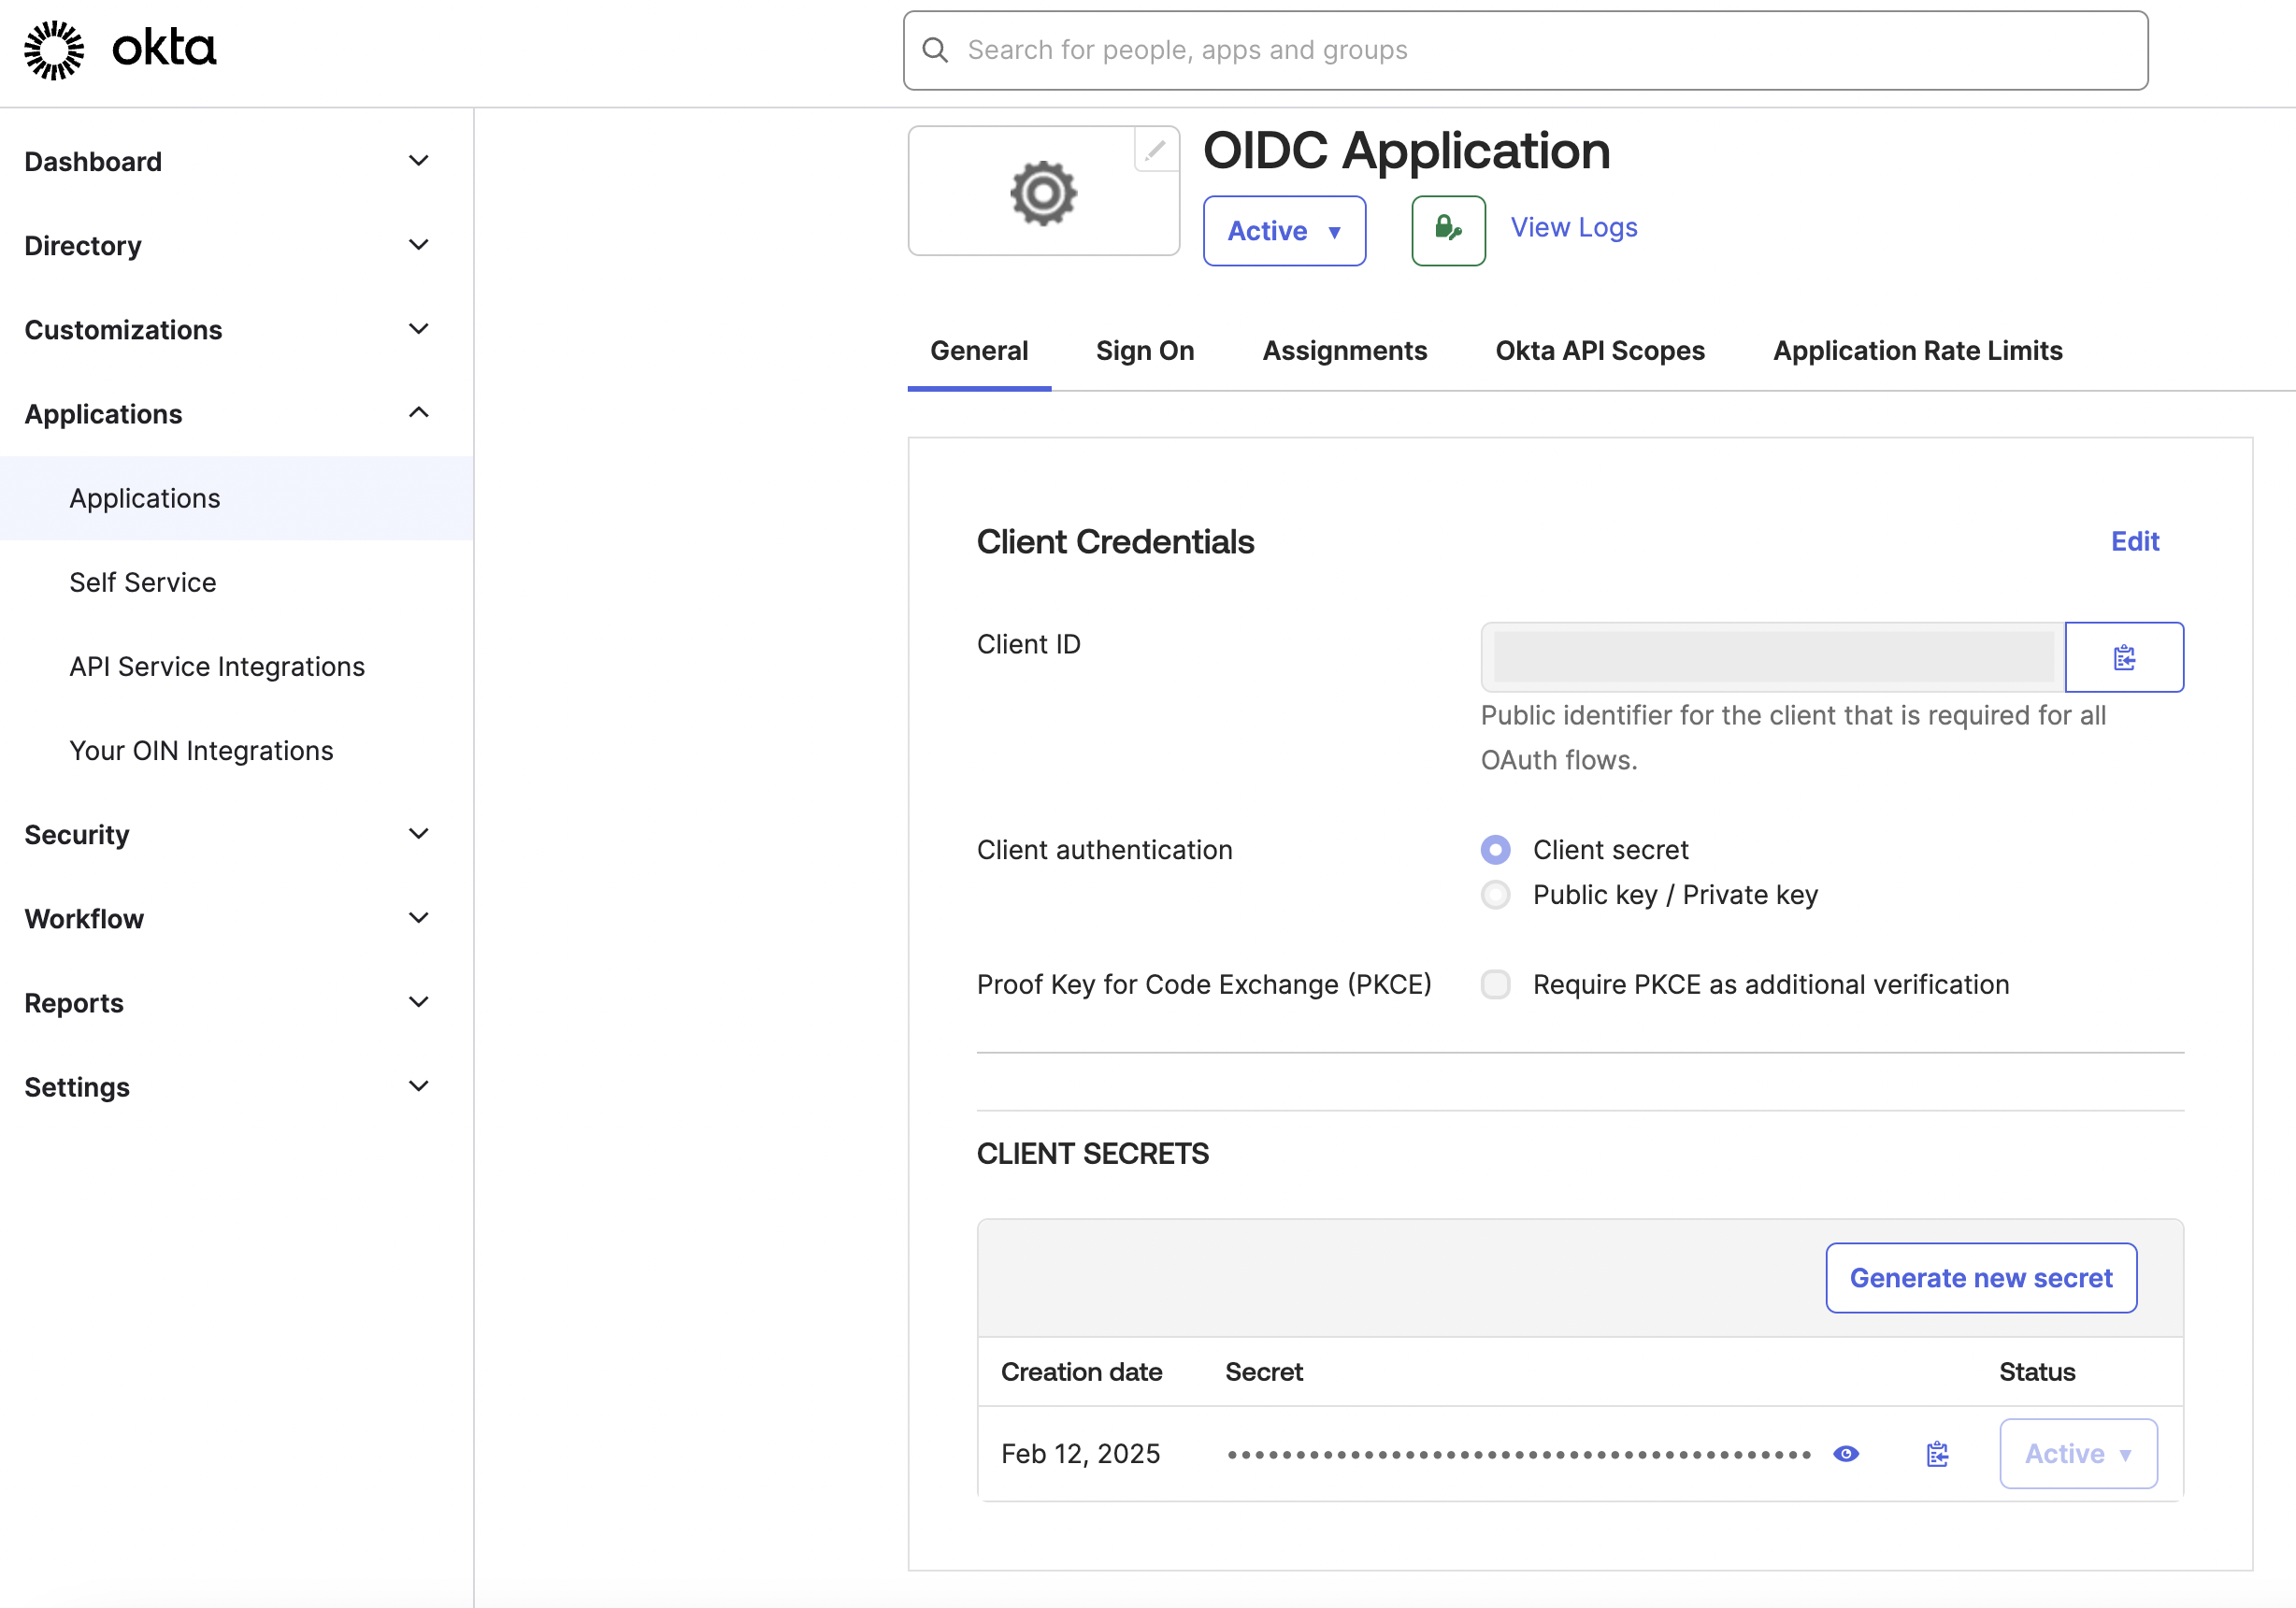
Step 3c – Get the Okta OIDC Client ID and Secret
-
Sign into your instance of Okta and navigate to the Okta OIDC app.
-
Navigate to Applications > OIDC Application, and then navigate to General.
-
Navigate to Client Credentials, and then copy the Client ID.
You will use the Client ID to configure the integration of the Okta OIDC IdP in Secure Access. -
Navigate to Client Secrets, click Generate new secret, and then copy the client secret.
You will use the Secret to configure the integration of the Okta OIDC IdP in Secure Access.
Step 3d – Get the Okta OIDC Configuration URL
Get the domain for your instance of Okta and the authorization server ID, and then create the Okta OIDC Configuration URL.
- Sign into your instance of Okta and navigate to the Okta OIDC app.
- Navigate to Security > API > default, and then navigate to Settings to view the Metadata URI.
- Get your Okta domain (
yourOktaDomain) and the authorization server ID (authorizationServerId). - Create the OIDC configuration URL substituting your Okta metadata in the URL.
https://{yourOktaDomain}/oauth2/{authorizationServerId}/.well-known/openid-configuration - When you set up the integration of Okta SSO authentication in Secure Access, add the OIDC configuration URL that you created.
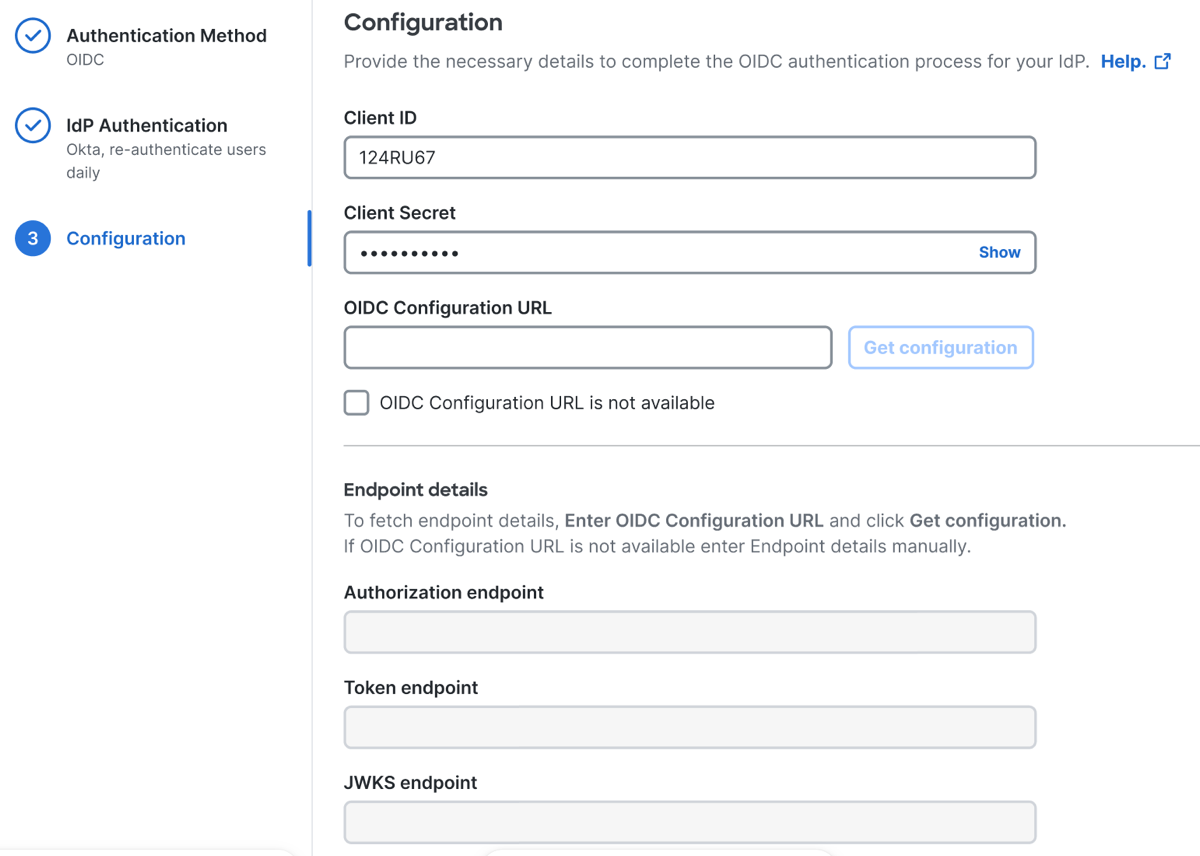
Step 4 – Add the OIDC Metadata in Secure Access
Note: If you update the Client Secret in the Okta OIDC app, you must reenter the Client Secret in Secure Access.
- In Secure Access, complete the configuration of the Okta OIDC IdP integration.
- Gather your Okta Client ID and secret. For more information, see Step 3c – Get the Okta OIDC Client ID and Secret.
- For Client ID, enter the client ID that you generated in the Okta OIDC app.
- For Client Secret, enter the client secret that you generated in the Okta OIDC app.
- Get your Okta OIDC configuration URL. For more information, see Step 3d – Get the Okta OIDC Configuration URL.
- For OIDC Configuration URL, enter the OIDC configuration URL that you created with the metadata from the Okta app.
Note: After you enter the OIDC configuration URL, Secure Access enables the Get configuration button. - (Optional) Click OIDC Configuration URL is not available if the OIDC URL is not known.
- For Authorization endpoint, Token endpoint, and JWKS endpoint, click Get configuration to use the OIDC configuration URL to retrieve the OIDC authorization API endpoint.
Note: If the OIDC configuration URL is not available, enter the values for Authorization endpoint, Token endpoint, and JWKS endpoint manually.
- Click Done.
Configure Integrations with OIDC Identity Providers < Configure Okta for OpenID Connect > Configure Microsoft Entra ID for OpenID Connect
Updated 6 months ago